ArtRage Stickers
Stickers are individual images that can be peeled off a sheet and stuck to your Canvas, or sprayed on to the Canvas using the Sticker Spray tool. Stickers can be anything from objects such as sparkly gold stars, pebbles, and leaves to artistic effect stickers that simulate painting styles. This section shows you how to use stickers in your painting and how to create new ones.
Sticker Properties

Stickers can contain more than just color information. Each sticker can have its own texture and even its own reflectivity, like a transparent plastic domed sticker you get from the supermarket.

Stickers can be tinted when they are added to the Canvas, and have their opacity and shadow adjusted. If you want to place a rock in to a scene you might not want it casting a shadow, but if you’re sticking a gold star or seashells to a photo the shadow can look good.
Normal layers lose quality when you change their size or rotate them, but stickers can be sized and rotated as much as you like without damaging their contents.
Flattened and Floating Stickers
The most important property of a sticker is whether it has been flattened or not. Flattened stickers are applied to the Canvas as if they had been painted on and they cannot be edited in way normal stickers can. Floating stickers can be moved, scaled, and rotated as much as you wish.
When you apply a single sticker to the Canvas by peeling it off a sticker sheet, it will always be Floating. When you use the Sticker Spray to can choose to have it either spray Flattened or Floating stickers. For more information see the Sticker Spray.
The Stickers Pod

Clicking this pod opens the Sticker Collection Panel. Clicking and holding produces a menu of available Sticker Sheets for easy selection. Select a sticker sheet and it opens for use.
The Stickers Panel
The Stickers Panel contains all the sticker sheets available for use in ArtRage. In this panel you can select and organize your sticker sheets and import or create new ones. On the left side of the panel is a list of groups of sticker sheets. When you select a group the right hand side of the panel updates to show the sheets that are available in that group.
A lock icon on a sticker sheet indicates that it was installed by ArtRage and cannot be overwritten, you can still select it.
When you click a sticker sheet on the right hand side of the panel it opens up and you can use it to apply single stickers to your Canvas.
Sticker Sheets

Stickers are organized in to sheets like the collections of stickers you can buy in stationary suppliers. There might be a sheet of numbers or letters, a sheet of shapes or a sheet of types of leaf.
When you click a sticker sheet preview in the Stickers Panel the sheet opens up for use.
Adding Single Stickers to the Canvas
If you want to add stickers to the Canvas one by one you can do so using a sticker sheet. To open a sticker sheet, locate it in the Stickers Panel and click its preview. When you click the preview the sheet opens up for you to use.
To add a single sticker from the sheet to the Canvas just click it and it appears on the Canvas. If you prefer, you can click and drag it from the sheet to the desired point on the Canvas.
When you complete the drag, or finish the single click, the sticker appears on the Canvas with a transformation outline. For more information on using the transformation outline see Transformations.
A single sticker on the Canvas is represented by an entry in the Layers Panel. In that panel you will see the sticker you just added along with an icon indicating it is a sticker. You can drag it around in the Layers Panel the same way you would any other layer. For more information see Layers.
Spraying Stickers on the Canvas
Sometimes you want to add many stickers to the Canvas at once. The Sticker Spray lets you do this by automatically selecting stickers from a sheet and spraying them on to the Canvas as you paint with it.
For full information on the basic settings of the Sticker Spray see the Sticker Spray section.
When you spray stickers to the Canvas they are either sprayed as flat or floating. Flat stickers will spray directly on to existing paint layers, but floating stickers will create a new sticker layer if there is not one already selected. Even though the floating stickers all apply to a single layer they can still be individually manipulated, the layer is just a way of collecting all the stickers you spray with the tool together so that you don’t end up with thousands of layers in your painting!
Manipulating Stickers
Floating Stickers on the Canvas can be positioned and adjusted after they have been created. Flattened stickers are just paint on the Canvas so you can smear and blend them like paint but you cannot change their nature once they have been applied.
Moving Stickers
Because stickers are part of the Canvas they must be used moving the Transform Tool. To move a sticker select the Transform Tool and click the sticker to transform. The transformation outline appears around the sticker and you can use that to scale, rotate, and move it. For more information on the transformation outline see Transformations.
- Use two fingers to drag on the Sticker to move it.
- Use two fingers and pinch inward or outward on the Sticker to scale it.
- Use two fingers and twist on the Sticker to rotate it.
Changing Sticker Color Properties
Stickers can have their basic tint and opacity adjusted after they are applied. Right clicking a sticker brings up a set of options that can be used to adjust these properties.
Changing the sticker tint brings up a Precise Color Picker that allows you to tint the sticker as you want. Changing the sticker opacity lets you enter an opacity percentage manually.
Sticker Shadows
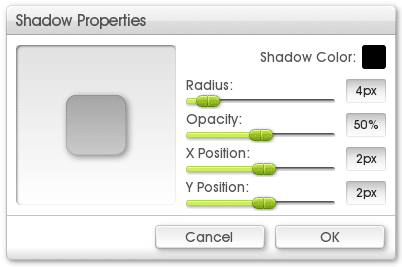
Right clicking a sticker gives you the option of changing its shadow properties. The Shadow Panel gives you control over the size, position, color and opacity of the shadow using sliders. Click and drag in the preview to the left to set the position manually.
You can click the color sample to select color using a Precise Color Picker, or click and hold to use a Popup Color Picker.
Erasing Stickers
To erase a single sticker layer you can delete its layer as you would any other layer using the menu button that appears when the cursor points at the layer in the Layers Panel.
If you have more than one floating sticker on a layer you can erase single stickers using the Eraser Tool. Select the layer with the stickers on and select the Eraser Tool, then click the stickers you wish to erase and they will disappear.
Because floating stickers are real objects on the Canvas, stickers behind ones you erase are still whole so they will show through from underneath.