Working with ArtRage Files
Paintings you create in ArtRage store a lot more information than normal image files, including how much paint there is on the Canvas and how wet it is. This means that ArtRage uses a special file format to ensure that this information isn’t lost when you save your work. These files (Painting Files or PTG files) can’t always be understood by other applications.
This section of the manual explains how to create ArtRage files, how to save them and how to reload them, print them, and export them in a format you can share with other people. Most of these options can be found in the File Menu.
Creating a New File
When you open ArtRage it displays a fresh Canvas ready for paint but if you want to create one of a different size, or if you want to create a new file while you are working you can do so using the ‘New Painting’ option in the File Menu. When you select this option, the New Painting Panel appears. This panel lets you create a new painting and set up its properties.
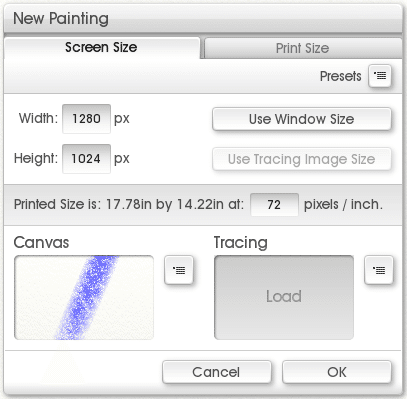
The top section of the panel is used to set the size of your new painting.
The bottom section is used to set the paper or canvas type you want to paint on, and load any Tracing Image you may want to work with.
The following sections explain how these various options work.
Painting Size
ArtRage lets you choose a size for your painting either by selecting how large it will appear on the screen (Screen Size) or by how large it will be when you print it (Print Size). Clicking either Screen Size or Print Size changes the controls in the panel to reflect the correct options for the selected mode.
Regardless of the mode you select, the grey information stripe just beneath the controls will tell you what values the other mode will have for your currently entered values.
Printing size can be confusing if you’re not used to it. For more information on selecting sizes and how this relates to printing, see the section on File Size and Printing.
Screen Size Mode
To select a size in Screen Size mode, enter the width and height of the painting you wish to create in the Width and Height boxes. If you wish to use the size of the ArtRage window click ‘Use Window Size’. If you have loaded a Tracing Image you can also choose to use the size of that image.
When you are setting the size in Screen Mode you can also enter the Pixels Per Inch resolution that will be used for printing. Entering a value in this box does not change the size of your image, it changes the size the image will be when printed. In the grey information stripe you will see how big your painting is going to be when it is printed taking into account this value.
Size Presets
Beneath the Screen Size / Print Size tabs is a Presets menu button. If you click that button you will be presented with a list of preset sizes. If you select a size preset its properties will be applied to the panel.
If you want to add a new size preset for your current settings select Add New Size Preset. You will be prompted to enter a name for the new preset. Enter the name you want and click OK.
If you wish to manually add or remove files from your collection of Canvas Presets you can use the ‘Open User Size Presets Folder’ option to see the location on disk where your custom presets are stored.
Print Size Mode
Selecting a size in Print Mode involves selecting the Units you wish to use from the ‘Measure In’ menu, and entering the size in the Width and Height boxes using those units.
For example, you might want a painting that will be 10 cm by 10 cm when printed. To do this you would select Centimeters from the ‘Measure In’ menu, and enter 10 in the Width and Height boxes.
You will also need to know the resolution you will be using to print. This is entered in the Pixels / Inch box. The term ‘PPI’ (‘Pixels per Inch’) or ‘DPI’ (‘Dots per Inch’) is used to indicate how many dots are placed down in each inch of paper, and in general the higher the number goes the clearer the image is.
If you wish to print your image at 300 DPI, just enter 300 in the Pixels / Inch box and ArtRage will calculate how big it needs to make the Canvas.
Whenever you make a change to one of the values in the Print Mode controls the grey information stripe will update to tell you how many pixels wide and high ArtRage has to make your Canvas to match the print size you have requested. Please be aware that very large files take lots of memory and slower computers may have problems painting on them.
If you are new to print sizes see File Size and Printing later on in the manual.
Canvas and Tracing Section
When you have selected the size you want your new file to be you can select a Canvas Texture and a Tracing Image for it using the controls below.
The Canvas preview shows you the texture and color you have selected for your Canvas. Click the preview to open the Canvas Texture Panel where you can select a new texture or create your own. For more information on this panel see Canvas Properties. The menu button beside the preview allows you to select a Canvas Texture Preset from the list of available presets if you wish.
The Tracing Image preview shows you the Tracing Image you currently have loaded for the new file. By default there is none, but if you click the preview or select ‘Load Tracing Image’ from the menu button next to it you can load an image. If you want to clear the image you can use the menu button next to the preview.
When you have finished setting up your new file, click OK to create it, or Cancel to cancel and return to your previous work.
Saving a File
Before you quit ArtRage or start working on a new painting you should save any work you have done on the previous painting to make sure you can get it back later. The ArtRage Painting file format allows you to save your painting so that it can be reloaded without losing any of its information.
To save a painting, just select ‘Save Painting’ from the File Menu. What happens when you select this depends on whether you have saved the painting before. If you have, the painting will automatically be saved and replace the previously saved version. If you have not, you will be asked to enter a name for the painting and choose where to save it.
If you wish to save a copy of your painting, without overwriting the previous copy, just select ‘Save As’ from the File Menu.
If you attempt to quit, create a new file, or load an existing file while you have a current painting loaded that has unsaved changes you will be asked if you wish to save before you continue. At this point you can either choose to save the changes you have made, discard the changes and continue, or cancel so that you can check your changes and save manually.
Files saved by ArtRage are of the type ‘PTG’, Painting files.
Loading a File
If you want to load a painting you have on disk you can select ‘Open Painting’ from the File Menu. This allows you to locate and select the file to load.
If you have loaded the file recently you may also be able to locate it in the ‘Recent Files’ popup under the File Menu. Select it there to load it if you can see it.
This option is for loading ArtRage Painting files only, to load a non ArtRage file, use the Import option as explained below.
Importing and Exporting – How to Share Your Paintings
As mentioned previously, ArtRage Painting files contain lots of data that is not understood by normal image formats. A JPEG file for example doesn’t know about how wet your paint it or how many Layers you have in your document. This means that normal image applications can’t display ArtRage Painting files easily. The solution when you want to share images with someone else, post them online, or load images created in another application, is to use Import and Export.
Importing Images
If you want to load a non ArtRage Painting file to work with select ‘Import Image File’ from the File Menu. When you select this option you are prompted to select a file to load. The file will be loaded in to ArtRage and a new Canvas will be created at the right size to contain it.
The image will appear on the Canvas and will be editable as if you had painted it in ArtRage.
Because you have Imported a file to create a new ArtRage Painting, you will be asked to enter a file name for it when you go to save. If you have edited the image, make sure to save it as an ArtRage Painting file so that you can work on it later.
To overwrite the original image with your edited version, you would need to use the Export function described below.
Exporting Images
Most applications do not understand the information stored in ArtRage Painting files. Not many applications recognize how much paint there is on a Canvas, or how metallic it is for example. This means that you can’t just load an ArtRage Painting file in to another application to view it, or send it to a friend to have them look at it.
The solution to this is to use the ‘Export Image File’ option in the File Menu. This option allows you to save a copy of your ArtRage Painting to disk in a format that other applications can understand. When you select the option you will be asked to enter a name for the copy, and select an image format to use. The copy of your painting is saved to disk and can be used as a normal image file.
Some file formats do not understand some properties of your Canvas. If you have made your Canvas transparent and you export to an image format that does not understand transparency (such as JPEG) the Canvas will be made completely opaque on export, displaying its standard color.
Photoshop Files
ArtRage supports Adobe Photoshop PSD files and can import and export them while maintaining many of their properties including layers, blend modes, and groups.
Text imported from a PSD file will appear in ArtRage as it did in Photoshop, and if you export the file as a PSD unedited text will remain correct when you open the file in Photoshop again. If you edit text that was imported from a PSD file it may appear different when you return the file to the previous application.
Printing a File
To print a copy of your ArtRage Painting use the ‘Print Painting’ option in the File Menu. This will open your computer’s normal print dialogue and allow you to set options as you wish.
On Mac OS X you will also be able to use the ‘Page Setup’ option in the File Menu to set up your print settings before printing.
File Size and Printing
The difference between the size of your painting on the screen and the size of your painting when it is printed can be quite confusing. ArtRage helps you understand this by letting you work in either Screen Size or Print Size, but it may still help to understand why they are different.
Screen Pixels v. Printer Dots
The image you see on your computer screen is made up of tiny dots called ‘pixels’. The number of pixels that are displayed on your screen depends on your computer and settings but there will generally be between 72 and 96 pixels on your screen for every inch of space on the monitor. This can change if you have manually adjusted how many pixels are displayed on the screen or if your computer has a high density display (such as a Retina Macbook Pro), but it’s a good rule of thumb.
When a printer prints an image, the image is made up of a number of dots clustered together to form the colors and shapes you want, these dots are basically like the pixels on your screen. The printer generally places many more dots down in each inch of space than your monitor has pixels. To get a crisp, clean image your printer might put down between 120 and 600 dots for every inch.
So imagine you have created an image in ArtRage that is 72 by 72 pixels in size. On your screen it might be about an inch wide and an inch high (because your screen shows 72 pixels per inch). But if you print it and your printer prints 300 dots per inch, your printed image is less than one third of an inch in both directions, because you only had 72 dots to give it.
You could tell your printer to print 72 dots per inch, so your painting would be 1 inch by 1 inch, but the quality wouldn’t be very good, 72 dots of ink isn’t enough to fill in an inch very well. You could also tell ArtRage to resize your painting so that it is 300 pixels wide and 300 pixels high. That would make it larger than an inch on your screen but your printer would print it as 1 inch in size. The trouble with that is that resizing your image is going to damage its quality, ArtRage has to guess at how to fill in the holes that are left when your pixels get stretched out to fit the new size and it will never be 100% perfect.
This means that if you are going to print the best time to decide what size you want to print at is when you create your file, before you have even painted a stroke.
Choosing a Size
When you create a new file in ArtRage you are given the option of defining how large it is either by entering a Screen Size or a Print Size. Both options create the same basic result: A new painting that is a certain size on your screen, but the options allow you to work in the manner you wish.
If you want to create an image that is only usually going to be seen on a computer screen, just work in Screen Size and set the pixel size of the image. For example you might create an image that is 640 by 480 pixels in size, to show on a web page. When you work in Screen Size you can see how big your image will be when it is printed. Better still, you can enter how many dots per inch you want the printer to print. So if you make a 300 by 300 pixel image that you want to be 1 inch in size when printed, you can just set the Pixels Per Inch value to 300. The number of pixels doesn’t change, because you are working in Screen Size, but you know how big it will be when printed.
If you want to create an image that you intend to print, work in Print Size. When you work in Print Size select the units of measurement you want to use and enter the size in those units. If you also enter the number of pixels per inch (the same as dots per inch here) then ArtRage will know how many pixels to create. For example if you tell ArtRage you want a 10 inch by 10 inch image that is 200 Pixels per Inch it knows that you have to have 2000 by 2000 pixels and creates the Canvas accordingly. You don’t need to worry about doing the calculation in your head.
Drag and Drop
You can drag image files on to ArtRage from your computer. What happens when you do this depends on the type of file. A single ArtRage Painting file will be loaded when you drop it. A non ArtRage file will prompt to see if you wish to Import it, load it as a layer in the current painting, load it as a reference or load it as a tracing image.
If you drop multiple files on to ArtRage and choose to load as a painting or a tracing image, only the first file alphabetically in the list of dropped files will.