Colors
On the right hand side of the ArtRage window you will find controls for selecting and managing colors. Whenever you paint a stroke with a paint tool the color that is selected on the right hand side will be used to make that stroke. This section tells you everything you need to know about working with color.
Pods

Color Pod: When the Color Pod is visible click it to open the Color Picker. Click and hold it to bring up the Popup Color Picker for quick color selection. This Pod contains a preview of the currently selected color.

Samples Pod: When the Samples Pod is visible click it to open the Color Samples Panel. Click and hold it for a menu of Color Sample options.
Color Picker
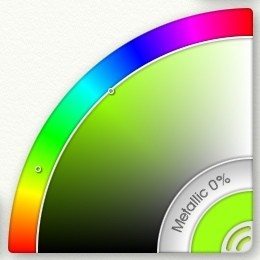
The Color Picker on the right hand side is used for selecting your current color. There are 5 important controls starting from the bottom right corner and working inwards:
- Sizing Grip: The grip at the bottom right can be clicked to close the panel. You can right click it for a set of options for scaling and tearing off.
- Current Color Sample: This shows you the color you currently have selected. Click here for an options menu.
- Metal Slider: Click and drag here to change the metallic value of the current color.
- Large Color Arc: Contains 2 of the 3 components that make up your color.
- The Small Color Arc: Contains the last of the 3 components that make up your color.
Selecting Colors
In real life selecting colors involves picking the basic color you want then blending in other colors to make the exact color you want to see. In ArtRage you do something similar because the Color Picker is split in to two sections. The Small Color Arc is where you pick your basic hue, and the Large Color Arc is the mixing area in which you mix in black, white, and grey to create the final color to be used in painting.
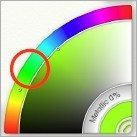
Around the outer edge of the panel is the Small Color Arc. By default this shows a rainbow spectrum of basic colors. Click and drag inside this rainbow to select the basic color you want to use. For example, if you want a green of any kind, click in the green section of the arc.
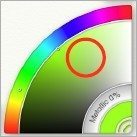
When you click in the green section the Large Color Arc updates to display the color you picked in various shades from black to grey to white. Now click in this section to choose how bright or how grey you want the green to be. This is a bit like a mixing palette where you blend the exact color you want.
When you click in the Large Color Arc, the Current Color Sample in the corner of the panel updates to show the exact color that is being loaded on the brush head when you paint the next stroke.
If you want your green to be a bit more yellow, you can click and drag in the rainbow spectrum again, towards the yellow tint. The Large Color Arc mixing area updates when you do this. Now you can select the exact brightness of yellow-green you want and the Current Color Sample updates to show the result.
So selecting colors involves:
- Picking a basic hue from the Small Color Arc rainbow.
- Picking how bright or grey you want it to be from the Large Color Arc mixing area.
- Watching the Current Color Sample so that you know what color you have selected.
For information on other forms of color picking in this panel see the section on Color Modes below.
Metallic Colors
The Metal Slider on the Color Picker allows you to make your paint more metallic. The higher this value the more reflective the paint becomes. Even plain colors like white will look different when they are more metallic.
You can blend metallic paint with non metallic paint to create a partially metallic result.
Color Modes
The Color Picker has a number of different modes that can be used to display color in different manners. The color options menu which can be found in the Tools menu or by clicking on the Current Color Sample allows you to select a mode for the Color Picker. Different modes cause the picker to change which properties of color are displayed in the Small and Large Color Arcs. These modes are:
HL / S, HS / L, LS / H (Default): These modes break the color down in to three components: Hue (the basic tint), Luminance (how bright the color is, varying from black through pure color, to white), and Saturation (how grey the color is). In each mode, the last character indicates the property that is displayed in the Small Color Arc. By default, the Hue of the color is displayed in the Small Arc, which gives you the rainbow of colors to choose from.
RG / B, RB / G, BG / R: These modes break the color down in to three digital components indicating the amount of Red, Green, and Blue that make up the color. In each mode, the last character indicates the property that is displayed in the Small Arc.
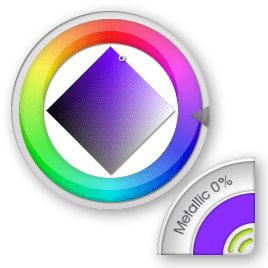
Tint / Tone: The Tint / Tone Picker provides a slightly different method of selecting color. When you choose this mode the Color Picker updates to display a circular Hue Wheel and a diamond in which you can select the artistic tint and tone of your final color.
To select the basic color you want, click and drag in the circular ring around the outside of the picker. When you have selected a basic color you can use the diamond in the center of the picker to select how light, dark, and grey the final color will be. The final color is still displayed in the Current Color Sample.
Custom Color Pickers
Custom Color Pickers are normal images that you can load in to the color picker for custom selection. This lets you create your own pickers for specific paintings or any case where you have a particular color set you want to use. The Color Options menu gives you access to the custom color picker system.
If you choose to load a new custom picker from disk you can select an image file that will be loaded in to the Color Picker, replacing the existing picker contents. If you choose to open the Custom Color Picker Collection you will be given the chance to select a Custom Picker already stored in the application.
Selecting a Custom Picker
If you want to load a Custom Color Picker from the collection of pickers already stored with the application just select ‘Custom Color Picker Collection’ from the color options menu. When you select this option the Custom Pickers Panel opens and you can choose a picker from your collection.
On the left hand side of the panel you see a list of groups, each of which can contain one or more custom pickers. Click a group name to select it and its contents appear on the right.
Click one of the pickers that appears on the right and it will appear in the Color Picker. A lock icon on a picker indicates that it was installed by ArtRage and cannot be overwritten, you can still select it.
Adding a New Custom Picker
You can add new custom pickers to your collection by loading them from disk or sampling them from your ArtRage Canvas. In the Custom Pickers panel you will see an Import Picker and New button above the pickers on the right. The Import Picker button allows you to select an image file from disk that will be loaded in to the current Group you have selected, and can then be selected as normal.
If you click the New button the Custom Picker Creator appears. Drag the panel until the preview area in the middle is over the area you wish to sample and click the tick button. This will sample the are you selected and ask you for a file name. The file location has already been set to the correct folder for the group you selected, so you can just save the file there. The picker will then appear in the Custom Pickers panel and you can select it as normal.
Using Custom Pickers
When you load a Custom Color Picker it replaces the contents of the Color Picker. The Large Color Arc is taken up by the custom picker you have selected, and the Small Color Arc becomes a Luminance slider, indicating the color you have selected in the Large Arc and its variance from black to white.
To select a color from a custom picker just click in the Large and Small Color Arcs as normal. To remove the Custom Picker go to the Color Options Menu (either in the Tools Menu or in by clicking the Current Color Sample) and select a mode for the Color Picker.
Precise Color Picker
If you want to select a color using exact color values you can use the Precise Color Picker. The Precise Color Picker can be opened using the Color Options menu that can be found in the Tools menu, by clicking the Current Color Sample, or by selecting the Precise Color Picker option from the View Menu.
The Precise Color Picker allows you to select the exact color you want using RGB or HLS color values. Using the menu at the top right you can change the picker’s display mode to use the standard modes listed in the section on Color Modes above.
The Precise Color Picker can be left open while you work. Some other interface items cause a Precise Color Picker to appear with OK and Cancel buttons. In this version of the Picker you can click the ‘Original’ button at the top left to reset the color.
Real Color Blending
Most digital painting packages blend colors using an RGB color model. This color model is familiar to people who use painting software but does not produce results familiar to people who work with real paint. Real Color Blending mode allows you to change how ArtRage blends color so that it mimics real world pigments more closely.
Real Color Blending mode can be turned on in the color options menu which can be found in the Tools menu or by clicking the Current Color Sample. The Real Color Blending menu item can be turned on or off whenever you wish. Changing it will not affect any of the paint already on the Canvas, but any paint you blend after changing it will blend in the newly selected mode.
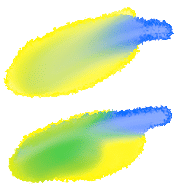
The most obvious example of how Real Color Blending changes the paint color can be found when you blend blue and yellow. Using an RGB blending model the resulting blend comes out somewhere between blue and grey. If you tun on Real Color Blending you find that the resulting color is green.
The Water Glass and Dirty Brushes
Some tools in ArtRage can be set up so that they do not completely reload their head with color at the end of every stroke. These tools pick up color from the Canvas and remain dirty until they are cleaned manually.

If your tool needs to be cleaned manually you will see the Water Glass Pod appear next to the color picker. Clicking the pod will clean your brush head. The Water Glass will vanish if your current tool does not require manual cleaning.
Color Samples
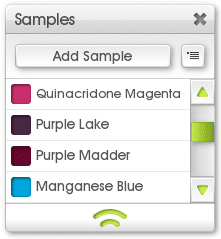
If you want to keep colors for later use you can store them as Color Samples. Clicking the Samples Pod opens up the Samples Panel which lists all the samples available to you.
At the top of the panel you will find a menu containing sample options and a button to add a new sample.
There are two types of Color Sample that can be added:
- Regular Color Samples: Usually referred to simply as ‘Color Samples’, these Samples are listed in the Samples Panel and are available to all paintings.
- Toolbox Samples: The Toolbox is a storage space for content specific to a particular painting. Toolbox Samples are samples that are stored in the painting only so do not appear in the Samples Panel unless that painting is loaded. For more information on the Toolbox see Toolbox and Workbench.
Both types of sample can be accessed from the Samples Panel. Toolbox Samples are listed at the end of the list in their own collapsible section. The menu at the top of the Samples Panel contains options for both types as well. Toolbox Samples are accessed from a sub menu of that menu.
Selecting Color Samples
To select a color using a Color Sample just click the sample in the Samples Panel. The Current Color Sample on the Color Picker will update to show the new selection.
Adding and Removing Color Samples
There are a number of ways to add new Color Samples, all of which can be accessed using the Color Sample Options Menu in the Tools menu, or using the menu button on the Samples Panel.
The Add Sample button at the top of the Samples Panel adds a regular Color Sample to the list. At the end of the list of samples, and the list of Toolbox Samples, is a + button that lets you add a sample to that section of the panel.
Each method of adding one or more samples from the menu is available for both regular and Toolbox samples, just select the appropriate option from the menu.
- Add Sample: Creates a new sample using the current color.
- Replace Samples: Replaces all existing samples of the indicated set with a new set of samples either from the collection of samples or by loading a file from disk.
- Add Samples: Adds a new set of samples to the current samples in the indicated set either from the collection of samples or by loading a file from disk.
- Export Samples: Allows you to save the samples you currently have in the selected set out to disk as an ArtRage Color Sample file.
- Add To Collection: Allows you to add the entire set of either the Regular or Toolbox Color Samples to your Samples Collection.
- Clear Samples: Clears out all current samples from the indicated set.
Individual samples can be removed by right clicking them and selecting the appropriate item from the popup menu.
Sample Names
If you turn on the Show Samples With Names option in the Color Samples menu the sample panel will list each sample on its own line with its allocated name.
When this option is turned on, you will be prompted to enter a name for each sample that you add. If names have been assigned to samples but the option to display them is not turned on, the sample will have a tool tip containing its name.
Sorting Color Samples
There are a number of ways to sort your Color Samples, all of which can be accessed using the Color Sample Options menu in the Tools menu, or using the menu button on the Samples Panel.
The easiest way to identify the samples is to give them a name. You can select to show samples with or without names using the appropriate items in the Color Sample Options menu. If you are displaying them with names you will be prompted to enter a name each time you manually add a sample. If you do not wish to enter a name, just press Escape or click outside the name edit that appears. You can also rename your samples by right clicking them when you have names displayed and selecting the appropriate option from the popup menu.
There are a number of alternative sorting options available in the menu. Each option sorts the entire sample set in to ascending order based on a property. If you have already sorted them in to that order, selecting the same order from the Sort menu will sort them in to descending or