ArtRage Package Files
Package Files are a convenient way to share custom content with other users by gathering items together in to a single file that can then be installed on another computer. Each Package File can contain multiple different types of custom content including Stencils, Stickers, Presets, and even Scripts. Installing a package file places all of its contents in to the correct folder on disk and store a receipt which allows you to uninstall the contents later if you wish.
Installing and Managing Package Files
Package files have a filename that ends in ‘.arpack’ and a ‘wrapped present’ icon. If you have installed ArtRage already, you can install a Package either by double clicking it (this will launch ArtRage and start the installation process) or by dragging it on to the ArtRage window. You can also find an option in the File Menu to install a Package file.
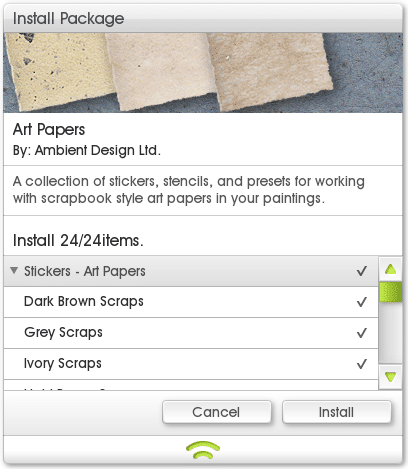
When you start the installation process, the Install Package panel appears. This panel lets you know about the contents of the package and allows you to select which files to install.
The space at the top of the panel tells you about the content and its author. The space below is a list of all of the files that are contained in the package.
Grey items with an arrow next to them represent groups. Each group will be installed as a group of resources in the appropriate panel.
For example, a Stickers group named ‘Art Papers’ will add and ‘Art Papers’ group to the Stickers Panel.
To Select Files To Install: If an item has a tick next to it, it will be installed. If it has a cross, it will not be installed. Click the item to change whether it will be installed. Clicking on a group’s tick will change all of the contents of the group.
To Open and Close Groups: To open or close groups, click the name of the group. The list will update to show or hide its contents.
Click ‘Install’ when you are ready to install and ArtRage will install the files you selected from the list.
File Naming
During installation, ArtRage will list all of the files that are being installed so that you can see what is being placed in your resource collection. If a file with the same name as the one being installed already exists in the collection, the file being installed will be given a new name. The Install Package panel will let you know the names of items that have been changed and a full report can be saved at the end of installation.
Repairing Packages
If you try to install a Package that has been installed before, ArtRage will ask you if you want to repair the installation. Repairing a Package re-installs the files from the Package to make sure that any damaged or lost files work correctly.
Tracking Installed Packages
You can see a list of all the Packages you have installed by selecting Show Installed Packages from the File Menu.
The Installed Packages panel displays a list of all the Packages you have installed down the left. Select a package from the list to display information about it, and a list of all the files it installed on the right hand side of the panel.
Uninstalling Package Files
To uninstall a Package, select Show Installed Packages from the File Menu. Select the Package you wish to uninstall from the list of installed Packages on the left then click the Uninstall button. When you uninstall a Package, all the files that it created will be removed from your collection.
Creating Package Files
To create a new Package, select Create Package from the File Menu. When you select this option, the Create Package panel appears. This panel allows you to set up the contents of your Package, including information for the end user and the files it contains. Once you have set up contents the Package can be Built to create the final file.
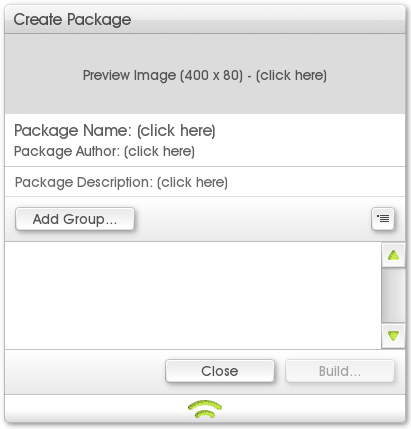
The top section of the panel allows you to set information regarding the Package that will be displayed to anyone who installs it. Information is optional, you do not need to enter any information here.
ArtRage will not display empty information items, so if your Package has no preview, no preview area will be displayed when the package is installed.
To set a Preview image, either click in the Preview Image section to select an image to use, or drag the image from your computer on to that section. The image needn’t be 400 x 80 pixels but it will be scaled to that size when it is loaded so it may look unusual if it has different dimensions.
Click in the Package Name, Package Author, and Package Description sections to set those values. The name of your Package does not need to be unique.
Adding Items to Packages
The contents of Packages are sorted in to named groups. When the Package is installed each group will become a new category in the user’s resource collection. Each group can contain only one kind of resource (for example, a group can contain Stencils, or Stickers, but not both).
You can create groups of different types of resources that have the same name (for example, you could have a group of Stencils named ‘Art Papers’ and a group of Stickers also named ‘Art Papers’).
You will need to add a group before you can add any contents to the Package. To do this, click ‘Add Group’ and select the type of resource you want to add from the popup list presented.
When you have selected the type of resource you want to add, enter a name for the group and it will appear in the list indicating which type of resource you have selected and the name you have chosen.

You can rename the group by clicking the ‘…’ button, add an item by clicking the ‘+’ button, or delete the group by clicking the ‘X’ button. Click the group name to expand or collapse it in the list.
Adding Files to Groups
Once you have added at least one group to a Package you can start to add files. There are two ways to add a file: Click the + button on the group titlebar to add a specific file form a menu, or drag a file from a folder on your computer on to the group titlebar to add it.
1. Using the + Button:
When you click the + button on the titlebar of a group a popup menu appears containing all of the items in your current resource collection for the type of resource your group represents.
The menu allows you to add an item that you already have in your own collection, or select ‘Add From Disk…’ to locate a file on disk for the group.
Types of resource that do not have a collection (Color Samples, for example) just present the ‘Add From Disk…’ option.
2. Dragging Files to the Group Titlebar:
If you want to add a file that is not in your current collection, you can drag it directly from a folder on your computer. Drag the file on the group titlebar and it will be added to that group if it is of the correct type. For example, if I drag an Image file on to a Stickers group, it will not be added. You can drag more than one file at a time.
If you are adding Presets to a group in this manner, the type of preset you are adding is not important, ArtRage will automatically create groups for the presets you drag. For example, if I have a group of Oil Brush Presets called ‘Matt’s Presets’ and I drag a Watercolor Preset on to the group titlebar, a new group of Watercolor Presets titled ‘Matt’s Presets’ will be created and the file I dragged in added to that group.
Building the Package File
When you have set up the contents you want to include in the new Package, you need to Build it. Building a Package takes all of the files you have selected for inclusion and writes them out to a single file for easy installation later.
When you are ready to Build the Package File click the ‘Build…’ button at the bottom right of the panel. You will be asked to enter a name for the file and the file will then be built. When the user installs the Package the name you set in the Package Information section will be displayed to the user, so it does not matter if the file name has to be abbreviated.
Package Creator Templates
Packages that have been built cannot be loaded in to the Package Creator for editing later. The contents of the Package Creator panel are just a list of files that will be included in a Package when you build it so if you want to be able to edit a Package later, to make changes to its contents or information, you need to store a Package Template. Package Templates are files that store the layout of your Package Creator, including all the information, groups, and files you have added.
You can save a Package Template using the menu button next to the ‘Add Group’ button in the panel. From this menu you can Save and Load Template files.
If you close the Package Creator without saving a Template for your current la