ArtRage Stencils
Stencils are used to create precise shapes or lines on your Canvas. They work just like a piece of plastic or wood placed on the Canvas, allowing you to paint over them without the paint applying to the Canvas beneath, or draw around them to make outlines.
Stencil Modes
Stencils come in three different types which have different properties on your Canvas: Stencil, Ruler, and Guide. Stencils you place on the Canvas can be switched between these modes whenever you like.

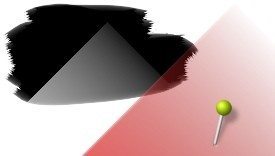
Stencil: A stencil just prevents paint from being applied underneath it on the Canvas. Stencils appear red on the Canvas.
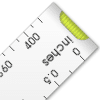
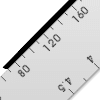
Ruler: Rulers help guide your cursor to create lines on the Canvas. Rulers appear grey on the Canvas.
Any Stencil can be turned in to a Ruler but only the default Ruler object has measurement marks along its length.
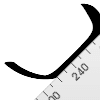
When your cursor approaches a ruler and ‘bumps’ against it, it will stick as if it was a pen against a physical ruler.
You can then draw roughly along the edge of the ruler and a straight line will be generated.
The easiest way to draw a line that starts against a ruler is to start drawing on the ruler itself. Start drawing on the ruler and the stroke will start on the Canvas against the ruler edge.
When you draw against a ruler your paint does not go underneath it.
Guide: Guides work exactly like Rulers but they do not prevent paint from being applied to the Canvas underneath them. This allows you to use a guide to precisely plot out the centre line of a stroke with paint applied on either side. Guides appear blue on the Canvas.
Stencil Transparency
Like real world stencils, ArtRage stencils have solid areas and areas that let paint through. Unlike real world stencils however, ArtRage allows your stencils to be partially transparent.
A stencil with different levels of transparency allows differing amounts of paint through to the Canvas. If you load an existing image as a stencil the different levels of brightness in the image define the transparency.
The Stencils Pod

Clicking this pod opens the Stencils Panel. Clicking and holding it brings up a menu of available Stencils for easy selection, and other useful Stencil menu items.
The Stencils Panel
The Stencils Panel contains all the stencils available for use in ArtRage. In this panel you can select and organize your stencils and import new ones from disk. On the left side of the panel is a list of groups of stencils. When you select a group the right hand side of the panel updates to show the stencils that are available in that group.
A lock icon on a stencil indicates that it was installed by ArtRage and cannot be overwritten, you can still select it.
The ‘Active’ Group

The Active group contains a list of all the stencils you have currently placed on your Canvas. Each stencil is represented by a preview and when your point at it with your cursor two buttons fade in. The Eye button is used to show or hide the stencil, and the Menu Button provides options for that specific stencil on the Canvas.
If a stencil is hidden the Eye button remains visible when the cursor leaves the area of the preview.
The stencil preview indicates the rotation of the stencil and the current mode it is in through its color.
Manipulating Stencils
To use stencils you have to add them to your Canvas. Stencils are utilities like panels or References so they do not appear in the final printed picture or if you Export a copy of your painting, they sit on the Canvas and act as guides or masks and can be moved and deleted without damaging paint.
Adding and Removing Stencils on the Canvas
To add a stencil that is already in your collection to the Canvas you can either click its preview on the right of the panel or click and drag its preview. If you click and drag, the stencil will appear on the Canvas and you can position it before releasing the mouse button.
Stencils in the Active group cannot be clicked to add to the Canvas.
If you want to load a stencil from disk and place it directly on the Canvas without importing it to the stencil collection, use the menu button at the top right of the Stencils Panel and choose ‘Select Stencil From Disk…’. This allows you to load an image to use as a stencil, it can be done for Rulers and Guides too.
You can also add a stencil to the Canvas by selecting ‘New Stencil From Layer Contents’ from the Stencil Options Menu. This option creates a stencil that surrounds the contents of the current layer.
To remove a stencil from the Canvas right click it and select the remove option from the popup menu. You can also use the menu button for the stencil preview in the Active Stencil group of the Stencils Panel.
Positioning Stencils
Once a stencil is on the Canvas you can position it freely. Because you may need to start a paint stroke on top of a stencil you can’t just click and drag them to move them. To move a stencil you should select the Transform Tool and click the stencil you want to move.
For information on how to use the transformation outline to position the stencil see the section on Transformations.
Stencils have a Pin that attaches them to the Canvas. The pin is also used as the point around which stencils will rotate and scale. To move the pin click and drag on the pin head.
- Use two fingers to drag on the Reference to move it.
- Use two fingers and pinch inward or outward on the Reference to scale it.
- Use two fingers and twist on the Reference to rotate it.
You can also use the right click menu for the stencil on the Canvas, or the menu button for the stencil in the Active group of the Stencil Picker to flip the stencil, set its angle precisely, or invert it.
The Reset options in the stencil’s right click menu allow you to set the stencil to its actual 1:1 scale for pixel precision, and reset the pin to its default central position.
The Straight Line Ruler

At the top of the Rulers group in the Stencil Panel is the straight line ruler. This ruler can be rotated and changed in length using the grips at either end. Click on the grip and drag it to the point you want the ruler to end.
Stacking Stencils
You can stack stencils on top of each other for cumulative effect. This works for all modes of stencil so if you want to create complex ruler paths, just place rulers against each other and draw around them.
Adding Stencils to the Collection
New stencils and groups of stencils can be added to the collection using the Stencils Panel. At the top left of the panel is a New Group button that allows you to add a new group, and on the right of the groups is an Import Stencil button that allows you to import a new stencil from disk.
When you select the Import button you are presented with a file dialog in which you can choose an image to import. The image you select is imported in to the current group. If there is already a stencil with the same name as the image you will be asked to change the name and try again.
Your Stencil Collection exists on disk as a series of folders representing groups and files representing stencils. You can access the folder in which all of your user stencils are contained using the ‘Open User Stencils Folder’ option in the Stencil Options Menu.
Creating New Stencils
If you create a stencil using the ‘New Stencil From Layer Contents’ option in the Stencil Options Menu it will not appear in the collection. To add it to the collection right click the stencil on the Canvas or use the stencil’s menu button in the Active group and select Store Stencil In Collection.
A file dialog appears pointing to the location of your user stencils and you can save the ste