Gradients in ArtRage
Any system in ArtRage that makes use of Gradients allows you to either select an existing one from the Gradient Collection, or create a new one using the Gradient Editor.
What are Gradients?
Gradients are automatically generated color progressions that blend between individual color points over a distance. For example, a Black to White gradient starts of black and over the length defined for its creation becomes white in a smooth blend.
Gradients in ArtRage can contain as many colors as you like, and can also blend between opacity values independent of those colors. You could for example have a gradient that is pure red along its length but blends from opaque to transparent.
The Gradient Editor
The Gradient Editor Panel is accessed by clicking on a Gradient Control. When you click the control, the Gradient Editor appears with the current gradient displayed at large size.
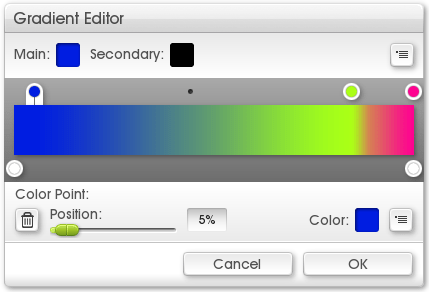
At the top of the panel are controls for selecting the Main and Secondary colors (see later for more information), and a menu that allows you to load and save gradients.
Beneath that is the gradient itself then controls for the selected point.
Above the gradient you will see circular points indicating the Color that has been assigned to that postion.
The currently selected point for editing is connected to the gradient.
Below, you will see circular points indicating the Alpha value (opacity) that has been assigned to that position.
Between each point is a smaller circle that indicates the Center Point of the blend between the surrounding points.

When you click on any of the dots, the controls at the bottom of the panel update to provide options for that type of dot (see below for details).
You can click and drag on any dot to move it around.
Adding Gradient Points
You can add a new gradient point just by clicking in the area above (for color) or below (for opacity) the gradient preview.
When you add a Color Point it takes on the color of the gradient at the point it appears, so the gradient’s appearance does not change. When you add an Alpha point, it takes on the opacity of the gradient at the point it appears.
Editing Gradient Points
There are three types of point that can be edited in the Gradient Editor:
- Color: A point that sets the color of the gradient.
- Alpha: A point that defines the transparency of the gradient.
- Center Point: A point that defines the center point of a blend between two other points.
Clicking one of these points in the Gradient Editor brings up a set of controls
specific to that type of point.
As you move points around, their properties move with them and the gradient updates dynamically. Dragging a color point for example will move that color along the length of the gradient. The color of the gradient is calculated by blending between each point and its surrounding points.
Pressing Tab cycles to the next gradient point in the area you currently have selected. Pressing Shift Tab cycles to the previous point.
Gradient Color Points
The following controls are available for Gradient Color Points:
- Delete: Deletes the point. There must be at least two points in the gradient.
- Position: The position of the point along the entire length of the gradient. 0% puts the point at the far left, 100% at the far right.
- Color: There are three options for Color, accessible via the menu button next to the Color Sample. Click the menu button to choose Main, Secondary, or Custom color, or click the Color Sample for a color picker that allows you to set custom color directly. Click and hold the sample for a Popup Color Picker.
The three color types work as follows:
- Main: The current Paint Color is the Main Color. If a Gradient Point is set to use the Main Color, the paint color at the time the gradient is created will be used for that point.
- Secondary: A secondary fixed color that is set inside the gradient editor directly. Because ArtRage supports imported gradients from Photoshop, the Secondary Color is required to represent the Background Color in those gradients. When the gradient is generated, the Secondary Color at the time is used for this point.
- Custom: If you set a point to use a Custom Color, the color you set for that point will be used when the gradient is created, regardless of the current paint color.
Combinations of these three color types can create different effects. For
example:
- To create a gradient that goes from Current Paint Color to black, set the first point to Main, and the second to Custom (black). Every time the gradient is applied, the first color will be the current paint color.
- To create a gradient that goes from black to white, set the first point to Custom (black) and the second to Custom (white). Because both points use a fixed, Custom Color, the gradient will always be black to white.
Gradient Alpha Points
The following controls are available for Gradient Opacity Points:
- Delete: Deletes the point. There must be at least two points in the gradient.
- Position: The position of the point along the entire length of the gradient. 0% puts the point at the far left, 100% at the far right.
- Opacity: The opacity value of the gradient at that point, from 0% to 100%.
Center Points
Center Points are automatically generated between each Color Point and each Alpha Point. They represent the half way point of the blend between the surrounding points. By default, Center Points appear half way between the points, so the blend is evenly distributed.
When you click a Center Point you are presented with a Position slider that can be used to set the position of the point between the surrounding points.
By moving the half way point of the blend in position you can change the bias of the progression between the surrounding values.

For example if I have a Blue point and a Red point and I move the Center Point towards Red more Blue will be visible: The half way color between Red and Blue occurs closer to Red so there is less ‘red space’ in the blend.
Center Points cannot be deleted.
Adding a Gradient to the Collection
When you have finished editing your Gradient you can choose the Add To Collection menu item in the Gradient Editor. You will be asked to select a group and name for the new gradient then the file will be created and the collection updated.
Importing Gradients
ArtRage allows you to import Photoshop Gradients either to disk or to your collection.
To import a gradient in the Gradient Editor select the Load From Disk option in its menu. This allows you to select either Photoshop Gradient Files (.grd) or ArtRage Gradient Files (.argrad). To import to the collection, open the Gradient Collection Panel and choose the import option.
Photoshop Gradient Files can contain more than one Gradient. When you choose a grd file to import from, a panel appears listing all of the available gradients in that file. When importing to the collection you can hold down Shift and click on multiple files to select them for import. When loading a gradient in the Gradient Editor you can only select one.