Fill Tool
The Fill Tool is used to pour large areas of paint on to the Canvas that expand until they find a border they cannot flow over. If you want to create large areas of solid color, gradients, or patterns the Fill Tool is the tool to use.
Solid Fill
The flood fill tool is extremely powerful and lets you ignore gaps, adjust opacity, fill in slow motion for partial fills, and fill areas up to bordering colors without ugly white edges.
Pattern & Gradient Fill
Add custom or premade gradients and patterns to a layer or selection with a single click.
The Fill Tool has the following features:
- Dryness: Although the Fill Tool pours paint in to an area, that paint dries as soon as it touches the Canvas. This means it cannot be smeared, but it can still be smudged using the Palette Knife.
- Automatic Fill: The Fill Tool automatically fills in areas on the Canvas, you do not need to manually define the area it will fill.
Settings
Type: There are three types of Fill Tool available:
Solid: Fills areas of the canvas with solid color. Click to start ‘flooding’ the canvas with color and the fill will spread outwards based on the tool settings listed below.
Gradient: Fills areas of the canvas with gradations of color. Click and drag to define the direction and size of the gradient based on the tool settings listed below.
Pattern: Fills areas of the canvas with a predefined pattern. Click and drag to define the direction and size of the tiles based on the tool settings listed below.
Each Type of Fill works in a different way. You can find explanations of how to apply them below.
Blend Mode: The Fill Tool allows you to adjust the color of the poured paint by applying a blend mode as it spreads on the Canvas. Unlike Layer Blend Modes, the blend mode used by the Fill Tool is applied to the paint as it lands on other paint, it does not change the color of the paint if it is landing on a blank area of Canvas. The Blend Mode will also only apply to paint on the current Layer, it does not change the color of the paint as it passes over paint on a different layer. For more general information on what Blend Modes look like when they are used, see the section on Layers.
Opacity: Controls the opacity of the paint that is poured on to the Canvas. The lower this value the more transparent the paint.
The following settings are unique to certain Fill Types. You can also find detailed information on how to create different types of fills in the next sections.
Solid Type
Spread: Controls how far the area to select will spread from the point you click. To select the area, ArtRage looks at the color of the point you clicked and expands outwards until it finds a different color, at which point it stops. The Spread value controls how different that color can be before the spread ends. The higher the Spread value, the more different it can be.
Antialias Edge: If this is on the edge of the filled area will be antialiased, selecting partial pixels to soften the selection. If you do not want to work with partial transparencies, turn this setting off.
Single Layer: When you click a point to fill an area ArtRage can either look at color only on the layer you clicked, or on all layers to find where it should stop expanding. If Single Layer is turned on, other layers will be ignored. If it is turned off, color on other layers is also taken into account as the paint spreads.
Gradient Type
Gradient: The Gradient Type allows you to select a gradient to use when applying the Fill. Click this control to open the gradient editor, or click the menu for options that allow the loading of gradients from disk or your collection. For more information on designing your own gradients see the Gradients section.
Gradient Type: The Type of Gradient that will be applied. Different types cause the gradient to be generated with a different shape on the canvas. For information on how each type works and how to apply it see Creating Gradient Fills.
Smoothing: Controls how smooth the steps between points in the gradient area. The higher this value the smoother sharp transitions in the gradient will appear.
Reverse Gradient: Turn this on to flip the start and end points of the gradient. This does not edit the gradient, it just adjusts the direction applied by the Fill tool.
Pattern Type
Pattern: The Pattern Type allows you to select a color image to be applied as a tiled pattern within the fill area. Click this control for pattern selection options including loading from disk and selecting from your collection.
Lock Scale: If this option is turned on the scale of the image you use in the pattern fill will not change, every tile will be the size of the actual image.If you turn this off the scale of the tile will be defined by the distance you drag when creating the fill area. For more information on how this works see Creating Pattern Fills.
Scale: Controls the scale of the pattern image when the fill is generated. If Lock Scale is turned on, this value is used regardless of whether you drag to create the fill. If Lock Scale is turned off, this value will be used only if you single click to create the fill.
Flip Horizontal: When turned on, this option flips the pattern horizontally.
Flip Vertical: When turned on, this option flips the pattern vertically.
Creating Solid Fills
The Solid Fill Type creates areas of solid color that spread outward from the point at which you click. The spread of the color is limited by the colors already on the canvas. The Spread slider indicates how different a color on the canvas must be before the Fill stops spreading.
The example below shows spread from the center of the dark blue circle, first with the Spread value at 0%, then with the Spread Value at 60%.
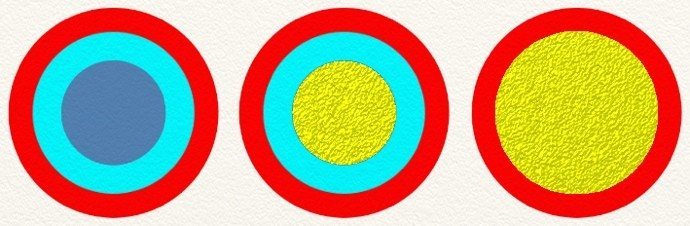
A 0% Spread means that as soon as the fill hits a color different to the one you clicked, it stops spreading. Here, the light blue has created a border it cannot spread past. A 60% Spread means that the fill will continue expanding over colors that are quite different to the one you clicked (here, the light blue) but will stop at colors that are significantly different. This is why the fill stops at the red border.
Fills and Antialiasing
Antialiasing is the process by which a digital line is made to appear smooth by
varying the opacity of pixels along the edge. This makes angled lines and
curves appear smooth despite the fact that your display is made up of discreet
blocks (pixels). This also means that a Flood Fill operation can have problems
where the fill area meets the edge of another line, because the antialiased
pixels of the edge of your line are not the same color as the pixels inside the
line itself. As a result you may see some fringing around the edge of the fill
area where it met these partially opaque pixels.
Increasing Spread can help to counteract this problem: If the Spread is slightly higher the fill area will extend further in to the line. In cases where this does not help, turning off the Antialiasing option in the Fill tool may help.
Creating Gradient Fills
Gradient Type Fills fill the entire available area with a color gradation, replacing any colors already on the Layer.
There are two ways to create them:
- Click and drag on the canvas: The gradient will be created with its starting color at the point you clicked, and its ending color at the point at which you release. The direction of the gradient (see below) is defined by the direction of your drag. Note that all space in the canvas before your starting point will be filled with the starting color, and all space after the point of release will be filled with the ending color. Hold down Shift to constrain the angle of the line to 15 degree increments.
- Single click on the canvas: The entire available area will be filled with the gradient you have selected, its direction will be treated as if you had clicked and dragged downwards.
If you create a Gradient inside a Selection, the gradient will not apply outside
the area of that Selection. If there are Stencils on the canvas, the Gradient will
not apply beneath them.
Gradient Types
There are five types of gradient. Each type defines the shape the gradation of
color will take when it is applied, and how click and drag works to adjust this.
Linear: The Gradient is created in a straight line. If you click and drag the starting color of the gradient is placed where you click, and the ending color is placed where you release.
Radial: The Gradient is created in a circular shape projecting outwards. The centre of the circle is the starting color of the gradient and is placed where you click, and the ending color is placed where you release.
Angle: The Gradient is created around a circular path like a clock face. The starting and ending colors of the gradient meet at the same point and the angle of that point is defined by the angle you drag.
Reflect: The Gradient is created in a straight line but repeats itself. The starting point and ending point of your drag will both be the starting color of the gradient, the ending color of the gradient will be placed half way between the two.
Diamond: The Gradient is created in a diamong shape projecting outwards. The centre of the diamond is the starting color of the gradient and is placed where you click, and the point at which you release defines the tip of the diamond and is made the ending color of the gradient.
Creating Pattern Fills
Pattern fills replace the contents of the available area with a predefined pattern that is tiled repeatedly to fill the space provided. The size of the pattern tiles and the angle at which they are placed is defined by how you use the fill tool on the canvas. There are two ways to do this:
- Click and drag on the canvas: The pattern will be created with its tiles aligned along the line you define. Hold down shift to constrain the angle of the line to 15 degree increments. If Lock Scale is turned off, the length of the line you drag defines the size of the tile: The starting point of the line is where the top center point of the tile will be placed, and the ending point is where the bottom center point will be placed.
- Single click on the canvas: The pattern will be created with tiles at the size defined by the Scale slider and oriented normally.
If you create a Pattern Fill inside a Selection, the Pattern will not apply outside
the area of that Selection. If there are Stencils on the canvas, the Pattern will
not apply beneath them.