How to pick a Canvas Size for your ArtRage Paintings
Choosing a canvas size is one of those horrible math-filled topics that are terrifying and mysterious the first time you try and do digital art, or start considering printing your art. It is important to make sure that you do not start with a canvas that is too small because you cannot make it larger later without losing quality. But what is “too small”? How large can you go? This comprehensive guide should help you jump into the confusing world of pixels, printing and canvas size guesstimates. You don’t need to understand it all, but it’s a good idea to understand it a little!
Quick Reference
Pixel sizes:
- Use around 500-1000 pixels for little easy paintings where the final quality doesn’t matter (e.g. sketches, stuff you’re just going to post online)
- Use 2000-5000 pixels a side for the stuff you might quite like to print, or want to turn into a Proper Painting and need some decent detail for.
- Use 5000-15,000 for the Really Detailed Stuff and the things that you know you need to print in super high quality or at poster size or above.
- Use 15,000 and up if you have a very fast computer and are obsessed with tiny details or are involved in some kind of super project.
Pixels/Inch (DPI/PPI)
- Ignore it entirely and base your canvas sizes on the pixel guidelines above
- Or… if you really want to understand what’s going on, or need a very specific print result, play around with the calculations and changing the final print size until you get an idea of how large your ideal printing size translates into pixels.
- In which case, use 150-300 pixels/inch, unless you have very specific instructions from your printer about what it is technically capable of/you know your specific printing plans require something else.
Working larger than your hardware likes
- Use scripts
- You can create tool sizes up to 500% in the desktop software by holding SHIFT and dragging left/right or by clicking on the size and typing in the number you want.
- Start small and expand the canvas as you work to keep the memory usage controllable.
- Merge layers as you go and avoid the memory-suck tools (watercolor, transform)
- Paint sections/objects in another document and copy the final result in as a single layer if you need to keep layers as an option.
Maximum Canvas Sizes
The desktop versions have unlimited canvas sizes, limited only by your computer memory. The mobile apps have capped sizes, due to the limited memory (RAM) in phones and tablets.
- ArtRage 4.5 and Lite have 64-bit support so can use unlimited RAM memory.
- Earlier versions can use up to 4GB RAM so usually can just make it to 8000-10000 pixels..
- Android, ArtRage Touch and iPad users can create canvases up to 2048 x 2048 pixels
- iPad 1 users are limited to 1400 x 1400
- iPad Pro 11″ users can create canvases up to 4096 x 4096 pixels.
- iPhone users are capped at 960 x 640
- ArtRage Free uses ‘whatever your screen resolution is’.
You can set your canvas size in ArtRage in:
- The New Canvas screen (all versions of ArtRage)
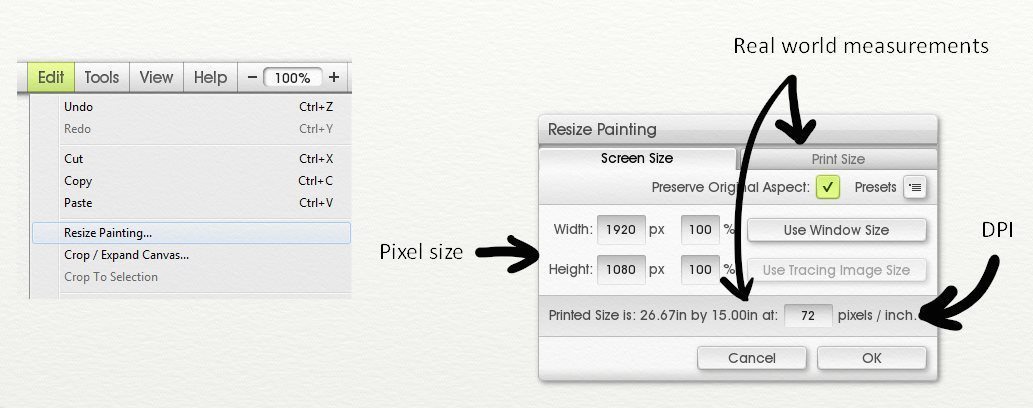
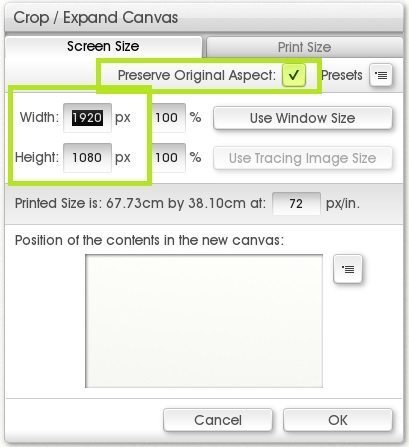
- The Edit > Resize Painting and Edit > Crop/Expand Canvas menu options (desktop versions of ArtRage only, resizing is too memory intensive for the mobile versions).
The Longer and More Detailed Explanations For Everything
What Are Pixels?
Pixels are the units of the internet. Every image on your screen is made up out of many, many little pixel dots, and this is what you are ‘painting’ with.
Every digital image contains a specific number of pixels, and the size of your canvas is literally just picking how many pixels you want to start with. The bigger your image, the more detail you can add, and the larger you can print. However, you don’t actually need a very large canvas size if you just want to share your work online. However, the bigger your image, the more memory it uses and the slower things might get (this is why the mobile apps have capped canvas sizes).
Print size is an estimate based on your pixel size (the ‘real’ size of the image) and the ‘Pixels/Inch’ measurement (also known as DPI/PPI), which tells the printer how detailed the final image should be. But you don’t need to worry about that unless you are trying to get a really specific printing result.
Picking A Size
When selecting a size, consider the following things:
Do you need to print it? Calculate the largest size and exact aspect ratio that you’ll need and use that so you don’t have to worry going forward.
I’m serious about the aspect ratio, by the way; you can usually fudge the print quality a bit (paintings are blurrier that photos by default so you don’t need to be as picky), but if your actual width:length ratio is wrong? You may have to make some painful cropping decisions as most print places only carry a specific range of paper sizes.
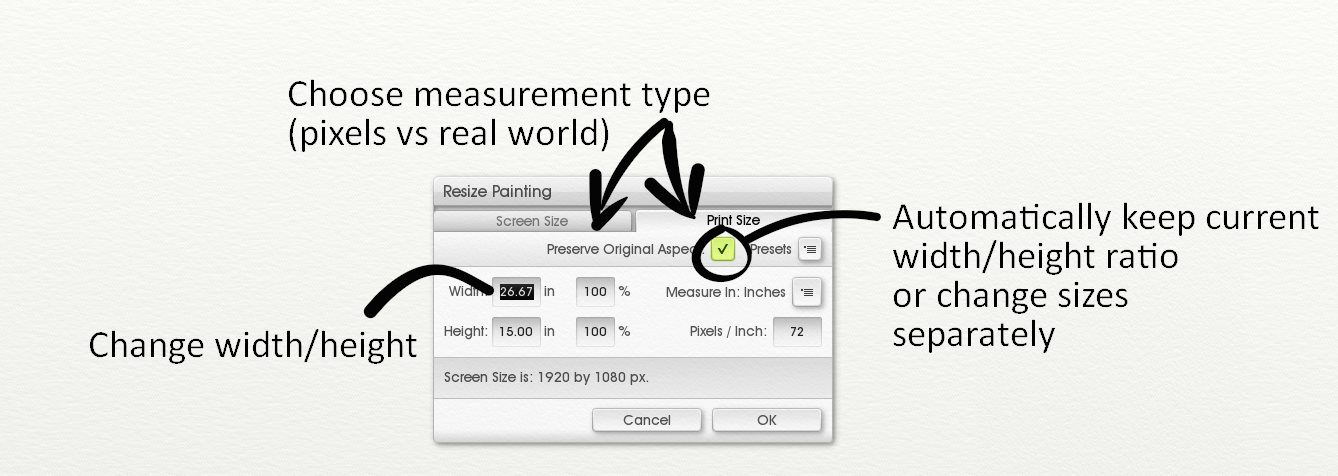
Don’t forget to untick ‘Preserve Aspect Ratio’ as that will force your width and height to stay the same relative sizes, so you’ll be stuck in an endless update loop.
Does it need to be high quality and detailed? Probably 5000-15,000. You’ll need to figure this out as you go, but you can resize your canvas as you work, and you may find you don’t like working at large sizes (as it affect tool size and computer speed).
Or is it just a quick sketchy image for the internet or a lowish quality web graphic? Pick a smallish basic size between 1000-4000 pixels and don’t worry about it. You can go even smaller, but usually you don’t need to.
I generally draw web graphics at twice their final size, which gives me some flexibility if I want to crop it or change the aspect ratio and means I don’t have to worry about quality loss for the fine details.
Bigger is always safer, as you can scale down as needed, but you might not like working at large sizes, so it’s a personal decision. I usually work at around 3000-5000 pixels a side, unless I know I will need a larger image for a specific result (e.g. I can make a small poster out of that, but the quality might not be great. On the other hand, I regularly sold A3 posters and even created an A2 poster out of a 3000 pixel image once and they sold just fine!).
If you are uploading your work to an online print on demand website, you may find that their system requires some very specific sizes and DPI settings. This is to avoid people uploading truly unsuitable images, but if you are confident that your image will be fine and doesn’t need to be the size they are requiring, just artificially resize your canvas upwards before uploading. How much you can get away with this is going to vary on a case by case basis, but ArtRage paintings are usually soft edged and can be upsized about 30% before you see noticeable issues. But you will always see some quality loss with any resizing upward, because the computer has to fill in empty pixel space.
How to Choose and Set the Print Size
Set the zoom level to 100% in ArtRage. This will show you how big the canvas actually is relative to your screen size. It’s very easy to lose sight of the actual size when zooming in and out to work ;D
Do the Pixels Per Inch x Pixel calculation: This is the horrible mathy bit that makes people’s heads hurt. If you need 300 pixels for each inch, what does 3000 pixels divide down into? (Ten inches ;D).
You can also ignore the nasty math and just toggle back and forth between the canvas size tabs in ArtRage, which calculates this for you.
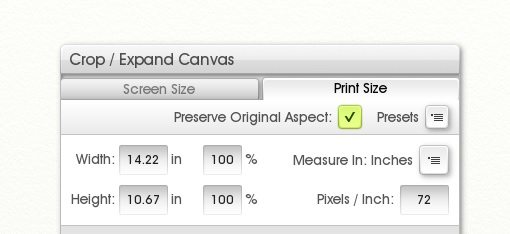
Screen Size uses pixels. Print Size lets you set the units (mm, cm or inches), but the Pixels/Inch measurement is very important here, because it is calculating the size based on your pixels.
The pixel size is the ‘real’ size of your file, so we highly, highly recommend getting used to what the numbers mean. A 5000 x 10,000 pixel canvas (which is large for most purposes) may be much higher than you need, or it may be just right.
I don’t understand, explain the printing size stuff a bit more?
Calculating the ‘perfect’ print size is a topic that tends to cause a lot of argument amongst ‘real’ artists (and photographers), for whom it is very important to get exactly the right result, but the easiest way to estimate the size for now is to switch over to the ‘Print Size’ tab in the canvas size screen (see picture).
- Figure out how big you want to be *able* to print in inches/centimetres and put that in.
- Decide what Pixels/Inch measurement you want.
- Then switch tabs again to see how many pixels that comes out to, and use that as a general guideline.
Once you know what pixel size you like working at, you can ignore the ‘Print Size’ tab and the Pixels/Inch measurement entirely, and just set those when you go to actually print something.
How to choose Pixels/Inch (DPI or PPI)
DPI = dots per inch, or how many ink drops. PPI = pixels per inch. These days they’re essentially the same thing and used interchangeably.
Your choice of pixels/inch is realistically between 72-450.
72 is ‘screen resolution’ and generally not great. 450 is super high quality overkill that most printers can’t even manage. 150-300 is a good range for art printing.
Note:
The ‘recommended’ DPI/PPI amount is usually set by a) photographers or b) Very Serious Artists. These people need very, very high pixels per inch because photographs do not look good when slightly fuzzy and Serious Artists will be printing out very high quality images on expensive paper and needing to consider everything down to the type of ink.
You probably do not need that. You can probably get away with 100 pixels per inch. The only times you need to worry a lot about the exact pixels per inch is if you:
- have a very ‘crisp’ drawing with lots of sharp edges, rather than thick paint and shadows and soft blending, which will show blurriness a lot more clearly
- are printing very small high quality images that people will be looking at very closely (e.g. greeting cards)
- are printing very Important Serious Art and know you are working with a fancy artist printer that can actually print very high quality
If you’re not sure what ‘too low but only slightly’ will look like in real life, pick up some random printed pictures or leaflets, hold them up to your nose and try and see if you can actually see any pixels. The cheaper the printing, the more likely you are to see low quality graphics! Then hold it at arms length and have another look – you’ll often find that the pixelated images look fine if you aren’t rubbing your nose on them, so you have a lot more leeway when creating very large posters.
Or just randomly print out some test images on computer paper. Your home printer will almost always use 72 DPI, so it’s very easy for you to see if that’s usable or not.
If you know you will want to use the same size again, just create a size preset.

Sharing Images Online
Sharing images online is a little complicated because every screen is different and websites will display everything differently, but most of the time, the actual size you need will be far, far smaller than the size you need for printing, so you’ll rarely run into quality issues. This can mean that problems won’t show up until you go to print!
Your screen resolution is somewhere between 600 and 1920 pixels across. That’s smaller than the maximum canvas size in our mobile apps (which is 2048×2048 pixels). So you could easily create a screen size canvas using the ‘Use Window Size’ button and not really worry about the quality or size.
Facebook and other social media sites tend to shrink pictures to a standard size that are easy to browse, but aren’t always the best size for sharing fullsize, detailed, art. Facebook shrinks images to around 900 pixels wide, so as long as your images are bigger than that, they will always be full size – for Facebook! – when you upload them.
To find out the exact size you need, try downloading an image off the website and then open it in an image editor or right click on it and have a look at the properties.
Problems With Large Canvas Sizes
The larger your image, the more likely you are to run into problems with memory, as you start working with a larger and larger file, or the tool sizes may just not scale up enough for your purposes. If you can’t create a big enough canvas for tool size/workflow/hardware limitation reasons, then you still have…
Scripts
ArtRage scripts record your painting process and let you literally replay the entire series of steps later. ArtRage 4 (desktop) will allow you to change the resolution (the size of the canvas), so you can record a painting that is 500×500 pixels wide and replay it at 10,000×10,000 pixels.
- You can record scripts in ArtRage 3 Studio Pro, Lite & 4 (desktop), Android & iPad.
- You can replay scripts at any size in ArtRage 3 Studio & Studio Pro and ArtRage 4. You can replay scripts at their original size in ArtRage Lite.
- ArtRage’s brushes include some random variation, so your scripts may be subtly different when you play them back. Most of the time this won’t matter, but occasionally you may find it annoying. Canvas texture scale may also affect your strokes.
- Your script may be very large and take a long time to replay, but there is an ‘accelerate script’ option for fast playback.
- You can replay a script as many times as you like and create a new painting each time. You can stop it at any point.
- If you stop recording during the script and forget it turn it back on until you’ve made a few strokes, this can mess up everything after that.
- You can edit the script files using Notepad or other text editors, just ctrl + f for tool names or create sample scripts to see what you need to look for. But script files are very, very long, so this is only helpful for ‘whoops, I didn’t record that I switched tools and it thinks I’m using a pencil, I need to delete the Pencil line’ or ‘I don’t want the reference to show up, I should delete that block of code’.
- Get more help with advanced script editing in the manual or the forums.
Script Recording on Mobile Devices
- Android and iPad: Both the full mobile apps for Android and iPad allow you to record scripts for playing back later, but you need to turn ‘Record Script’ on in the new canvas screen. The script is then embedded into the painting, and you need to export it later. You can export multiple scripts at different times.
- Go to File > Play/Record Script in the desktop programs.
- Script recording is complicated and memory intensive so you cannot edit or play them back on mobile devices, only in the desktop programs.