Stylus Controls
ArtRage includes support for two sets of advanced features available with some graphics tablets and stylus based screen input devices:
- Stylus Properties: Stylus properties such as Pressure, Tilt, and Barrel Rotation.
- Stylus Recognition: The ability to recognize individual styluses as they are brought close to the tablet.
These two sets of features are supported via the Stylus Properties and Stylus Control Center.
Stylus Properties
ArtRage includes support for the following stylus properties:
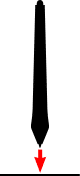
Pressure:
This tracks how hard you press on the surface while using the stylus.
The Pressure slider in the Tool Settings Panel is used to offset the incoming pressure value, increase it to make changes in pressure have a larger effect on the canvas, decrease it to reduce the pressure.

Tilt:
This tracks the angle of the stylus relative to the flat surface of the tablet.
Some tools such as the Airbrush change the shape of their spray automatically when the stylus is tilted.
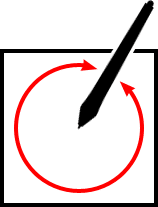
Tilt Angle:
This tracks the rotational angle of the stylus around the surface of the tablet.
The view on the left is from above as you look down on the tablet, the pen is like the hands on a clock face, its rotational position is the Tilt Angle.
Airbrush Wheel:
Some styluses, usually of the airbrush stylus type, have an additional wheel control.
The wheel sets the absolute value of the property it is attached to, it’s like a slider in the Tool Settings Panel when you use it.
Twist:
This tracks the barrel rotation of the body of the stylus around its vertical axis.
Most styluses do not support this property. If your stylus does not, the direction of the stroke tends to define the Twist value of the brush head as you paint.
ArtRage allows you to assign the Pressure, Airbrush Wheel, and Twist properties of a stylus to individual settings in each tool.
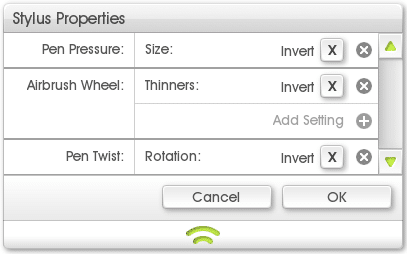
This is done via the Stylus Properties Panel, which can be opened using the Set Stylus Properties menu option which can be found by clicking the Preset Block at the top of the Tool Settings Panel.
The Stylus Properties Panel contains a list of all of the stylus properties supported by the tool. For example, the Oil Brush supports Pen Pressure, Airbrush Wheel, and Pen Twist.
Beside each property is a list of Tool Settings that will be affected by that property. For example, in this image the Oil Brush Size is being affected by Pen Pressure. As you press harder, the brush size will increase.
Some Tool Settings support an ‘invert’ value represented by a check box next to their entry in the property list. Turning this check box on causes the relationship of the property and value to be inverted.
For example, if I turn on Invert for the Pen Pressure’s Size property in the Oil Brush, pressing harder with the stylus will cause the brush to become smaller.
Each setting is listed with an X button that allows you to delete it. If you delete a setting, the Property it was assigned to will no longer affect that setting.
If a property has the potential to affect more settings, there will be an ‘Add Setting’ entry listed next to it. Click that entry to get a list of all the settings that property can modify.
Not all settings can be modified by stylus properties. Some settings are locked to specific properties or unavailable for modification due to their nature. In general, properties that would be associated with the brush are modifiable, while properties that define the base nature of the paint are not. This is due to the painting simulation running in the background, which tracks properties of your media in a natural manner.
For example, the Loading of a brush head defines how much paint is on the brush at the start of a stroke, so it is not possible to modify that value after the stroke has begun.
Stylus Recognition
Some graphics tablets and other stylus based input devices support the ability to recognize unique styluses. ArtRage allows you to take advantage of this feature in the Stylus Control Center, which lets you assign specific tool settings to specific styluses.
The Stylus Recognition system does not just recognize different types of stylus (eg. Normal, Airbrush etc.), it recognizes different styluses of the same type. This means that if you have multiple styluses you can assign specific tools to each and switch styluses to change tool settings.
To open the Stylus Control Center, select the Stylus Control Center option using the menu accessed by clicking the Preset Block at the top of the Tool Settings panel.
Stylus recognition works by monitoring the stylus that is currently in use. When you bring a new stylus close to the tablet, the settings that were assigned to that stylus are applied (including tool type, color, size, and any additional settings).
Stylus Control Center
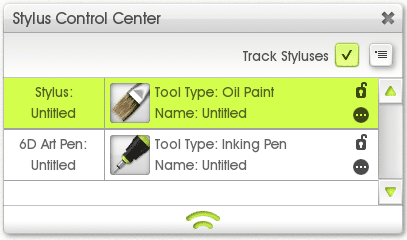
The Stylus Control Center allows you to assign properties to each unique stylus ArtRage has detected in use.
At the top of the panel is a checkbox that allows you to turn off stylus tracking. If this option is turned off, ArtRage will not store or assign settings to the styluses you use.
The menu button at the top of the panel allows you to save out sets of settings that you have assigned, or load them back in again later.

The main bulk of the panel is taken up with a list of styluses and their assigned properties. Every unique stylus that has been brought close to the tablet while ArtRage is running is listed here.
The left hand side of the list indicates the type of stylus that has been detected, and any name you have given it.
Types of stylus recognized include a generic ‘Stylus’, a Wacom Airbrush Stylus (which supports Airbrush Wheel properties), and a Wacom 6D Art Pen Stylus (which supports Pen Twist properties). Click the name area to assign a name.
On the right hand side of the list you can see the Tool that has been allocated to the stylus and the name of the Preset if a preset was selected. The tool icon is displayed, or the preset icon if there is one.
If no settings have been assigned to the stylus, this is indicated here in the list.
On the right hand edge of the list are a Lock and Menu icon for each stylus.
The Menu item is used to assign the settings of the current tool to the stylus, or clear out settings. The menu also allows you to remove from the list any stylus that is not currently being used.
The lock icon is used to lock the currently assigned settings (or lack thereof) to the current stylus so that they do not change.
The last stylus to have been detected is lit up in the list.
Working With Stylus Recognition
Stylus recognition and how settings are allocated can be confusing at first. The basic model is this:
- When a stylus is brought close to the tablet for the first time, it appears in the list with no settings assigned.
- When a different stylus is brought close to the tablet, the tool settings at the time are assigned to the last stylus, then the new stylus becomes active.
- If you then bring the first stylus back to the tablet, its tool and settings are applied in the interface.
So you can see that this process is driven by stylus changes. Until a different stylus is brought close to the canvas, no changes will be applied to the settings allocated to the current stylus.
If you only use one stylus, you won’t notice any difference in behavior, your settings will never be allocated to the current stylus.
If you don’t specifically lock a stylus in the list, you will notice that every time you bring a stylus close to the tablet the tool settings that were applied when it was last used are restored.
This means that you can use different styluses to represent different tasks in a painting, using each one as if it was a specific real world tool.
Locking Stylus Settings
Locking stylus settings makes a small change to the workflow. When you turn on the lock for a stylus, the settings (or lack thereof) that are currently assigned to it will be locked on and will never change.
If no lock is applied, changes you make to settings while using a stylus will be stored when you switch styluses. For example:
- I use Stylus A and select Oil Paint.
- I bring Stylus B to the tablet – Stylus A now has oil paint allocated. I switch to Watercolor.
- I bring Stylus A back to the tablet and Oil Paint is selected. I now switch to Palette Knife.
- I bring Stylus B back to the tablet – Stylus A now has Palette Knife allocated.
So we can see here that changes I make while using Stylus A will be kept when I return to Stylus A. If I want to make sure that Stylus A is always Oil Paint when I bring it to the tablet, regardless of what I change after I bring it to the tablet, I would turn on the lock for Stylus A after Oil Paint has been allocated to it in step 2.
Manually Allocating Stylus Settings
If you prefer, you can manually control the settings that are allocated to each stylus and avoid changes being made. To do this:
- Bring a stylus close to the tablet.
- Click its lock icon in the Stylus Control Center list.
- Set the tool settings up as you want them.
- Use the Menu Button for the stylus in the Control Center list and select Assign Current Settings.
The current settings are assigned to the stylus and because the lock is turned on, they will never be automatically chan