The ArtRage Interface
This section explains where you can find the tools and options you will need while painting, what the various types of control in the products are and how they work, and how to change the layout of your workspace.
The ArtRage Window
When you open ArtRage a window appears that contains the Canvas and a number of objects that are arranged around the edge.
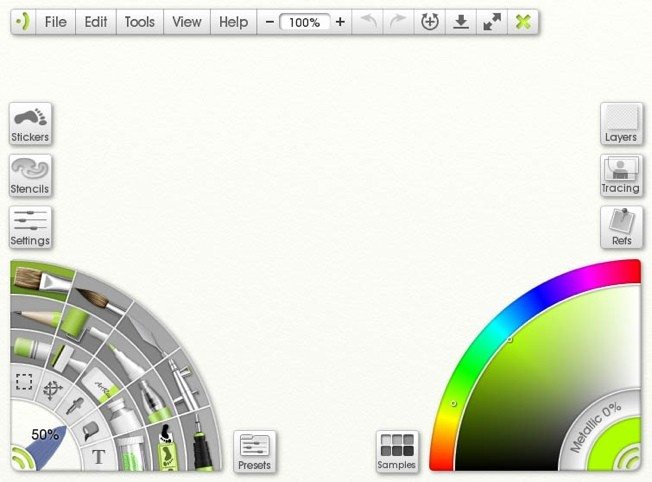
Around the edge of the window you will find a collection of control items: Large ‘Panels’ that contain sets of controls, and smaller ‘Pods’ that give you quick access to important functions without getting in the way of your painting. Pods are placeholders for panels, click one and it expands to display the appropriate panel. Close the panel and the pod will appear again. ArtRage manages the layout of these items for you so you don’t need to worry about moving things around.
The empty area of the window is your Canvas, the surface you paint on. When you start ArtRage a new Canvas is created that is the same size as the window so you can start painting right away.
As you paint, any panels and pods on the screen will get out of the way of your stroke, so don’t worry if you are painting close to a corner, the controls will vanish as you approach to make sure you can continue working. They will reappear when you end the paint stroke.
Pods
Each pod has its own specific functions, but there are two main things you can do with all of them:
- Click to open the Panel the pod contains.
- Click and hold to trigger a command menu containing common options for the controls the Pod represents, without needing to bring up the full Panel.
Some pods provide other forms of interaction. For example the Color Pod can
be clicked and held down on to get a popup color picker, and the Tracing Pod
will load a Tracing Image the first time it is clicked. These functions are
detailed in the section for each Panel and Pod combination later in the
manual.
Pods are gathered in to groups of similar functions:
- On The Top: The Menu Pod contains the Menu Bar for making application wide changes.
- On The Left: The Stickers, Stencils, Settings, Tools, and Presets Pods represent the things you use to change your painting.
- On The Right: The Layers, Tracing, Refs, Color, and Samples Pods represent color and helper functions.
Panels
Panels contain most of the in depth functions in ArtRage. There are two types of Panels that can be opened when you click a Pod: Floating Panels that can be freely positioned anywhere on the screen, and Docked Panels that are attached to the edges of the screen by default.
Panels that are Floating have a grey title-bar at the top, while Panels that are docked have a Collapse Button that is used to close them.
Panels that are Floating have a grey title-bar at the top.
Panels that are docked have a Collapse Button that is used to close them.
There are three Docked Panels and they are visible by default when you first start ArtRage: The Menu Bar, the Tool Picker, and the Color Picker. These panels sit on the sides beside the other Pods and their position is managed automatically by ArtRage.
The other Panels are all Floating Panels, so they can be moved wherever you like, including a second monitor if you have one. Floating Panels can also be scaled and rotated so you can lay them out however you want.
The exact functionality of each Panel is covered in detail later on in this manual, but there are some controls that apply to all of them.
Manipulating Floating Panels
The grey title-bar at the top of any Floating Panel can be used to manipulate it in a number of ways, including moving it, changing its scale, and rotating it. At any point you can right click the title-bar to get a menu of options that allow you reset any changes you make.
To manipulate a Panel with its title-bar:
- Move the Panel: Click and drag on the title-bar and the Panel will move.
- Scale the Panel: Hold down Command (Mac OS X) / Control (Windows) and click and drag on the title-bar and the Panel will scale. You can increase its scale to 200% or reduce its scale to 25% of its original size.
- Rotate the Panel: Hold down Option (Mac OS X) / Alt (Windows) and click and drag on the title-bar and the Panel will rotate. If you also hold down Shift the panel will rotate in 15 degree increments.
- Options Menu: Right click the title-bar to get a menu of options including a reset option to undo any changes you have made. The ‘Jauntify!’ option applies a random small rotation to your Panel to give it a jaunty angle!
- Close the Panel: If the Panel has an ‘X’ button in its title-bar you can click this to close it.
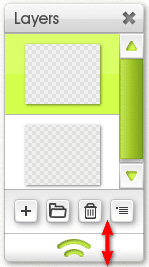
Some Panels allow you to change their size by expanding or collapsing their area (as opposed to changing their overall scale).
These Panels have a Sizing Grip at the bottom. To change the size of the Panel, click and drag the Sizing Grip up and down. Panels that can be resized in this manner have a minimum size to prevent them going too small.
Manipulating Docked Panels
Docked Panels are stuck to the edge of the ArtRage window like Pods, and when they expand or collapse the Pods around them shift to make best use of the available space. Because they are docked, these Panels are fixed in place and cannot be moved using a title-bar.
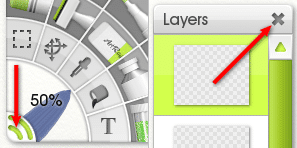
The Collapse Button at the corner of the Docked Panel allows you to close the Panel once it is open. Click once to close the Panel.
Right click the Collapse Button on a Docked Panel to get a menu of options for scaling the panel. A Docked Panel cannot be rotated, but it can still be scaled using this menu.
Docked Panels can also be disconnected from the edge and converted to Floating Panels. If you find that you want to place them somewhere else for ease of access, or just to get them out of the way, you can right click the Collapse Button and select the ‘Tear Off Edge’ option to tear the Panel off the ArtRage window and float it.
When a Docked Panel has been torn off, you can use its Close Button to move it, scale it, and rotate it as if it was the title-bar of a Floating Panel. The Close Button will not collapse the Panel if it is floating in this manner.
To reattach a Docked Panel to the ArtRage window, just right click the Close Button again and select ‘Stick To Default Edge’. This will return it to its original position.
The Canvas
The Canvas sits underneath the Panels and Pods in the ArtRage window and is the area upon which you apply paint. When you start ArtRage the Canvas fills the window completely, but as you paint you may find you want to move, rotate, or zoom so that important bits of your painting are in the center of the screen.
There are a number of ways to manipulate the Canvas, including shortcut keys and a Canvas Positioner that can be left open if you find you are making frequent adjustments. Detailed instructions on manipulating the Canvas can be found in the Canvas section.
Interface Controls
There are a number of types of basic control used in the ArtRage interface. This section looks at each control type and the shortcuts you can use with them.
Buttons: Click a button and it will perform the action indicated by its label. Buttons that open popup menus are marked with the Menu Icon.
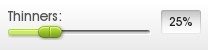
Sliders: Sliders allow you to click and drag to set their value, or click the text item to enter the value manually. If there is more than one slider on a panel you can press the Tab key while editing its value to select the next one, or Shift + Tab to select the previous.
Toggles: Toggles are simple on/off switches. The current state of the control is indicated by the colored tint. Click anywhere on the toggle to change the state.
Popup Lists: Some settings have a large list of potential values. Popup List controls can be clicked to generate a popup menu containing all the value options. The arrow on the right indicates that there is more information to be had by clicking the control.
Preset Blocks: Some panels have areas that contain information about presets or other components of the panel. These blocks contain an image preview of the content, sometimes a name, and an arrow indicating that more information can be found by clicking. Click anywhere in the block for options related to its contents.

Type Selectors: Type Selectors show a preview of a small range of settings. Click the setting you want and it will become active. The name of the setting you have chosen is indicated at the top right of the control.
You can also right click the Type Selector to get a list of all of its options in popup menu form.
Tabs: Tab controls let you select settings that change the nature of the contents of the panel. Just click a tab and the panel contents will update to reflect the change.
Tooltips: Most items that do not have a text label in ArtRage have a Tooltip. Just hover the mouse over an item and a small text tip will appear telling you what the item is.
You can adjust the time you need to hover before the Tooltip appears in the Interface section of the ArtRage Preferences Panel. See Preferences for more information.
Collapsible Categories

Some sets of controls in ArtRage are large enough that they are divided in to Collapsible Categories. Each category has a title and an arrow indicating if it is open or closed. Click anywhere in the grey title-bar of the category to open or close it.
Popup Color Picker
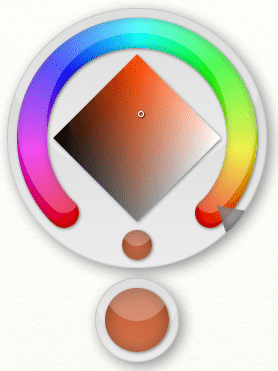
Popup Color Pickers are used when you want to get quick access to a color without worrying about being too precise.
They let you quickly select the Hue, Luminance, and Saturation of a color with a single click and drag. They appear when the mouse button is pressed, and vanish when it is released.
When the Popup Color Picker appears, the Current Color sample is under the pointer. This is the color that is currently selected for whatever option spawned the picker.
Without letting go of the mouse button, drag around the color selection area of the picker. As you drag over the different areas the New Color sample changes to indicate the color that will be selected when the mouse button is released.
Dragging around the horseshoe ring in the color selection area changes the Hue of your color. Drag from there in to the diamond area and you can change the Luminance and Saturation. Typical color selections start with Hue selection, then the pointer slides to the diamond and the details of the color are selected.
If you want to undo your change, just drag the pointer over the Current Color sample and release the mouse button, the color will not change.
Resource Pickers
Many of the custom resources you can use in ArtRage, such as Stencils and Stickers, are chosen from a Resource Picker. Resource Picker panels present a list of specific types of resource sorted in to groups for ease of organization.
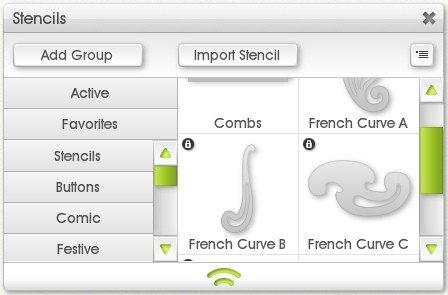
On the left of the picker is a list of available groups. Click a group and the right hand side of the picker will update to indicate all of the available objects in that group.
Some Resource Pickers have special group types such as Favorites. These groups are always listed at the top of the panel and sit above the scrolling list of custom groups.
At the top of the Picker you will find buttons for adding groups and adding items to existing groups. These buttons may vary depending on the nature of the resource type.
Editing Resources
Resources that you have added to the panel can be removed or renamed. Right click an item for a list of options available.

If the item has a lock icon next to it cannot be edited, these items were installed by the application.
Cursors
ArtRage lets you select from three different styles of cursor depending on how precise you want to be:
Tool Cursors: These cursors take on the appearance of the tool you are currently using. The tip of the tool is where the tip of the cursor will apply paint.
Outline Cursors: These cursors show you the outline shape of the tool head where you are about to apply paint. Some tools that do not have Tool Cursors automatically use Outline Cursors.
Precise Cursors: These cursors are small crosshairs that show the precise point where your stroke will begin. When Outline Cursors are too small to display accurately, Precise Cursors are automatically used.
You can choose which type of cursor to use in the ‘Cursors’ section of the Prefer