ArtRage Toolbox
When you’re working on a project that uses a small set of tools you might not want to have the entire interface visible constantly. The ArtRage Toolbox lets you gather a set of tools, colors, and utilities that are relevant to the specific project you’re working on in to a single panel that can be used in place of the main interface. When you’ve gathered your tools together, Workbench Mode lets you collapse the entire interface in to a single toolbar and work in a focused environment without distraction.
This section explains how to use the Toolbox and Workbench.
The Toolbox
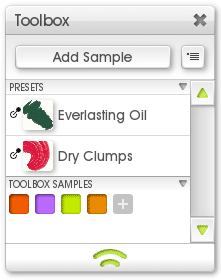
The Toolbox Panel is a place where you can store tools, colors, and utilities that are relevant to a specific painting. The contents of the Toolbox are stored with the painting itself so that when you reload it, the Toolbox is restored.
When you store an object in the Toolbox it appears in the Toolbox Panel. Objects are sorted in to groups for ease of location. Clicking on an object in the Toolbox Panel activates it, the actual effect of which varies depending on the object type (see below for details).
When objects are added to the Toolbox they are automatically pinned to the Workbench Pinboard. The pin icon next to the object in the Toolbox Panel can be clicked to unpin or re-pin them.
The following objects can be added to the Toolbox. Each object is listed with information on how you add it, and what happens when you click it in the Toolbox:
Color Samples
Color Samples stored in the Toolbox are stored for the current painting only. They also appear in the Samples Panel.
Adding Color Samples: You can add Color Samples to the Toolbox either by choosing the Add options from the Toolbox Samples menu item found in the Color Samples menu, or by using the Add Sample button at the top of the Toolbox. once you have at least one Color Sample in the Toolbox there will be an add button in the list of available samples.
Clicking Color Samples: When you click a Color Sample in the toolbox, that sample is made the current color.
Layers
Any Layer in your painting can be added to the Toolbox. This can be useful if you’re working on a specific subset of layers in a larger document and want quick access to them.
Adding Layers: Right click the Layer you want to add in the Layers Panel and choose the Add to Toolbox option. You will be prompted to enter a name for the item. This does not change the name of the Layer, it just labels the item in the Toolbox.
Clicking Layers: When you click a Layer in the Toolbox that Layer becomes the active Layer. If you right click a Layer in the Toolbox its options menu appears.
Tracing Images
A Tracing Image that has been loaded can be added to the Toolbox. When stored, it retains all of its settings including scale and opacity.
Adding Tracing Images: When you have a Tracing Image loaded, use the Add To Toolbox option in the Tracing Menu to store it in the Toolbox. You will be prompted to enter a name to label the item in the Toolbox panel.
Clicking Tracing Images: When you click a Tracing Image in the Toolbox the image is loaded and its settings are restored. It is important to note that Tracing Images stored in this manner don’t store the actual image, they store a reference to the file on disk that was used to create the image. If that file does not exist, the item cannot load.
References
Any Reference Image, Scrap, or View that is currently in the painting can be stored in the Toolbox.
Adding References: Right click on the Reference or select its menu in the References Panel and choose the Add To Toolbox option. You will be prompted to enter a name to label the item in the Toolbox panel.
Clicking References: When you click a Reference in the Toolbox its visible state is toggled. This allows you to quickly show and hide References you are using. If you right click the Reference in the Toolbox, its options menu appears.
Stencils
Any Stencil that is active in the painting can be stored in the Toolbox. Stencils that have not yet been added to the painting cannot be added.
Adding Stencils: Right click on the Stencil on the canvas, or use the menu for the Stencil in the Active category of the Stencils Panel and select the Add To Toolbox option. You will be prompted to enter a name to label the item in the Toolbox panel.
Clicking Stencils: When you click a Stencil in the Toolbox its visible state on the canvas is toggled. If you right click a stencil in the Toolbox its options menu appears.
Custom Color Pickers
Any Custom Color Picker in your Collection can be added to the Toolbox.
Adding Custom Pickers: Right click the Picker in the Custom Pickers Panel and choose the Add To Toolbox option. You will be prompted to enter a name to label the item in the Toolbox panel.
Clicking Custom Pickers: Click a Custom Picker in the toolbox to activate it in the Color Picker.
Saving Toolboxes
The contents of the Toolbox are automatically saved with your painting and restored when you load it. There may be cases where you want to save a Toolbox to disk for use later however, and you can do this using the menu button in the Toolbox Panel.
Because some of the items that are stored in the Toolbox are only relevant to a specific painting file however, not all items will be saved. Any item in the Toolbox that represents an active item in your painting will not be saved when you export the Toolbox to its own file. This includes:
- Layers.
- Stencils.
- Reference Images, Scraps, Views.
Items that represent either a file on disk or an object that does not rely on a specific painting will be saved when you save the Toolbox file.
The Workbench
The Workbench is a compressed interface mode that clears away all of the panels on the screen and replaces them with a single toolbar that sits on the edge of the ArtRage window. Workbench Mode is designed to give you a focused environment for working, and contains quick access to important app functionality as well as a Pinboard for storing custom objects that are relevant to your current work.
Activating Workbench Mode
Workbench Mode can be activated by selecting the Workbench option in the View Menu, by right clicking the canvas and selecting Workbench Mode, or by pressing Enter (the default shortcut key).
When Workbench Mode is activated any interface controls that are on or overlapping the canvas vanish. This means that panels you have moved outside the main ArtRage window will remain visible. For example, if you have dragged panels to a second monitor they will not vanish when entering Workbench mode.
When you leave Workbench mode, any panels that were hidden will be restored.
The Workbench Toolbar appears when you enter Workbench Mode.
Workbench Toolbar Layout

The Workbench Toolbar is laid out in to individual segments that contain controls of a specific type. Layout can be either horizontal or vertical depending on its docked location.
The X Button: Ends Workbench Mode and restores normal panels.
The Menu Button: Click for access to all of the ArtRage Menus and Workbench docking options.

Tool Selector: Indicates which tool is active. Click to select another from a menu.
Tool Size: Indicates the size of the current tool. Click to enter tool size manually, or click and drag to change tool size smoothly. Drag left and right if the Workbench Toolbar is docked at the top or bottom, or drag up and down if it is docked on the left or right.
Current Color: Indicates the current paint color. Click for a Color Picker to select color manually. Click and hold to get a Popup Color Picker.

Layer Preview: The preview of the current layer you are painting to. This item updates as you paint. Click for a Layer Panel, or right click for the options menu for the current Layer.
Presets Pod: Click to open a Presets Popup Panel.
Settings Pod: Click to open a Tool Settings Popup Panel.
Samples Pod: Click to open a Color Samples Popup Panel.
Toolbox Pod: Click to open a Toolbox Popup Panel.
Tracing Pod: Click to open a Tracing Popup Panel. If no Tracing Image is loaded, clicking this pod prompts you to load one.
References Pod: Click to open a References Popup Panel.
Stickers Pod: Click to open a Stickers Popup Panel.
Stencils Pod: Click to open a Stencils Popup Panel.
Canvas Zoom: Click to set the canvas zoom level manually, or click and drag to change it smoothly. Drag left and right if the Workbench Toolbar is docked at the top or bottom, or drag up and down if it is docked on the left or right.
Shift click this button to zoom in a step. Alt (Windows) / Option (Mac OS X) click it to zoom out.
Canvas Positioner: Click to open a Canvas Positioner Popup Panel.

The Pinboard: The rest of the space in the Workbench is the Pinboard, which contains any custom items you have pinned to it. For more information, see below.
Workbench Popup Panels
Many of the buttons in the Workbench Toolbar open a Popup Panel. Popup Panels are exactly the same as the normal panels they represent, but their position is docked to the Toolbar and they vanish when you click outside them. You can also press Enter or Escape to close a Workbench Popup Panel.
If you trigger a Popup Panel for a panel that is already visible on the screen, the original panel vanishes. It will reappear when you leave Workbench Mode. If you want to display a full, non vanishing panel when in Workbench Mode, hold down Shift and click on the appropriate Pod in the Toolbar.
Showing and Hiding the Toolbar
At the Right or Bottom edge of the Toolbar is an arrow pointing to the edge of the window. Click that to retract the Toolbar off the screen.
When the Toolbar is retracted a small arrow button appears in the corner of the window. Click this to bring the Toolbar back.
The Pinboard
Any space in the Workbench Toolbar that is not taken up with its normal buttons is available for custom items. This is called the Pinboard. When you add an item to the Toolbox it is automatically pinned to the Pinboard so that it is available for use when in Workbench Mode.
The icon that appears to the left of items in the Toolbox Panel indicates whether the item is pinned to the Pinboard. Click it to toggle the value.
When there are more items than can fit on the Pinboard, a set of scroll arrows appears allowing you to scroll through rows of items.
Some items have identifier icons indicating the type of object they represent. This is common for items that may appear either blank or similar in nature.
Because some projects use a wide range of tools that may all be stored in the Toolbox, you can unpin objects from the Pinboard if you would like to create a smaller, focused set for use during painting.
For example, if you are working on a portrait and want to focus on a single aspect such as the eyes, you might want to pin only those tool presets, layers and color samples relevant to the eyes to your Pinboard, even though the Toolbox might contain tools for all aspects of the portrait