How to start painting in ArtRage Lite for the first time!
Fear not, for this tutorial is here to help! It will walk you through the most important basic features, explain the more complicated extras and give you an idea of how to jump in and get started.
There is also a Quick Start guide inside ArtRage Lite. Just go to Help > ArtRage Manual!
Jump to a section!
- Installation Problems
- First Impressions: The Interface
- Part One: The Basics
- Part Two: The Fun Extras
- Part Three: The Dropdown Menus
I know all this stuff already…
If this tutorial isn’t telling you anything new, you have some idea of what you want from a digital art program, or you are already finding ArtRage Lite is a bit too limiting for your needs, then you might be ready to graduate to our full program. Try the demo, or take a peek at the feature comparison list to see if you can benefit from the upgrade (and don’t forget to use your upgrade discount). But we’ve seen users creating amazing art in all editions, so if you don’t feel you’re ready to upgrade, you can still enjoy using ArtRage’s amazing paint!
Already Know How The Menus Work?
If you’re already comfortable with the interface itself and just want to learn how to paint, or read some more advanced tutorials, head over to our main Tutorials section and start browsing. We also have a series of ArtRage Lite painting videos here.Installation Problems
Obviously this tutorial is no good to you if you can’t even get ArtRage Lite working! If you are having trouble installing or running ArtRage Lite, you can contact our tech support. However, the most common issues we see are the things below, which are usually easier and faster to fix yourself if you know what to do (while we try and answer our emails quickly we are in a different time zone to most of the world and we’re a very small team that likes to stop and sleep occasionally).
- Incorrect or missing serial from Wacom: Follow the steps on this page, or contact Wacom support, or check your account on Wacom’s website for the serial number (sometimes your registration worked, but the email never made it to you).
- Incorrect or missing serial from us: If you purchased directly from us and the serial isn’t working, try using the ‘Paste from Clipboard’ button to avoid errors. If it still fails, or never showed up, contact us with your order details.
- Problems downloading, or you accidentally downloaded the version for the wrong operating system: Register your serial in our Member Area and you can download ArtRage Lite for both Windows and Mac OSX as many times as you like.
- Error when launching on Mac OSX: Make sure to drag the ArtRage icon over to your Applications folder and then launch it from the Applications folder directly.
- Error installing on Windows XP: Windows XP is not supported by ArtRage Lite. Contact us directly or consider ArtRage 5, which has an older version available in the member area that you can download after purchasing a licence.
- Upgrade Discount not applied: The upgrade discount from Help > Upgrade to ArtRage 5 should be applied automatically but very rarely, it glitches. If the cart still lists the full price, register your ArtRage Lite serial in the member area to access your discount from there instead.
First Impressions: The Interface
The first rule of playing in ArtRage is that you can’t break anything. Pick anything that looks fun and start messing around. Pick a tool on the left, a color on the right, dab at the canvas a bit, open up the Settings and tweak them to see what happens, and generally see how much fun you can have making a mess.
Once you’re starting to get comfortable with your tablet and the way ArtRage looks, you can start to actually study the program a bit more. Or you can just keep splashing glitter around forever!
This is what you see when you open ArtRage Lite
This is what you will see when you get to know the program.
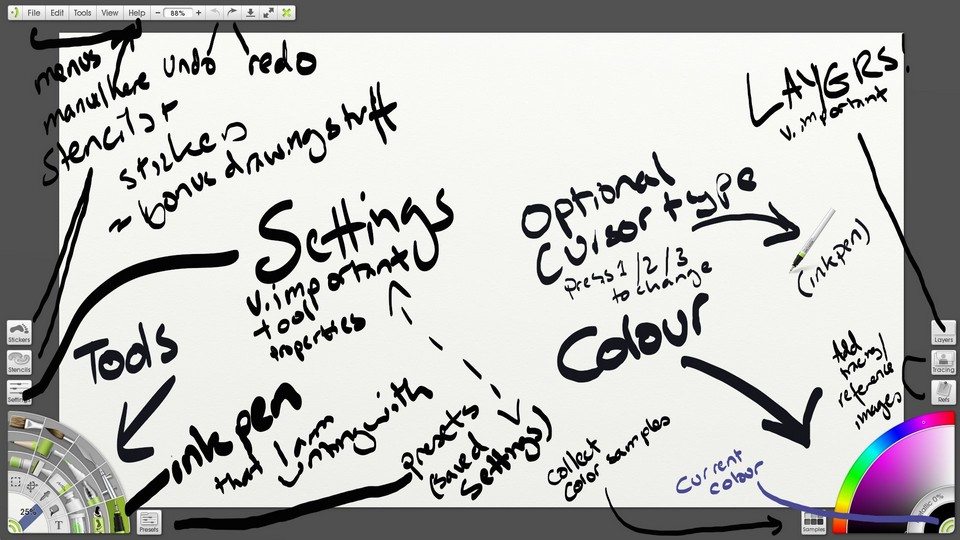
But that’s far too many options to deal with at once, so we’re going to start by looking at the most important ones, then move onto the fun optional stuff and the boring menus.
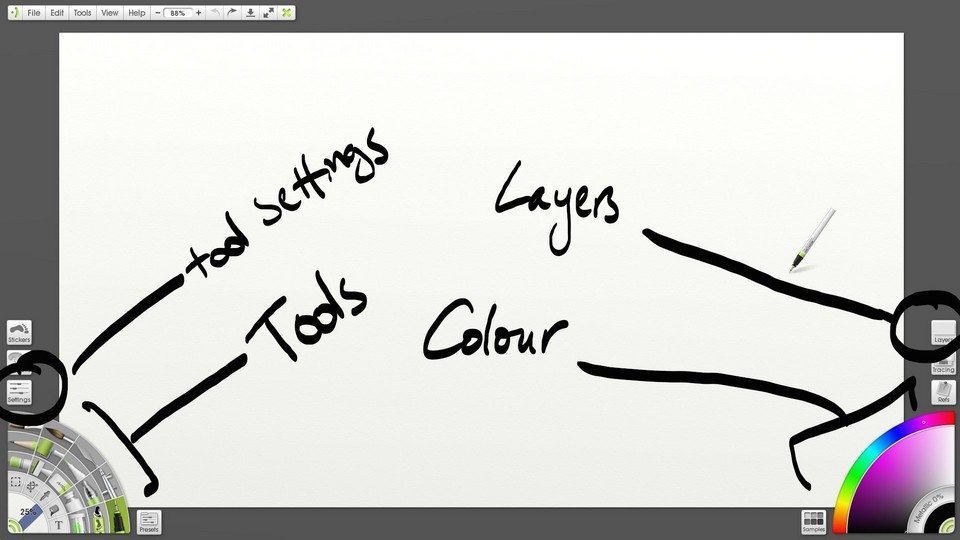
The Basics: Tools, Layers and Color
The most important things to learn to use are the Color Picker, the Layers and Canvas Settings, the Tool Picker and the Tool Settings & Presets. Think of the way you would approach normal traditional art: you need your paper, you need the tool (a brush and oil paint, pencil or a pen), you might need to sharpen the pencil or pick different types of brushes as you work, and you need to choose the color of your ink, lead or paint. You might never learn anything else in ArtRage and you will still be able to paint and draw almost anything you want using these features.
1. Tool Picker
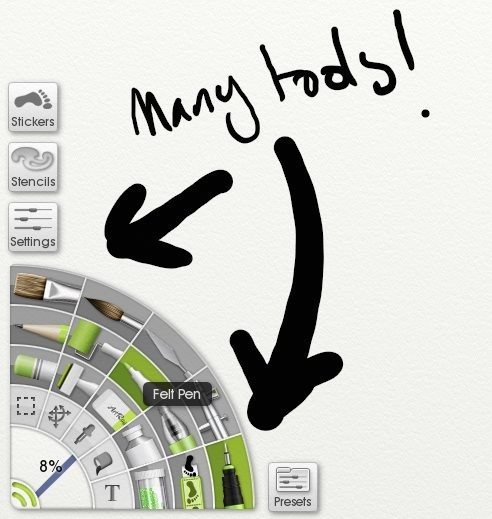
Any tool. It really doesn’t matter which one you pick – if you can’t figure out what it does, or you don’t like it, just try another one. Each tool icon is a completely different type of media, rather than variants of different drawing brushes, so they will each behave very differently. Experiment with oil, watercolor, ink pen, airbrush, pencil, paint roller, paint tube, glitter…
- The Oil Brush is the default. But you really don’t have to stick with it! If you want the tool to act differently, try a different tool.
- All the arrows and writing on the screenshots are created using the Ink Pen!
- Pencil and ink pen are good for drawing. Felt Pen can be made to act like art pens or copic markers. The paint brushes act like paint. The airbrush is a nice way to get soft effects.
- If you hover over a tool, it will tell you what it is.
- If you pick and draw on the canvas, you can see what it does (mostly. A few need paint already there to do anything, e.g.: Cloner, palette knife, eraser).
- The Sticker Spray tool will either spray out lots of images or act like a Photoshop Brush. Browse the Presets to experiment with the options (and check out the “Stickers” section below).
- That row of grey buttons inside the colorful tool icons are the ‘digital’ things: selection, transform, color picker, fill, text.
- The inside section with ‘8%’ is the tool size. Click it, or click and drag left/right (or press shift and drag left/right on the canvas) to change the size.
2. Settings and Presets
Once you have chosen a tool, click on the Presets and the Settings pods just to the right of, and just above, the tools.
These will open up into proper menus. Settings and Presets are very closely connected, which is why I want you to open up both and I’m counting them as one thing.
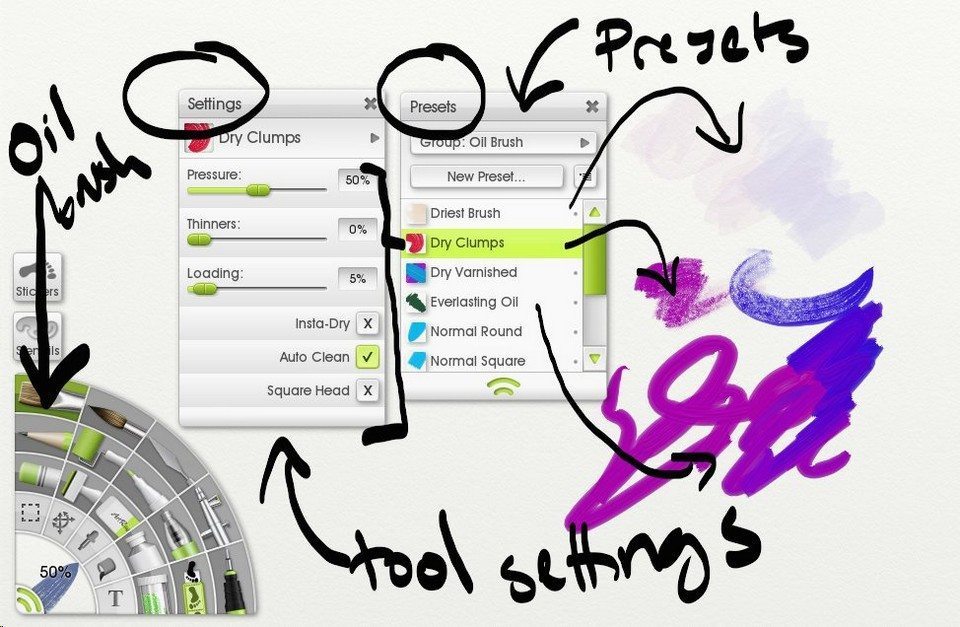
Settings are all the different properties of the tool you are using. You can customise lots of different things to get exactly the effect you want, but the options will be different for every brush.
- If you mostly like a tool, but wish it was slightly different, you probably just need to tweak something in the Settings a bit.
- The settings are based on real world properties; oil paint thinners means you’re adding solvents to the oil paint and the paint is thinning out.
- You can also make the tools easier to control instead of more realistically messy: Smoothing for the Ink Pen will smooth your wobbly lines, ticking ‘Precise Mode’ makes the Pencil more digital, and you can adjust brush shapes and flow and thickness.
- ArtRage 5 has more advanced Settings options, so if you really like a tool but wish it would let you adjust a couple more things, have a look at the full program and see if it has what you need (you get a nice upgrade discount if you decide you want the full program).
- Find more detailed examples for individual tools in the tutorials section.
Presets are the equivalent of ‘saved brushes’ in other programs. They are shortcuts to certain setting combinations that make for good brushes.
ArtRage Lite includes a range of useful basic presets so you can just use these to get started. Click on different presets and see what they actually do when you draw.
- When you click on the presets, watch the Settings. You will see all the properties changing.You can then start playing with the properties in the Settings menu directly – and even ignore presets entirely going forward (or create new ones!) – or just continue to use Presets for as long as you like.
- You can also download Presets from other users in the Art Supplies forum – this is how ArtRage users share custom brushes (just be aware that some brushes may be for ArtRage 5 and use features that aren’t available in ArtRage Lite).
3. Layers & Canvas
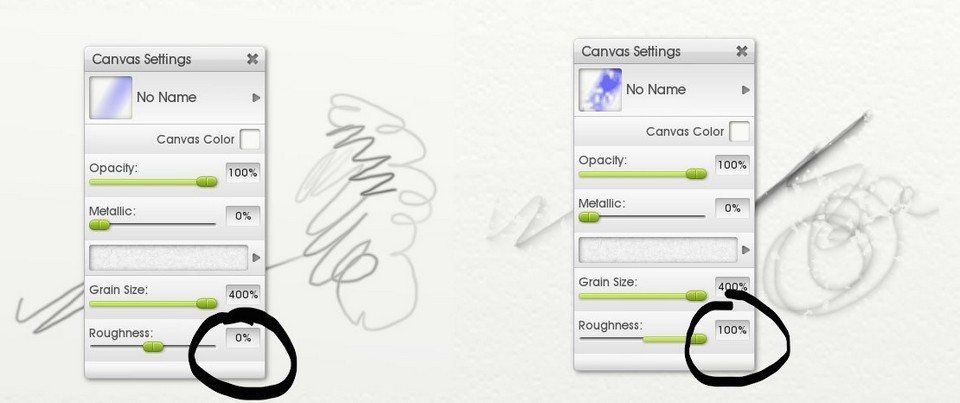
The canvas texture is a something that confuses a lot of first time ArtRage users: the canvas is part of the drawing. When you first open ArtRage Lite, the canvas settings will be set to a lightly textured canvas that is very suitable for realistic oil painting and you can use any tool easily with. However, it is very easy to change the texture grain and the canvas color to anything you like. The texture radically affects your tools and you can change it as you work to get different effects, so if you don’t like the results you’re getting you should definitely experiment with the canvas textures.In the background of the image below you can see the difference the texture makes to the pencil stroke; the default canvas settings creates a broken, textured stroke and the flat canvas creates a smooth digital stroke.
- You can change your canvas whenever you create a new painting.
- Open View > Canvas Settings or press Shift + Ctrl + C or go to the menu in the layers panel to edit the canvas for a current painting.
- Experiment with the presets, try fun dramatic textures or subtler art papers for different media
- Create a completely digital canvas by setting the canvas texture to 0% Roughness
- The default canvas is not pure white – click the Canvas Color box and slide Luminosity up to 100% to get perfect white
- You can save a blank painting with your preferred settings if you know you’ll always want the same set up, or poke around at the canvas presets
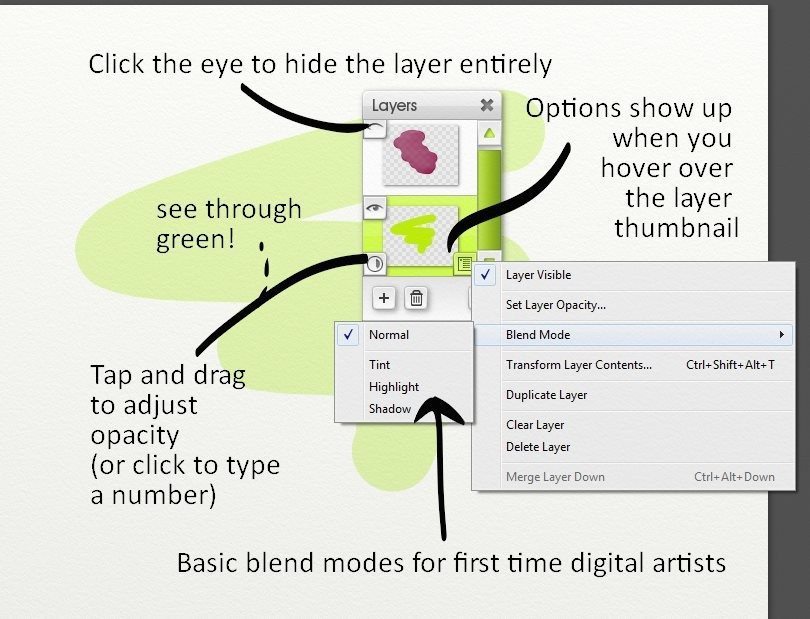
Layers are the magical digital thing that makes life happy and sparkly because you can draw lines and then color behind the lines and not mess up your existing drawing. They also allow you to import sketches from photographs or other programs and color them in.
The Layers menu is over on the right above the color picker. Open it up, and add a new layer by pressing the ‘+’ symbol. Then draw!
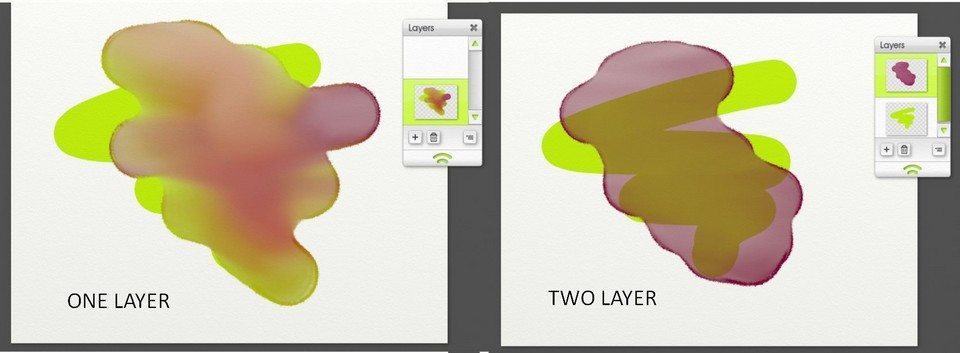
In the image below, you can see that paint only mixes when it is on the same layer, which allows you to control the results you want, change things later, and clean up mistakes much more easily .
- The current layer is always highlighted, just click on another layer to switch to it.
- If you hover over a layer, little icons will appear in the corners.
- You get slightly different options if you click the ‘overall’ menu button instead of the ‘individual’ menu button (e.g. you can then merge multiple layers together).
- The ‘overall’ menu button down the bottom of at the bottom of the layers menu is also one way to access the Canvas Settings.
- You can move layers around by clicking and dragging them up and down.
- The blend modes are ‘layer effects’ and can be used or ignored as you prefer. They affect the way the colors blend with the layers below. We gave them user friendly names based on what they actually look like, but they have Real Photoshop Names too. Tint = Multiply, Highlight = Screen, Shadow = Darken.
4. Color Picker
Pick the color you want to use by clicking on the outer ring and adjust the brightness and intensity (‘grey level) by clicking on the large inner ring. Your current color will be displayed in the smallest, inside, ring, and you can adjust the level of metallics in your paint using the slider.
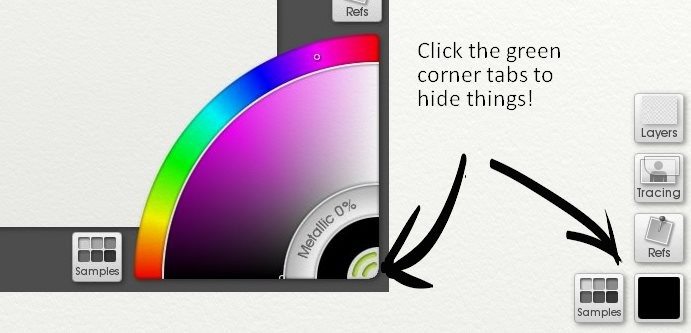
- The colorful outer ring is the hue – ‘where on the rainbow do you want to be today?’
- The big purplish section inside that is the luminance/saturation ring, where you pick a second time (if needed) to refine the exact shade of your hue.
- Inside that is the metallic ring which lets you increase the shiny metallic level of your paint.
- And then there’s the current color (black) followed by the green ‘this whole pod thing shrinks if you click it!’ tab.
- ArtRage 5 has some additional options for color picking but ArtRage Lite is pretty straightforward.
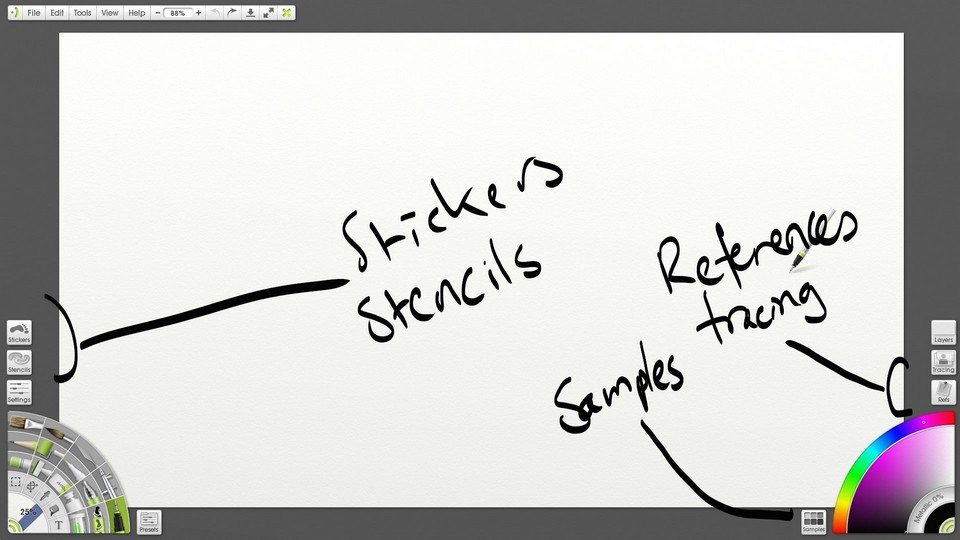
Useful Extra Features
The next section covers the other menu pods scattered around: Stickers, Stencils, Tracing and References, and Color Samples.
These are all the ‘nice to haves’ that help you create things but you can ignore for actual painting and drawing until you’ve found your feet. Or you can spend lots of time creating collages and fun mishmash effects!
1. Tracing and References
These two options sit over on the right above the color picker. They both let you add images to act as drawing guides (they are not part of your actual painting).
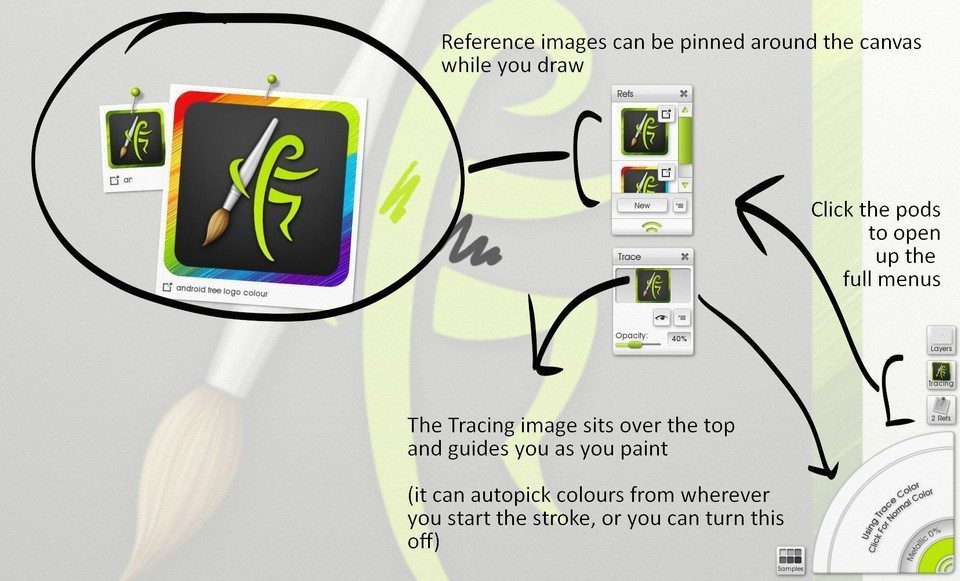
The References are pinned around the canvas and you can move and adjust scale/rotation (not as much as you can in AR4, but enough for basic reference purposes!). You can have as many as you like and make them literally as big as the screen if you want.
The Tracing image acts as a faint overlay on your entire painting. It will partially hide your drawing, so you need to toggle the opacity to get it just right for whatever you want to do.
The color picker has changed, to show you it’s automatically choosing the color of your stroke based on where you start it under the tracing image – just click the blank white area of the color picker to go back to normal.
The expanded menus let you edit/hide/remove/scale individual references/tracing images as needed.
2. Samples
This is just a way to save a color palette.
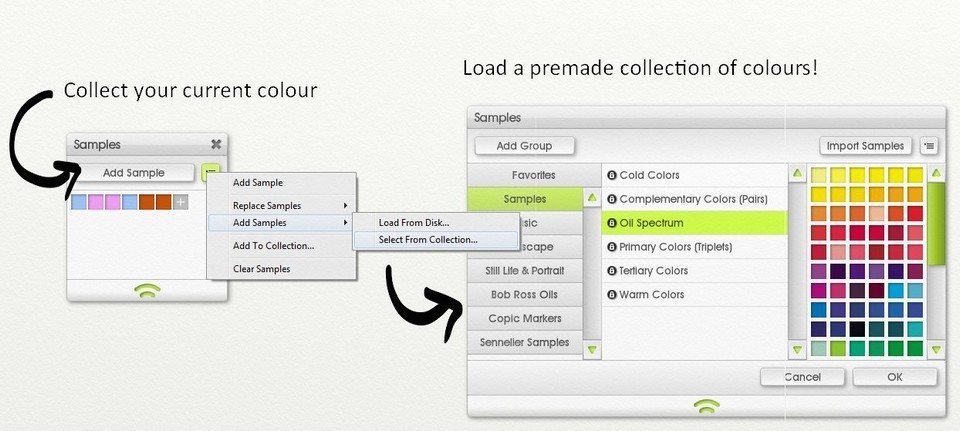
- Hold alt + click to sample color from your picture (you can also just import a screenshot of your sample colors as a reference image)
- ‘Add sample’ adds your current color.
- You can access the default color collections, or import new custom ones. For example, you can download a complete collection of named Copic Marker colors and Bob Ross paint colors in our Downloadable Color Samples section of the manual.
3. Stencils
Stencils cover your canvas and prevent you painting inside them. Stencils act like real world stencils, or like Photoshop Masks that are separate objects you can play with. Place them over your paper and use them to paint in shapes and textures.
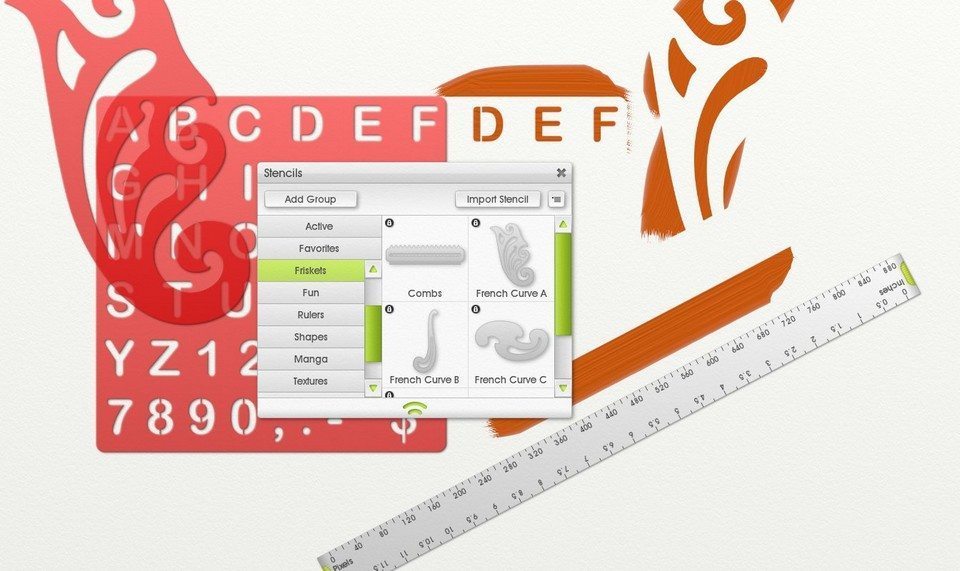
- There is a large collection of premade stencils in ArtRage Lite (the screenshot includes some custom stencil groups – Manga and Textures).
- You can turn any image into a stencil, which is great for creating your own templates and textures.
- You can scale, rotate, flip, invert… use right click > menu, shortcuts, or the transform tool.
4. Stickers
Use Stickers for premade image effects and specialised brushes. Stickers are… either really goofy or really advanced. They’re basically premade images you can ‘stick’ onto your painting.
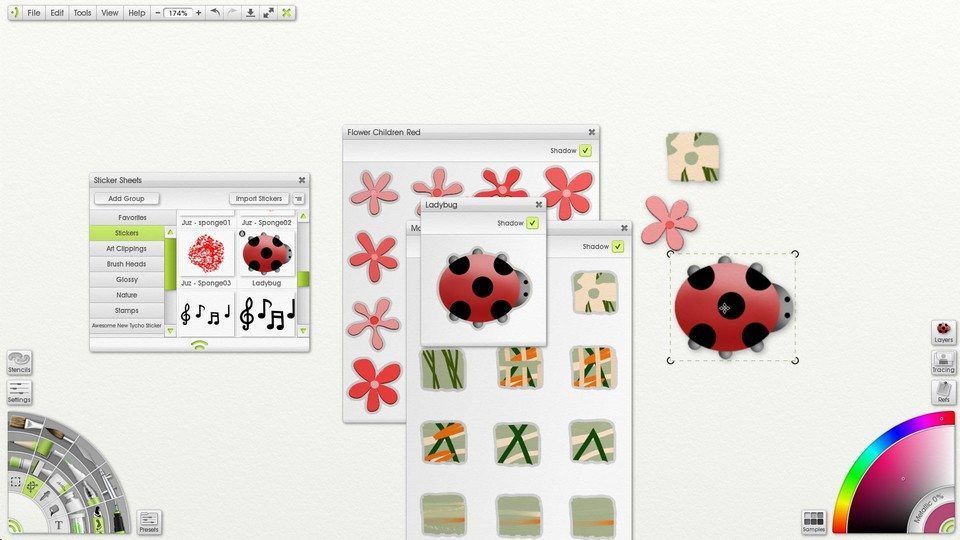
But wait.
They’re also the image patterns used for the Sticker Spray tool.
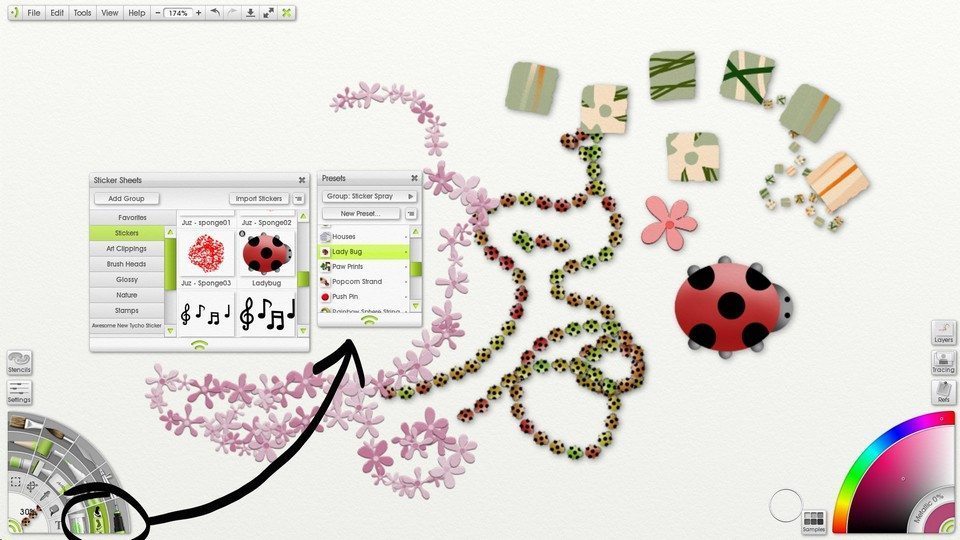
You can find all kinds of advanced Photoshop-style brushes hidden in the sticker spray presets. You can also download them from other users (ArtRage Lite can’t create, only import). Some of the groups in the screenshot below are custom sticker sprays imported from the forums.
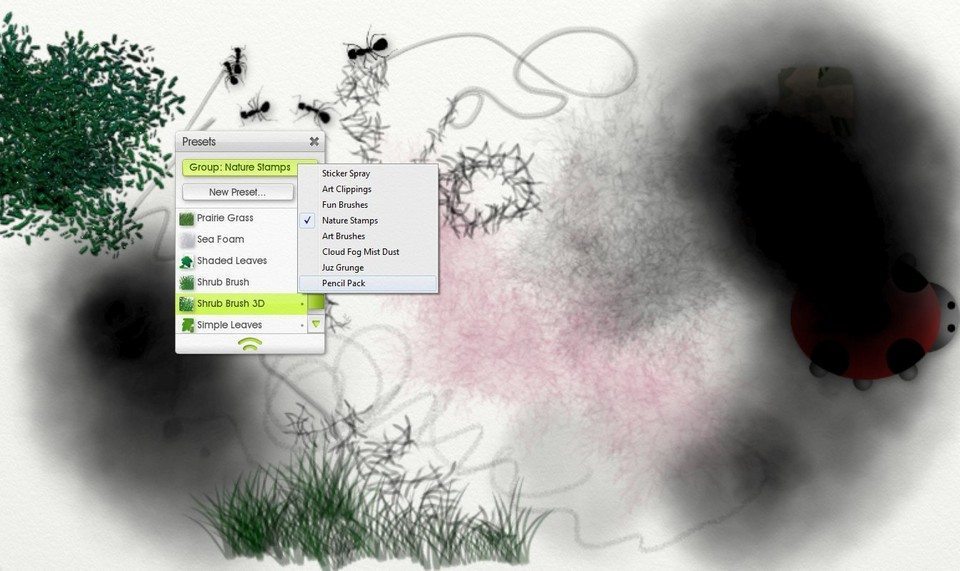
The sticker spray is an enormously complicated and powerful tool that can do basically anything Photoshop can with its brushes. You can’t do much with it in Lite except play with what other people have created, but if you’re curious about custom brush creation in ArtRage, take a look at the following links (you can always download the ArtRage 5 demo to try experimenting):
The Menus
The menu bar up in the top left contains all the basic ‘this is a computer program’ stuff as well as options to edit the interface, find important file editing options, and quickly access resource and general tool options. You don’t need to understand any of the menus when actually painting, but at some point you’re going to need to know how to export a picture to upload it to Facebook, or you’ll want to find the manual or resize your canvas.
The screenshots show a Windows interface. Mac OSX has all the same options, but they are split into two separate sections to match the rest of the operating system. The dropdown menu organization follows Photoshop standards, so if you’ve used other digital art programs you shouldn’t have too much trouble finding things.
.The remaining icons on the right are (in order) the zoom level of your canvas view, undo/redo shortcuts, and icons to minimise, expand and close the ArtRage window.
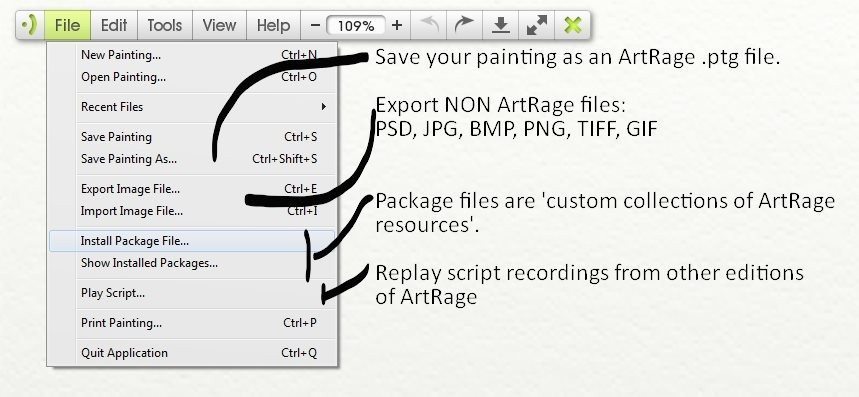
The File Menu
File is about creating/editing stuff that applies to your entire painting file/the entire application.
The Edit Menu
Edit is about editing your current painting in general ways.
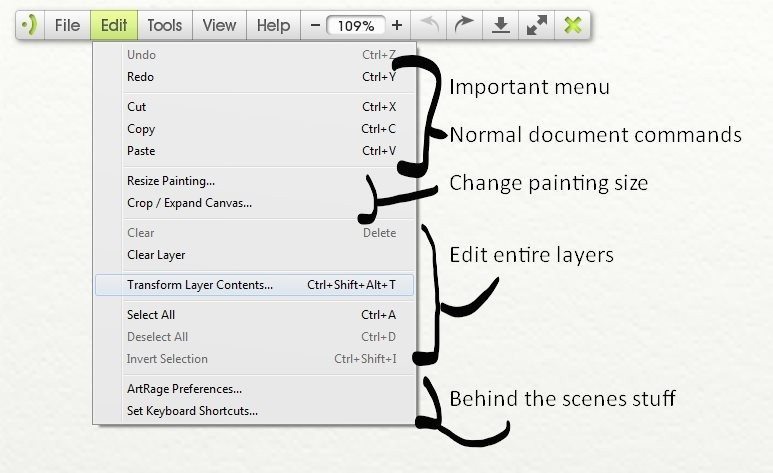
Most of the Edit options are just basic shortcuts – undo, paste, select all. The ones that are pretty unique to ArtRage are the Preferences, which is where all the ‘under the hood’ stuff like tablet settings and the colors of the interface and JPEG export quality are hidden, and the Keyboard Shortcuts, which let you peek into, and edit, all the possible keyboard commands for things.
The Tools Menu
Tools is mostly just stuff that affects your current tool – it’s a different way to access the secondary options (sub menus).
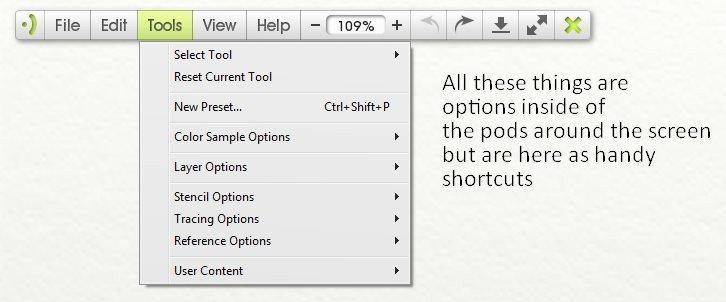
You can use this menu instead of going to the main pods around the screen, or just ignore it. It’s there to collect all those kinds of options in one place.
The View Menu
View affects the interface itself.
This lets you tick/untick the displays of the various stuff on your screen, so you can customise the layout a bit or go straight to the resource collections without hunting through other menus.
It’s also got a shortcut to the canvas settings, which technically falls under ‘resource collection’ stuff, and is important to know about.
The Help Menu
Help collects all the misc ‘find more help/register stuff/about your program’ bits and pieces.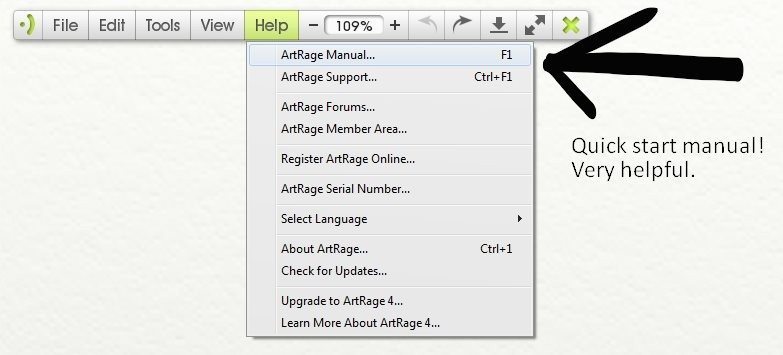
- You can open a quickstart manual from here!
- There are several links to ‘good to know about’ places on the website.
- Registering in the member area means you will never lose your serial number and can always redownload ArtRage Lite from us.
- You can view your serial under ‘ArtRage Serial Number’.
- You can also change the language, do update checks (you can disable autochecking under Edit > Preferences) and poke around at the upgrade options (because ArtRage 5 is More Awesome and has all the ‘professional’ features you might decide you need later).
Additional Resources for ArtRage Lite Users:
Official Introduction to ArtRage Lite VideosArtRage YouTube Tutorials and Painting Videos
Find more ArtRage tutorials!
We have a large collection of resources on the Art Community Tutorials page, including links to tutorials in other languages. Below are some of the recent tutorial posts on ArtRage.com.
[fp_carousel width=”940″ height=”200″ items=”5″ num=”-1″ speed=”600″ cat=”Tutorials” orderby=”date” post_type=”post”]For more help with using ArtRage, check out the ArtRage Manual, the list of community tutorials or previous posts in the Tutorials category. And don’t forget to check the FAQ section!
You can also drop by our Artrage Forums, or Contact our Tech Support directly.