The Custom Brush
Learn to create your own digital brushes or download new brushes from other artists.
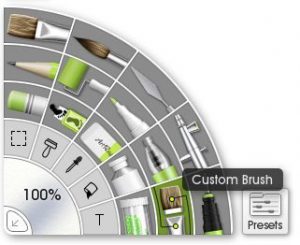
The Custom Brush lets you create specific digital brushes and effects that aren’t part of ArtRage’s traditional media system, but still allow you to use canvas texture and color mixing. You can edit a range of effects to make it more or less like a realistic brush and control the overall stroke from the Settings panel. You’ll see a lot of familiar settings from other tools, like Smoothing and Loading.
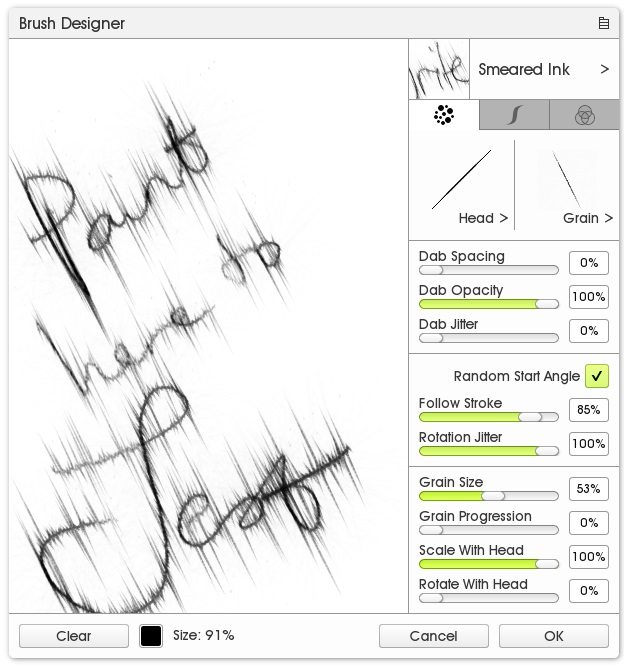
If you want to customize it further, change the shape or pattern (grain), and edit the individual brush dabs, then you need to open the Brush Designer. The Brush Designer allows you to select bitmaps to use for brush heads and masks, and adjust a huge array of sliders relating to stroke and dab properties.
You can also download custom brushes from other users: Custom Brush Preset Downloads
Videos
Learn about the Custom Brush in ArtRage 5 with these painting demonstrations and step by step tutorials.
Browse the full Youtube Playlist
Settings
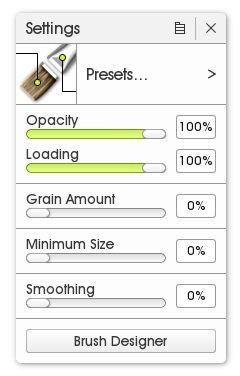
The Settings panel lets you access some of the main options from the Stroke Settings tab in the Custom Brush Designer. These options let you adjust your stroke as you work. If you need to change the dab itself, fine tune the stroke, or edit the color mixing, open the Brush Designer.
The example brush for these images looks a lot like the Airbrush. This is the default setting without any custom head, grain, or other settings. For a much wider variety of brushes with more interesting effects, open the Presets.
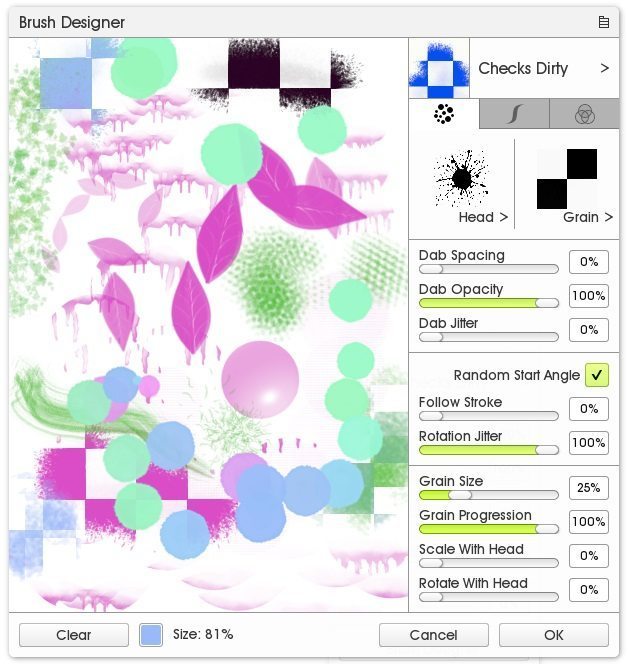
Brush Designer
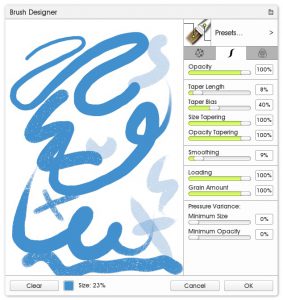
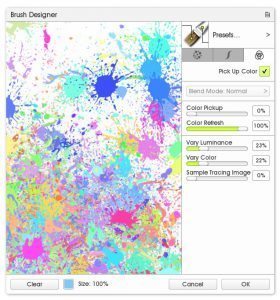
The Brush Designer offers a lot more options for editing your custom brushes. See these pages for help with the Head, Stroke, and Color Settings.
Head Settings | Stroke Settings | Color Settings
Opacity
Opacity controls the overall opacity of the stroke. You can edit the opacity of the dabs separately in the Brush Designer.
Loading
Loading controls how much paint is loaded on your brush and how quickly your stroke dries up. 10% loading will only create short dabs, but 100% loading will never run out of paint.
Grain Amount
Grain Amount lets you use the canvas texture, even with the canvas lighting off. 0% Grain Amount will make a perfectly smooth digital stroke, and 100% Grain Amount will show all the canvas grain.
Minimum Size
Minimum Size lets you set the size variation of the brush stroke. Leave it at 0% for a full range of size in response to pressure, and set it at 100% for a brush that stays exactly the same size at all times.
Smoothing
Smoothing automatically adjusts your stroke to reduce sharp corners and wobble. The amount of smoothing you need for your stroke depends on the size of your stroke and the effect you want.
Create Your Own Digital Brushes in the Brush Designer
The Brush Designer is where you create new brushes for the Custom Brush tool and tweak your existing presets. When you open the Brush Designer, you’ll see a large area of white space, a multitude of sliders and three tabs across the top of the sliders on the right.
The Head Settings are the only thing you need to worry about for basic brushes. This is where you set up what the actual brush dabs and grains look like.
The Stroke Settings affect the lines you draw (smoothing, opacity, taper, loading, size)
The Color Settings allow you to edit the color effects (blending, color variation, blend modes, tracing image)
Test Area
The large area of blank space on the left is for testing out your settings. You can clear the entire canvas using the ‘Clear’ button and change the tool size and color using the options down the bottom (click on the color box to get the color picker, and click and drag or click and enter a number for the tool size).
Learn More!
Tips
It’s definitely worth exploring the Brush Designer. Here are some of the things you can do!
- Set ‘Dab Spacing’ to 0-10% for a solid stroke. Turn it up to 50% or more to scatter images around.
- To create a blender, open the Brush Designer, turn on ‘Color Pickup’ and set the Refresh rate to 0%
- Set Grain ‘Progression’ to 100% to create a repeating background pattern (this is good for screentones and similar effects).
- Set ‘Progression’ to 0% to get solid ‘strands’, such as for hair.
Increasing Performance
While the default presets should perform smoothly, some of the features available in the Brush Designer are very demanding. If your custom brushes are very slow, you can improve performance and reduce the memory usage by adjusting the following settings:
- Dab spacing. A dab spacing of 0% creates a solid line of multiple dabs instead of the single dab you get at 100%. This means it’s using 100 times the memory, and even increasing dab spacing very slightly from 0% to 3% can improve performance noticeably.
- Color pickup options. If your colors are blending live as you paint, this increases the number of calculations required with each stroke.
- Post-stroke effects (smoothing and tapering). The higher the Taper/Opacity/Size/Smoothing effect or the larger your strokes, the more time they will take to apply.
- Tool size and the size of your brush head or grain (if you’re loading a custom image, try and keep it under 500kb, as ArtRage has to load it with every dab). This is a simple ‘image size’ issue – the larger your stroke and brush images, the more content ArtRage has to process with each action.
Changing any one of these settings may significantly improve performance, but different brush effects will require different settings, so there is no one best combination. A hair brush with tiny strands will need a much higher dab space than a repeating pattern, for example. ArtRage’s performance is also affected by your hardware, especially your available RAM, so it may vary noticeably between devices.
Stylus Properties
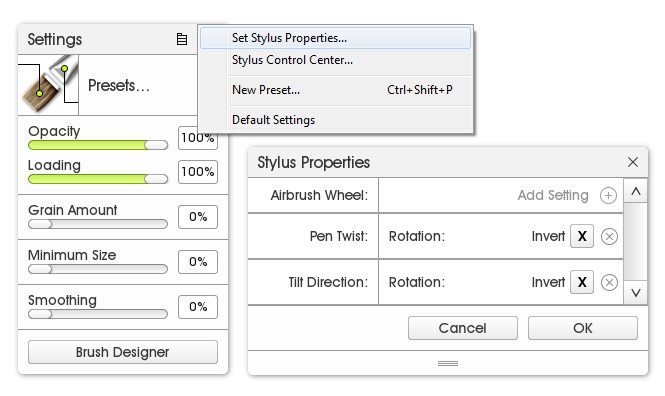
The Stylus Properties let you adjust certain options that aren’t available in Settings, to make better use of your tablet stylus. Not all styluses support the same options. You can save your changes as presets. You may wish to disable ‘Tilt = Rotation’ for certain presets for the Custom Brush.
But What About The Sticker Spray?
The Sticker Spray is the other kind of custom brush that ArtRage offers. The Sticker Spray lets you import custom images with multiple colors and turn them into a very advanced spray effect, with highlights, depth, and all kinds of advanced properties, but you do not need most of these things for simple art brushes.
The Custom Brush offers some things that the Sticker Spray doesn’t have: color blending, canvas texture and the ability to edit the entire stroke, rather than just individual dabs. It’s also easier to create a separate brush shape and brush grain and edit them separately. But if the Custom Brush isn’t meeting your needs, you might want to try using the Sticker Spray instead.