Tracing and References
ArtRage provides a range of tools to help you recreate existing images as paintings or guide you while you paint: Tracing Images and References.
Tracing Images are existing images that can be loaded in to ArtRage and projected on to your canvas to help you choose colors as you paint.
References are items that are pinned to the canvas to give you a guide while painting. They can be existing images, ‘scraps’ of paper to sketch ideas on or mix paint on, or views that display parts of your canvas while you work.
This section explain how to use these systems.
Pods

Tracing Pod: If you do not have a Tracing Image loaded, clicking this Pod opens a file picker to allow you to load one. If you do have a Tracing Image loaded, clicking this Pod opens the Tracing Panel. Click and hold for a menu of Tracing Image options. This Pod contains a preview of the current Tracing Image if there is one.

Refs Pod: Clicking this pod opens the Reference Panel. Click and hold for a menu of Reference options. The Pod indicates how many References you currently have available.
Tracing Images
A tracing image is an existing image of any kind, such as photos or images produced in other software, that is loaded in to ArtRage and projected on to the Canvas like a film projected on to a wall. This allows you to use it as a guide for shapes as you paint, and you can even use it to set the color that will be applied for each stroke. Using a tracing image allows you to recreate existing images using the painting tools in ArtRage and give them your own artistic touches.
The Tracing Panel
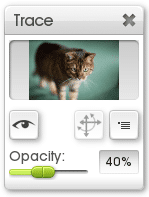
If you have a Tracing Image loaded and you click the Tracing Pod, or if you use the Tracing Panel option in the View menu, the Tracing Panel appears. This panel allows you to load or clear Tracing Images and manage their properties.
The preview at the top of the panel shows the current tracing image, it can be clicked to load a new one. Beneath the preview are three buttons for showing or hiding the tracing image, transforming it, and accessing the tracing options menu for setting the various properties of your image. At the bottom of the panel is an Opacity slider used to set how visible your tracing image is on the Canvas.
Managing Tracing Images
You can load a tracing image using the option in the tracing options menu in the Tools menu or on the Tracing Panel. This menu also allows you to clear the current tracing image. Clearing the image removes it completely, unlike hiding it which leaves it invisible but still usable.
The Convert Tracing Image To Paint option in the tracing image options menu allows you to convert the current tracing image to paint on the current layer.
When you select this option the tracing image is immediately recreated as paint on the Canvas so you can smear and work with it as if it was an imported image.
Automatic Color Selection
ArtRage can automatically select colors from the currently loaded tracing image as you paint. The first time you load a tracing image this happens automatically, but you can turn the feature on or off using the tracing options menu in the Tools menu or on the Tracing Panel.
When the automatic color selection option is on the color picker updates to indicate this. Click the text to turn automatic selection off if you wish.
Every time you start a paint stroke with this option on ArtRage selects the color that is under your pointer in the tracing image. This lets you concentrate on the shape and flow of the strokes rather than the color.
Positioning Tracing Images
The tracing options menu in the Tools menu or on the Tracing Panel allows you to set the scale of your tracing image. The options in the Tracing Image Scale menu allow you to control whether the image is stretched to fit inside the Canvas, stretched so that it retains its original shape but fills as much of the Canvas as it can, or repeated to fill the Canvas if it is too small to do so on its own.
The Manual Scale and Tile options allow you to use the Transform button on the Tracing panel to move and scale your tracing image as you wish. At any point while you are doing this you can use the reset option in the Tracing Image Scale menu to reset the image back to the center of your Canvas.
References
References are pieces of paper that are pinned to your canvas to act as a visual guide or aid to painting. There are three types of Reference, each of which has different properties:
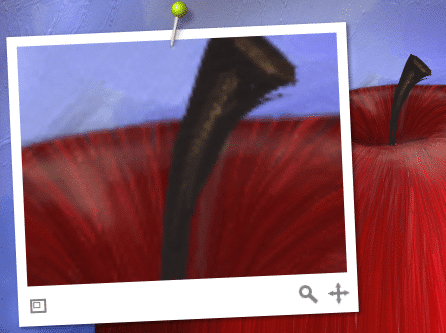
Reference Image: An image such as a photograph that is pinned to the canvas to act as a visual guide.
Scraps: Scraps are mini-canvases you can paint on. They are pinned to the canvas and can be used as mixing palettes or test areas for painting without altering your canvas.
Views: Views are alternative ‘windows’ in to the canvas. A view can be set to display all or part of the canvas and lets you zoom and pan independent of the main canvas window to view other areas while you work.
This section explains the differences between the three types and how you work with them from the References Panel.
The References Panel
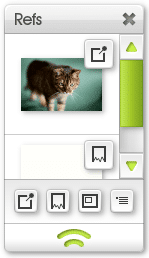
When you click the References Pod the References Panel opens. In this panel is a list of all the References currently available.
Each item in the list has an icon at the top right indicating what type of Reference it is. Clicking that icon brings up a list of menu options for it.
At the bottom of the list is a set of buttons for adding new References and accessing general Reference menu options.
When you hover the mouse over one of the References in the list, a Show/Hide button appears. Click it to toggle the visibility of the Reference. This button will remain visible when your pointer moves away from it if the Reference is hidden.
Manipulating References
You can add or remove References using the Reference Options menu in the Tools menu or from the References Panel. To remove an individual Reference either use its menu in the list in the References Panel or right click the Reference itself for options.
You can manipulate the size, position and rotation of a Reference by clicking and dragging on its area in various ways.
- Move: Click and drag in the control tray at the bottom of the reference, or right click and drag the reference anywhere inside its body.
- Scale: Click and drag in the white border at the corners of the reference.
- Rotate: Click and drag in the white border on the edges of the reference.
- Use two fingers to drag on the Reference to move it.
- Use two fingers and pinch inward or outward on the Reference to scale it.
- Use two fingers and twist on the Reference to rotate it.
You can drag References anywhere on your desktop, they do not need to stay inside the area of the canvas.
Right click a Reference for additional options you can use to hide or remove the reference.
Reference Controls
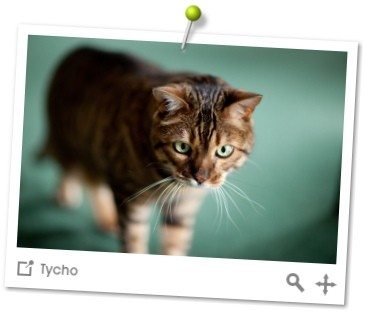
Every Reference has a set of controls that appear underneath it in a ‘tray’ that slides out when your mouse is pointing at the Reference. These controls allow you to access the Reference Options menu for the specific Reference, and manipulate its contents.
Different types of Reference have different controls and options detailed below but there are some controls common to all Reference types:
Type Icon: You can tell what type of Reference an item is by looking at its Type Icon. Click the icon to get a menu of options for the specific Reference.
Internal Scale: You can change the scale of the contents of the Reference by clicking and dragging on this control. This does not scale the Reference, it scales the image you can see inside it.
Internal Position: You can change the position of the contents of the Reference by clicking and dragging on this control. This does not move the Reference, it moves the image you can see inside it.
Reference Images
Reference Images are pre-existing images that can be pinned to the canvas to act as a guide while painting. When you create a new Reference Image you will be asked to load an image from disk.
Reference Images display the name of the file that created them in their control tray.
Hold down Alt (Windows) / Option (OS X) to sample color from a reference image.
Scraps
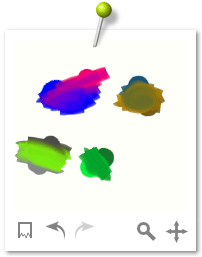
Scraps are mini-canvases that can be painted on using the current tool.
Scraps can be used as mixing palettes, pieces of paper for jotting down notes or ideas, or surfaces for experimenting with tool settings without having to edit your main canvas.
Scraps use whichever tool is currently selected in the main tool picker and whatever color is currently selected in the main color picker.
Scraps have their own Undo / Redo system that can be accessed using the Undo and Redo buttons on the Scrap’s tool tray.
Views
Views are alternative displays of your canvas that update live as you paint.
Painting in a View will apply paint to the main canvas in the area the View indicates, on the current layer, and any paint applied in the main canvas will be displayed live in the View.
Views allow you to keep track of specific areas of the canvas when you need to monitor how changes you are making might be adjusting areas you’re not zoomed in to or not looking at directly.