Organizing Your Layers in ArtRage
Layers are a powerful tool that can allow you to quickly make changes to your painting without damaging paint above or below, but understanding them can be difficult. This section explains what layers are and how to add, remove, and organize, them.
What are Layers?
Layers are like sheets of transparent paper that can be stacked on top of each other and painted on. As many of these sheets can be stacked on top of each other as you like, and you can paint on any of them at any time. This means you can build up a painting by putting different parts of it on different sheets.

For example, a painting of an apple might start out with the table and background on their own layer, then on to a new sheet above you paint the apple itself.
The apple covers the table, but you could at any time erase it and still see the table behind because the table and apple are on their own sheets.
Layers can be used to simulate the drying of paint. Take the apple example again: If you paint the table on a real canvas, you would generally wait for the paint to dry before painting the apple over it. In our case, we paint the table on a Layer then add a new transparent Layer so that we can paint the apple. The table paint beneath is still there but it’s not mixing with the apple paint, so it’s like we’ve left the table to dry. Of course, if we want we can still go back and paint on the table layer and it will be like it was before, wet and smearable, but it still won’t blend with the apple.
When there’s a transparent area of a layer, we illustrate this in its preview by putting checkers in the hole. You can see this in the apple layer above.
As explained in the section on The Canvas above, all layers are transparent and sit on top of the Canvas so you can see the Canvas Texture through them. If we make the background Canvas transparent we’d see checkers in our painting, not just the mini-preview. Don’t worry, those checkers won’t be there if you print your painting or Export it. They also won’t blend with your colors as you paint.
For more information on how to work with layers in ArtRage see The Layers Panel.
Types of Layers
There are three types of layer in ArtRage:
- Paint Layers: These are normal layers that can be painted on with all the normal painting tools.
- Text Layers: These layers contain text that can be edited with the Text Tool.
- Sticker Layers: These layers contain Stickers that can be edited using various tools.
For more information on how to recognize what type a layer is see The Layers Panel.
Layer Groups
Sometimes in a complex document that has many layers you might want to group them together to make it easy to locate them, to edit them, or to show or hide them while you are working on other things. In our apple example above, we might want to hide the apple so that we can see the table layer beneath and paint in the contents of the white hole. But what if the apple was painted on to its own set of layers, rather than just one?
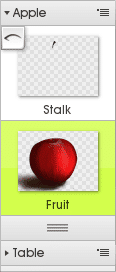
In this example the apple and table layers have been grouped together differently. The apple is actually made up of multiple layers of paint on top of each other, which we can see when we open up the Layer Group it’s in.
When the group is opened, we can see that the apple is made up of two different layers. The stalk is at the top, the main body of the apple is below. The advantage to placing these items in a group is that you can collapse it down so that you don’t need to see them when you’re working on other things. Better yet, if you want to make the apple smaller you can just make the Apple group smaller and everything inside it scales as well.
At the bottom of the Layer Panel is a button that allows you to create a new Layer Group.
The Layers Pod

When the Layers Pod is visible click it to show the Layers Panel. Click and hold down on it for a menu of layer options. The Layers Pod shows a preview of the contents of the current layer.
The Layers Panel
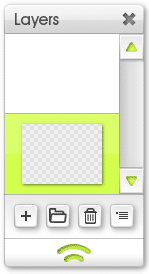
The Layers Panel contains all the controls you need for creating and manipulating layers. It contains a visual stack of all of your layers with previews of their contents and controls for each of them.
The + button adds a new layer above the current layer. The Folder button adds a new layer group. The trash can button deletes the current layer. The menu button provides options for the current layer.
This section contains information on how to use the various options available in this menu and in the layer thumbnails.
Layer Thumbnails
The top area of the Layers Panel is taken up by a list of layer entries. Every layer you have in your document is represented here by a thumbnail that has additional controls for manipulating that layer.
The layer thumbnails are stacked in their vertical order on the Canvas, so the topmost thumbnail is the topmost layer visible in your painting. When you create a new layer it is added on top of the currently selected layer.
The current layer is lit up in the stack. This is the layer you will be applying paint to if you paint a stroke on the Canvas. To select a layer for painting, click the thumbnail.
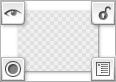
When your mouse hovers over the thumbnail a set of buttons becomes available. The buttons fade out when your mouse pointer leaves the area of the layer unless they are indicating that the layer has a special state. Which buttons appear depend on the type of layer you are pointing at:
Layer Visibility: Click to set whether the layer is visible on the Canvas. If the layer is not visible, the eye icon loses its central dot. This button stays visible if the layer is hidden.
Layer Opacity: Click and drag up and down on this button to change the opacity of the layer. The circle fills in to indicate how opaque the layer is. If you hover the mouse over this button the Tooltip will indicate your precise opacity. Click this button to enter the opacity value manually. This button stays visible if the layer is not 100% opaque.
Menu Button: Click for a list of layer options. When you use the layer thumbnail menu button rather than the menu bar layer options menu item or the menu button at the bottom of the Layers Panel the options refer to the layer you clicked, not the current layer.
Layer Locks (Paint Layers Only): This button allows you to lock various aspects of the layer to prevent editing. If the lock icon is open then nothing is locked, if it is closed then some aspect of the layer has been locked. Locks can be applied as follows:
- Lock All: This option prevents any changes being made to the layer.
- Lock Transparency: Locks the layer so that no new areas of paint can be added. Existing paint can be changed but where there is no paint on the canvas already, no new paint will be added when you make a stroke.
- Lock Paint: Locks the layer so that new new areas of paint can be added and existing paint cannot be modified by paint strokes.
- Lock Position: Locks the layer so that it cannot be scaled or moved by the Transform tool.
This button stays visible if any lock is applied to the layer.
Text Options (Text Layers Only): Click for a set of options for the text layer. This button is always visible for text layers.
Sticker Options (Sticker Layers Only): Click for a set of options for the sticker layer. This button is always visible for sticker layers.
Layer Blend Mode: This button is only visible if you have selected a layer blend mode other than ‘Normal’ from the layer options menu. The icon indicates the current mode if it is Tint (T), Shadow (-) or Highlight (+). Any other mode is indicated by an ellipsis. Click the button to select a new Blend Mode for your layer.
Layer Groups
Layer Groups are represented by two icons in the stack of thumbnails: A title bar and a grip. Click the name in the title bar or the grip to open or close the group.
When a group is open all the layers it contains are displayed between the title bar and the grip and the folder icon on the group title bar will open up.
The group menu button on the right side of the title bar gives you options for the group including setting the group name and opacity value.
Naming Layers
If you want to give a layer a name so that it is easier to locate in the future click the Menu Button on the layer thumbnail and select the ‘Set Layer Name’ option. Enter a layer name and click OK and the thumbnail will update to show the new name. If you enter a blank name, the layer name will vanish from the thumbnail.
Creating New Layers
To create a new layer click the ‘+’ button at the bottom of the Layers Panel. You can also select the ‘Add Layer’ option from the layer options menu. If you want to make a copy of the current layer select the ‘Duplicate Layer’ option from the layer options menu.
If you are using a tool that relates to a special layer type such as the Sticker Spray or Text Tool you do not need to create a new layer to use them. If you have a Paint Layer currently selected, clicking with either of those tools automatically creates a new layer of the correct type for their content. If you have already added a layer but have not added any paint to it, clicking in that layer with the Text Tool or Sticker Spray converts the layer to the appropriate type for editing with the tool.
If you try to paint with a painting tool on a non Paint Layer ArtRage will automatically create a new layer for the paint to go on.
You can create a new Layer Group using the folder button at the bottom of the Layer panel or by selecting the Add Layer Group option in the layer options menu. When you create a new Layer Group it is added above the currently selected layer.
Moving Layers
You can move layers around in the stack to change the appearance of your Canvas. To move a layer click and drag it up and down.
While you are dragging, an arrow in the stack indicates where the layer will be dropped when you release the mouse button.
If the arrow points between the title bar and grip of a Layer Group the layer will be dropped in to the group. If the group is closed, the layer will not be visible in your stack when you drop it.
Exporting Layers
The layer options menu allows you to export the contents of a single layer to an image file. Because layers have transparency, you should export to a file type that supports transparency such as PNG if you are exporting a single layer.
The Export Layer To Channels option exports the layer to a series of files that contain the different values that make up an ArtRage layer including the color of the layer, its paint volume and its reflectivity. This option can be used if you want to import layers from ArtRage in to a 3D package for rendering.
Merging and Flattening Layers
You can merge multiple layers in to a single one if you are sure you do not want to edit them independently any more. This can save memory in large documents, or allow you to blend paint that was applied to different layers. To do this use the layer options menu.
Merging the current layer down causes the currently selected layer to merge with the layer directly beneath it. Merging all layers causes the entire painting to be merged in to a single layer. The contents of Layer Groups can also be merged in to a single layer by using the option menu in the group title bar.
When layers are merged, any layers that are hidden are discarded. The merged result is intended to look like the Canvas you can currently see so before merging all layers or a layer group make sure that the right layers are visible.
If you want to use standard paint tools on a Sticker Layer or a Text Layer you will need to convert the layer to a Paint Layer. The Text and Sticker icons that appear at the top right corner of the layer thumbnail for those layer types provide an option to flatten the layer to paint. This converts the layer to a Paint Layer.
When you flatten a text or sticker layer you can no longer edit it using the original tool that created it. So if you want to edit text you add to a layer, avoid flattening that layer.
When a text or sticker layer is merged with any other layer it is autom