How to quickly recolor an area of paint in ArtRage
If you need to quickly repaint an area of your work or edit the color of the image in ArtRage, you have several options, from automatic filters to the fill tool.
Note: These tips all refer to ArtRage 5. If you have a different edition, you may not have all the same options available.
On This Page:
- Filters
- Fill Tool
- Selections and Masking (Stencils)
- Layer Effects
1. Filters
Filters automatically adjust or edit a single layer. If you need to edit your entire painting, you will either need to merge all layers, or do each layer one at a time.
To find the included filters, go to Edit > Filters. You can also add custom Photoshop filters, but you may need to run the 32 bit version of ArtRage (many filters found online are still 32-bit), and they may not always be compatible.
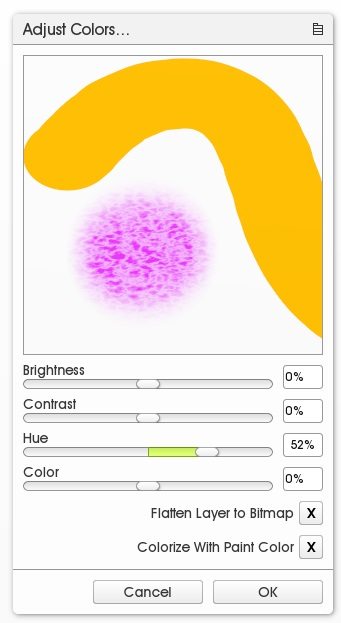
Adjust Layer Colors
This filter lets you adjust contrast, brightness, hue, color intensity and add color to grayscale. You can also ‘flatten to Bitmap’, which means all the 3D highlights and shadows just become flat paint pixels instead. It is usually the easiest way to quickly change the color of an entire layer.
You can convert a sketch to pure grayscale by setting ‘Color’ to 0% or add color to a greyscale image by choosing a color in the color picker and then selecting ‘Colorize with Paint Color’.
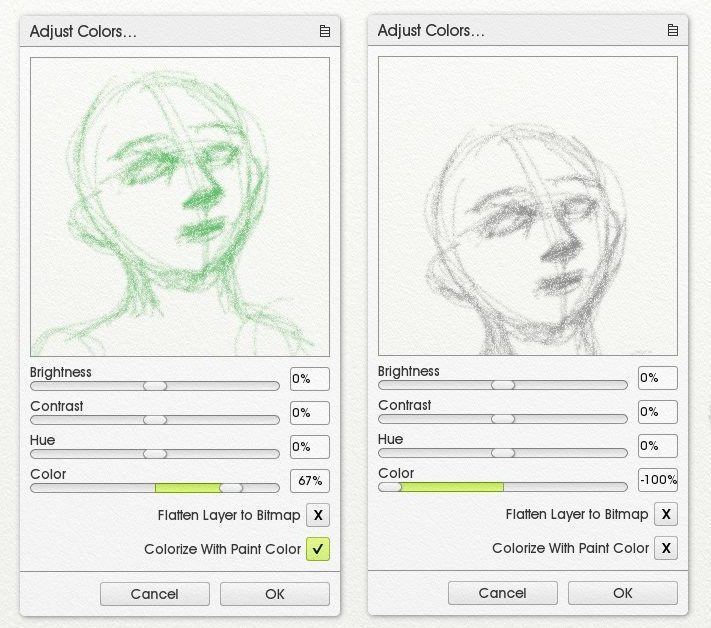
Note: If adding color to grayscale paint, you may need to increase Brightness significantly to see a color change. Semi-transparent black paint may appear gray, but is still actually black so may be difficult to add new color to.
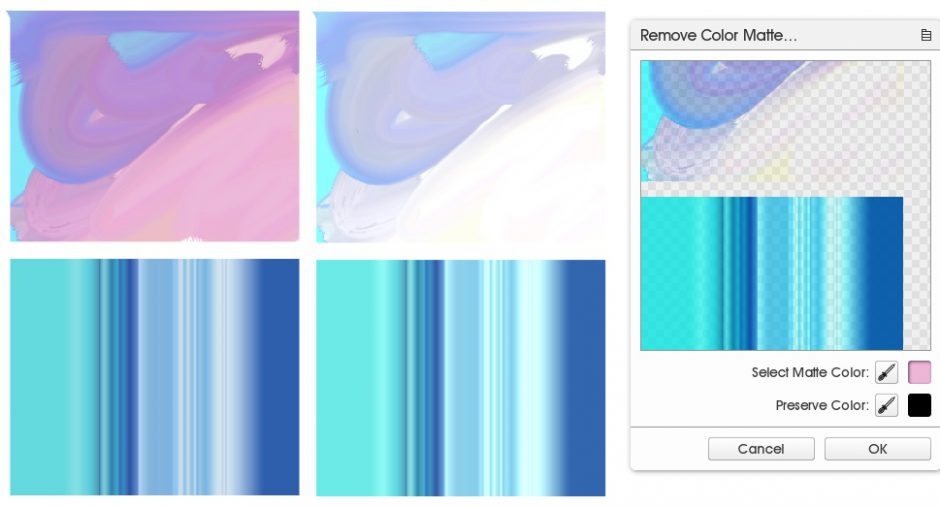
Remove Color Matte
This filter does not change a color to another color, but deletes it completely. Use this filter to remove all of a particular hue (for example, a white background, or red lighting) from your picture. Learn more about how to use the Remove Color Matte filter here.
2. Fill Tool
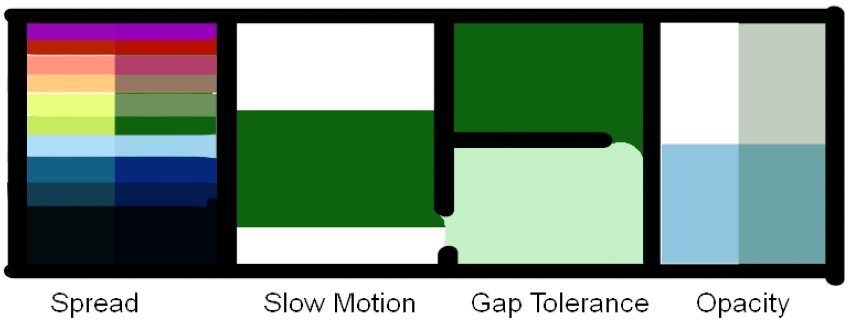
The Fill Tool is often the easiest way to change the color of a specific area within a layer instead of the entire layer at once. The Solid Fill will flood one area of color with a different color, and you can adjust the settings to get different effects. For example, lower Opacity to subtly tint existing colors and increase Spread to get the new color to spread out further into other colors. You can also use the Slow Motion, Gap Tolerance and Border Fill settings to get more controlled effects.
For help using the different Solid Fill settings, see the Solid Fill guide. The Fill Tool also lets you add custom repeating patterns and gradient effects.
Note: If you want to use a Pattern or Gradient Fill, then you need to mask out the area of paint using one of the options below (Stencils, Selection, or Lock Transparency).
3. Masking with Stencils, Selections, Lock Transparency
But what if you want to completely repaint an area, not just adjust the color? There are three different ways to mask or select a specific area of paint so that you can freely repaint that section and nothing else.
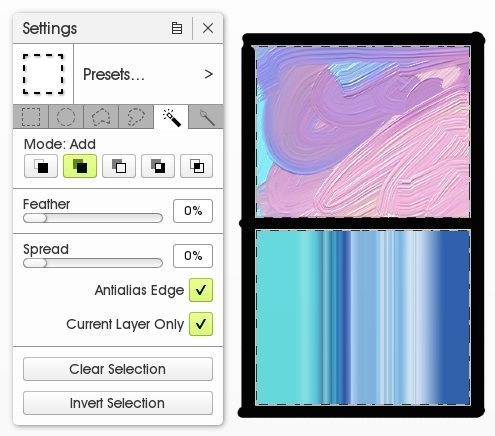
Stencils
Turn a layer into a stencil to create a perfect mask over the areas of existing paint. Invert that stencil to mask all the transparent areas, so that you don’t have to worry about going over the edges. You can also add default stencils, like multiple rulers or a circle shape, and position them to block out shapes and edges.
Lock Transparency
The Layers menu allows you to lock all the paint on a specific layer so that it can’t be edited. You can also simply lock the transparent areas instead, so that you can’t add any new paint to the empty parts of a layer. This lets you easily and quickly recolor existing paint.
Selections
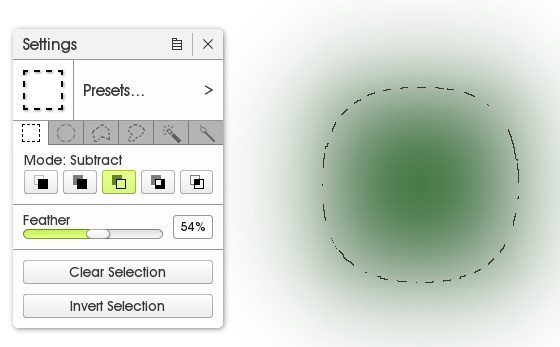
You can use the selection tool to draw shapes, select entire areas of color with Magic Wand, or paint out custom areas using Paint Area. Once you have created your selection, you can add or remove areas from it by using the ‘Subtract’, ‘Add’ or ‘Difference’ modes, invert it, move it around, or switch to other layers while retaining the same selection shape.
Adjusting Feather will allow you to select shapes with soft edges and decreasing opacity.
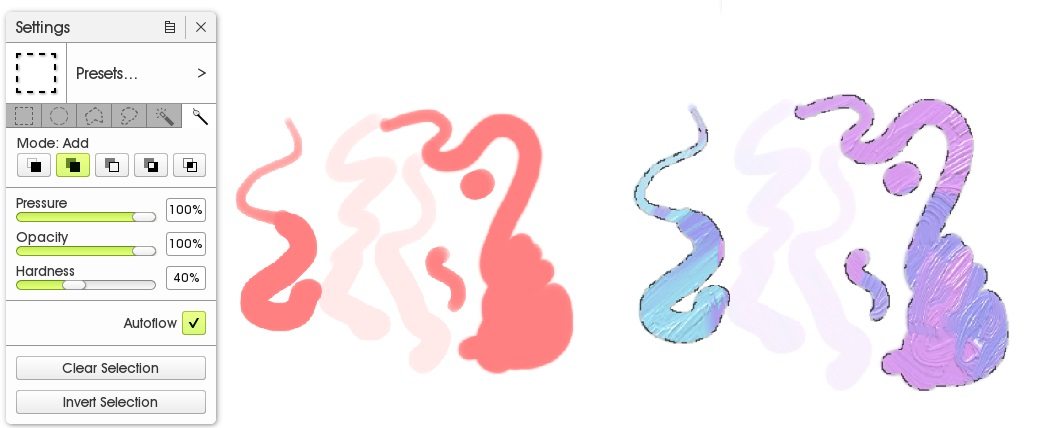
‘Paint Area’ in the Selection tool acts like a stencil that you can paint onto the canvas itself. Use it to mask out areas and adjust opacity and size as you draw, using the tool settings. You can invert your final selection (as in the example below).
4. Layer Effects
The Layer Effects let you add shadows, embossing or glow effects over or around existing paint. If you want to tint all the paint on a layer with a specific color, choose ‘Inner Glow’ and adjust the radius to tint the paint area with a single color. Changing the opacity lets you adjust the strength from ‘slightly tinted’ to ‘solid and even’ and get exactly the results you want. The radius of the glow will only affect a certain distance from the edge of your paint, so if you have a large area of solid color, the Fill Tool (on low opacity) will usually work better.

If you just want to add a visible texture or background pattern, then you can load a custom texture in the Emboss Surface tab and set the Emboss are to cover the inside of the paint. See this guide for ways to edit texture in ArtRage.