ArtRage Canvas
The ArtRage Canvas is the sheet of material on to which all of your paint strokes go. It sits underneath your Layers and acts as a backdrop for everything you do. This section explains how you can navigate around your Canvas and how to change its visual and textural properties.
Navigating the Canvas
As you work with ArtRage you may find you want to change the position of the Canvas, or rotate it or zoom in or out to see different detail. There are a number of different ways to do this. Mouse and keyboard shortcuts provide a quick and easy way to move around, but the Canvas Positioner can be used if you want more accurate control.
Menu Options
At the top of the View Menu you will find a Canvas Position menu that allows you to control zoom level and reset individual navigation properties of the Canvas. You will also find the Canvas Positioner option if you want to open the Positioner.
Mouse and Keyboard Shortcuts
To navigate around the Canvas using the mouse:
Move the Canvas: Right click and drag and the Canvas will move.
Zoom the Canvas: Hold down Ctrl (Windows) / Cmd (Mac OS X) and right click and drag right and left, and the Canvas will zoom in and out.
Rotate the Canvas: Hold down Option (Mac OS X) / Alt (Windows) and right click and drag, and the Canvas will rotate.Instead of using a right click you can use a left click if you hold down the spacebar. For example, to move the Canvas you can hold down the spacebar and left click and drag, to rotate the Canvas you can hold down the spacebar and the Option / Alt key and left click and drag.
- Use two fingers to drag on the Canvas to move it.
- Use two fingers and pinch inward or outward on the Canvas to scale it.
- Use two fingers and twist on the Canvas to rotate it.
Canvas Positioner
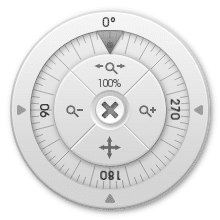
The Canvas Positioner can be kept open if you find you want to make many precise adjustments to the Canvas position while you are working with ArtRage. It can be opened using the easel button on the Menu Bar, or with the Canvas Positioner option in the View Menu.
Move The Canvas: Click and drag on the move icon in the panel to move the Canvas.
Zoom The Canvas: Click and drag up and down on the magnifying glass icon in the panel to zoom the Canvas in and out. You can also click the percentage indicator text in the Zoom Button to set zoom level by entering a number.
Rotate The Canvas: Click and drag in the outer ring of the panel, this causes the Canvas to rotate. The dot on the ring shows you the direction the top of the Canvas is pointing. If you click the arrows around the edge of the ring the Canvas will immediately jump to that angle. You can also click the rotation indicator above the top arrow to set the rotation by entering a number.
You can close the Canvas Positioner by clicking the X button in the middle. You can move the Canvas Positioner by clicking and dragging in the area outside the rotation ring.
Behind the Canvas
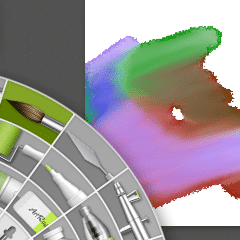
If you move the Canvas so that it does not fill the ArtRage window you will be able to see the area behind it. That area is tinted with a single color that you can adjust if you want to make the Canvas clearer.
In the ‘Interface’ section of the ArtRage Preferences Panel you will find the ‘Background Color’ option which can be used to change the color beneath the Canvas.
Canvas Properties
The look of the Canvas and how other tools interact with it is controlled using settings that are available in the Canvas Panel. You can open the Canvas Panel using the Canvas Settings option in the View Menu.
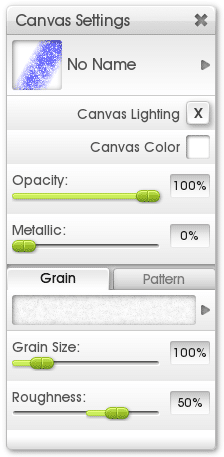
This panel contains all of the options available for defining how your canvas looks.
At the top of the panel is a preview of the current canvas, and if a preset has been selected its name will appear here.
Click the top preview area to get a menu of canvas options including the ability to reset your canvas, store default canvases, and load presets from the Canvas Collection.
The following options are available in the Canvas Panel:
- Canvas Lighting: The texture of the canvas and the paint strokes that you apply is created by a ‘Lighting’ system. Turning off the Canvas Lighting removes all texture effects so paint texture will vanish and the canvas will appear perfectly flat.
- Canvas Color: Click the color sample to choose the color of the canvas. Click and hold to bring up a Popup Color Picker for quick selection.
- Opacity: Controls how opaque the canvas is. Transparent Canvases in ArtRage are represented by checkered squares. When Exporting files it is important to remember that a transparent Canvas is not understood by all file formats, and some other applications don’t recognize them even if the file format does. For more information see the section on Importing and Exporting.
- Metallic: Controls how metallic the surface of the Canvas is. Metallic Canvases reflect light differently and if this value is high the Canvas Texture will become much more visible.
- Grain and Pattern Tabs: These tabs give access to specific controls for the Canvas Grain and Canvas Pattern.
Canvas Grain
The texture of the canvas is defined by a Grain image. The grain image defines the high and low points of the surface of the canvas which, in turn, interacts with the painting tools as you work.
When you select the Grain tab a set of controls appear for selecting and manipulating the canvas grain.
- Preview Control: This displays the current Grain image. Click in this area to select a new image either from disk or from the Grain Collection.
- Grain Size: Controls how big the grain is. The higher the value the larger the grain will be.
- Roughness: Controls how rough the Canvas Texture is. The value can be taken up to 100% or down to -100% to invert the high and low points of the grain. The closer the slider is to its edges, the rougher the grain will be and the more it will affect paint strokes.
Canvas grain images are black and white, they use the brightness of the image to determine what is a high point and what is a low point in the texture. Dark patches will become dents in the Canvas, while light patches will become peaks.
You can create your own Grain Images and import them to the Grain Collection by clicking the grain preview and using the Resource Collection panel to import a new item.
Canvas Pattern
Canvases can have colored patterns applied to them to represent colored variations in the surface. For example, a hand made paper might have tiny colored threads in it, or a natural surface such as wood or stone might have color variations.
When you select the Pattern tab a set of controls appear for selecting and manipulating the canvas pattern.
- Preview Control: This displays the current Pattern image. Click in this area to select a new image from disk or from the Pattern Collection, or to clear the current image.
- Opacity: Controls how opaque the Pattern is against the canvas.
- Scale: The Pattern image is applied in tiles to fill the canvas. This slider controls the Scale of the pattern image. 100% indicates that the Pattern will be at its normal image size.
Default Canvases
Clicking the preview at the top of the Canvas Panel opens a menu that allows you to set and clear the Default Canvas. If a Default Canvas is set ArtRage will use that canvas whenever a new file is created.
If you have a Default Canvas set you can clear it using the same menu. If no Default Canvas has been set ArtRage uses a basic paper when new files are created.
Resizing the Canvas
If you want to resize your Canvas there are two ways to do it: Resize the Canvas along with its contents, or expand or crop the Canvas without changing its contents.
Resizing the Canvas is like taking a piece of patterned elastic and stretching it, the patterns expand with the elastic as it grows. Expanding or Cropping the Canvas is like taking a piece of paper with a picture on it and either sticking more paper to it to expand the space you can draw in, or slicing off part of the paper, reducing the area available for drawing in but not changing the size of the contents.
These two types of resizing can be achieved using the ‘Resize the Painting’ and ‘Crop/Expand the Canvas’ options in the Edit Menu. Both options bring up a panel that allows you to define the new target size for the Canvas.
Resizing
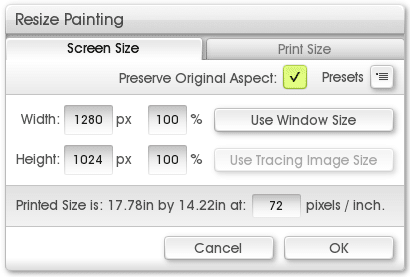
To stretch or shrink the Canvas and all its contents select the ‘Resize the Painting’ option from the Edit menu. This option brings up a resize panel that allows you to enter a new size for the painting.
The basic size settings in this panel work in exactly the same way as the ones in the New File Panel. See Creating a New File.
There are two important new settings:
Preserve Original Aspect: If this item is turned on, the size you entered will be automatically adjusted to maintain the original width to height ratio of the painting. For example, if you have a 200 x 200 painting (square aspect) and you have this item ticked, if you set Width to 300 Height will automatically adjust to 300 to maintain the aspect. If you want to change the aspect of the painting, turn this item off.
Percentage Size: You can size the Canvas to a percentage of its original size if you wish. Next to the Width and Height items are percentage text boxes that allow you to enter a percentage size to use.
If you edit the Pixels Per Inch setting when you are in Screen Mode the size of the Canvas will not change (remember that Pixels Per Inch just tells the printer how many pixels you want it to print in an inch, so you’re not actually changing the screen size of your painting when you edit that setting). The print size will update to reflect the change.
If you click OK the entire Canvas and all of its contents will be changed in size to match the new size you requested.
Cropping / Expanding
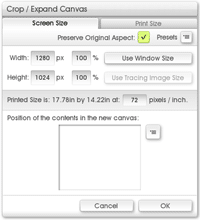
To change the area of the Canvas without changing the size of its contents select the ‘Crop / Expand the Canvas’ option from the Edit menu. This option brings up a Crop/ Expand panel that allows you to enter a new size for the painting.
The basic settings in this panel work in exactly the same way as those in the Resize panel detailed above. There is one additional set of controls:
Position Of Contents: At the bottom of the panel is a preview showing you where your current Canvas contents will be inside the new area of the Canvas. When youchange the size using the controls at the top you can drag the preview below around to position your painted contents.
If your new Canvas size is smaller than your painted contents you will lose any content that is not on the Canvas after the resize. You can Undo the crop if you want to after it is completed.
The menu to the right of the content preview allows you to quickly select default positions for the content inside the new Canvas area.
If you click OK the Canvas will be resized to the new size but the contents left at their original size.
Crop to Selection
The Crop To Selection item in the Edit menu allows you to crop the Canvas down to fit a selected area. Select the area you wish to appear in the new Canvas space and select this option. The Canvas will be trimmed to fit just t