How To Color in ArtRage for Manga Art
This tutorial follows on from Drawing Manga in ArtRage: Sketching and Inking and Drawing Manga in ArtRage: Tools & Canvas and assumes you start with a drawing that you want to colour.
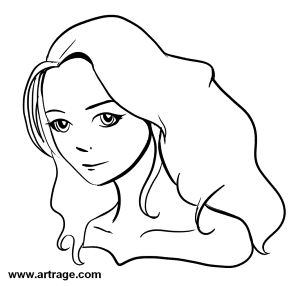
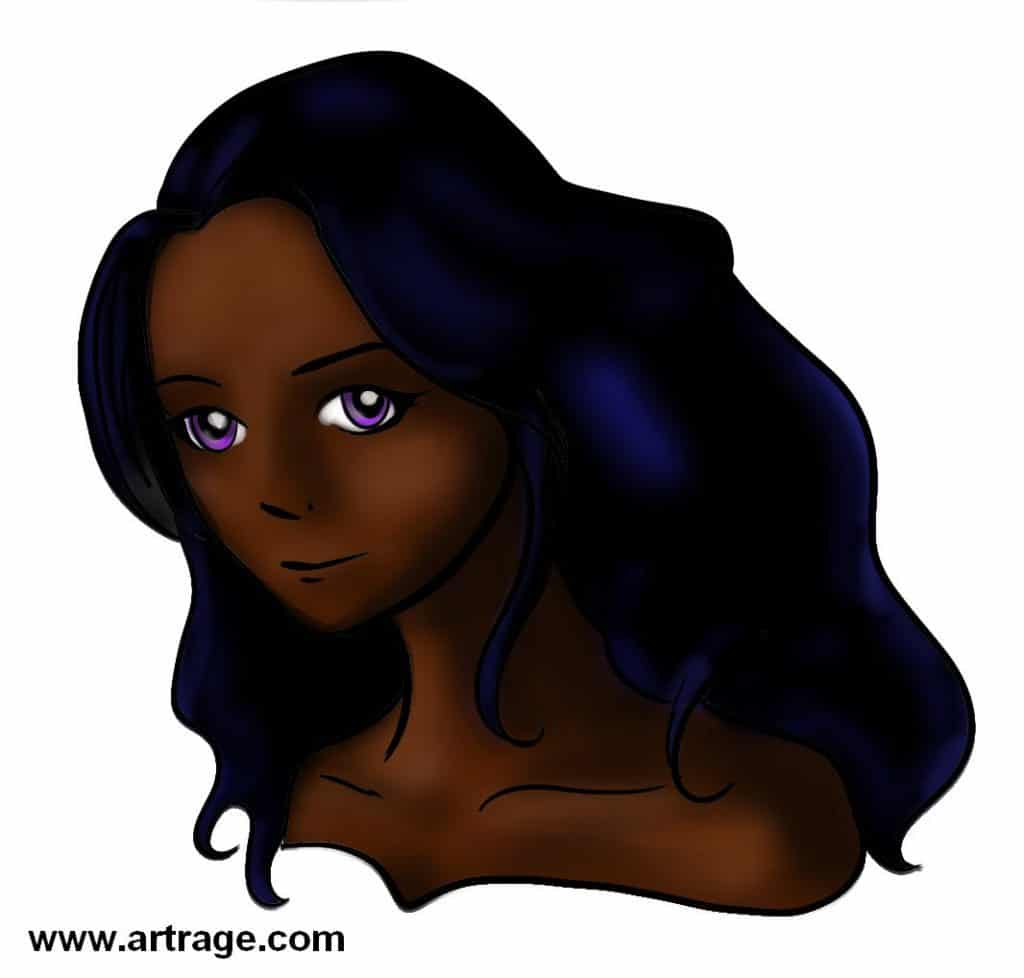
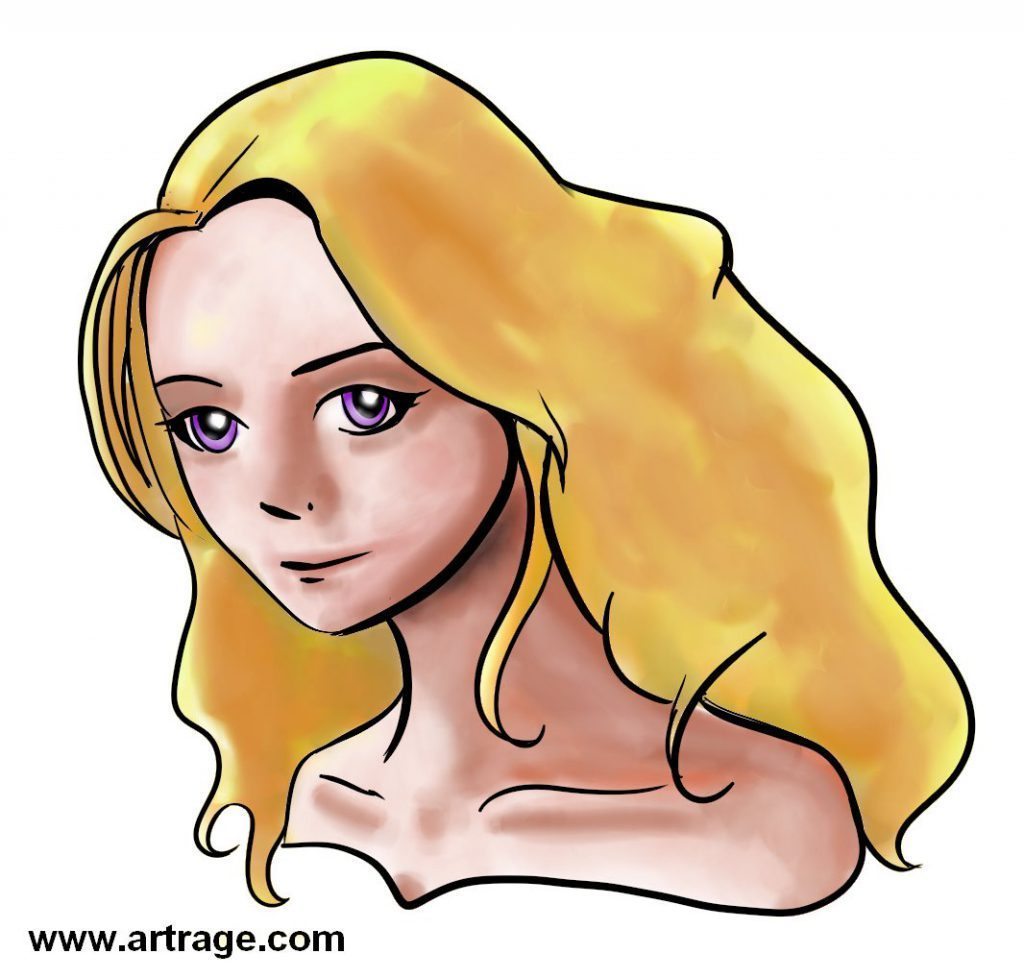
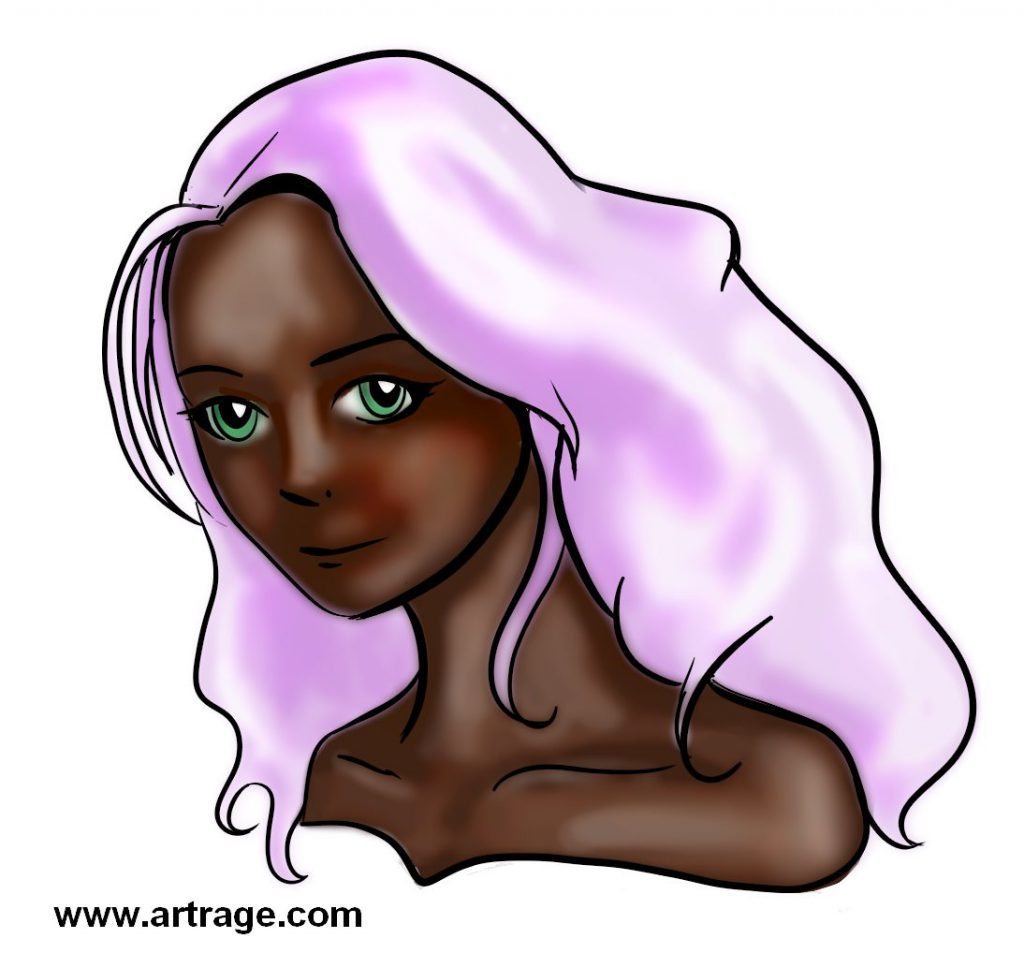
Ready to colour? Great! (If you need a line art, you can download the picture on the right and import it into ArtRage). Most manga-style art begins by laying down flat colour inside the lines, so add another layer under the line art and choose your colouring tool of choice. If you’re not sure what to choose, then keep reading!
This is an ArtRage 4 Tutorial
This tutorial assumes that you are using ArtRage 4. While most of these options are available in other editions (including the mobile apps!) the menus may look a bit different, and some of the most advanced settings are only in ArtRage 4.
If you don’t currently have ArtRage, you can download the demo and follow along!
Real Colour Blending
ArtRage 4 offers a realistic blending mode. This isn’t on by default, so you need to turn it on by going to View > Color > Real Color Blending.
Turning it on will give you a more real world result (for example, blue and yellow will be green) and mixed colours will generally be a bit more intense. Leaving it off will mean that the colour mixing acts the same way as other digital art programs and everything will be slightly greyer overall.
For more about how colour works in ArtRage, see the manual and this guide to custom colour palettes.
Colouring
What effect are you looking for? What tools do you enjoy using?

Different people prefer different techniques, but the tools you choose will matter. If you prefer full control, or flat colours and distinct shadows and highlights, you are probably best off with the non-blending tools like the Fill Bucket and the Ink Pen. You can then soften the edges by blending it using the palette knife, blur layer filter or Airbrush.
If you prefer naturally blending as you go, then the Felt Pen or Airbrush are probably the best tools to start with. All of ArtRage’s natural media tools (oils, watercolour, pencil, wax/chalk) will blend into each other as well, so you can easily switch to a different tool for a specific effect as you become more comfortable with the options available.
Because we’re working without paper texture, a lot of the tools may seem fairly similar, but if you turn textures back on, you’ll start seeing some huge differences. They also ‘feel’ different to use, in ways that are hard to explain without actual trying them. Test a few and see which you like best!
You can also use custom brushes, gradient fills and stencils (masks) to get very specific effects, but that’s a bit advanced for this tutorial (though there are some examples below!).
There are two approaches to colouring an existing drawing. Both can end up looking very similar, and require you to build up detail
- Fill the entire area (e.g. the face, the hair) with colour, then add shading and highlights. This allows a lot more control, but can take a lot longer.
- Figure out the areas of darker and lighter colour as you go, and blend them as you paint.
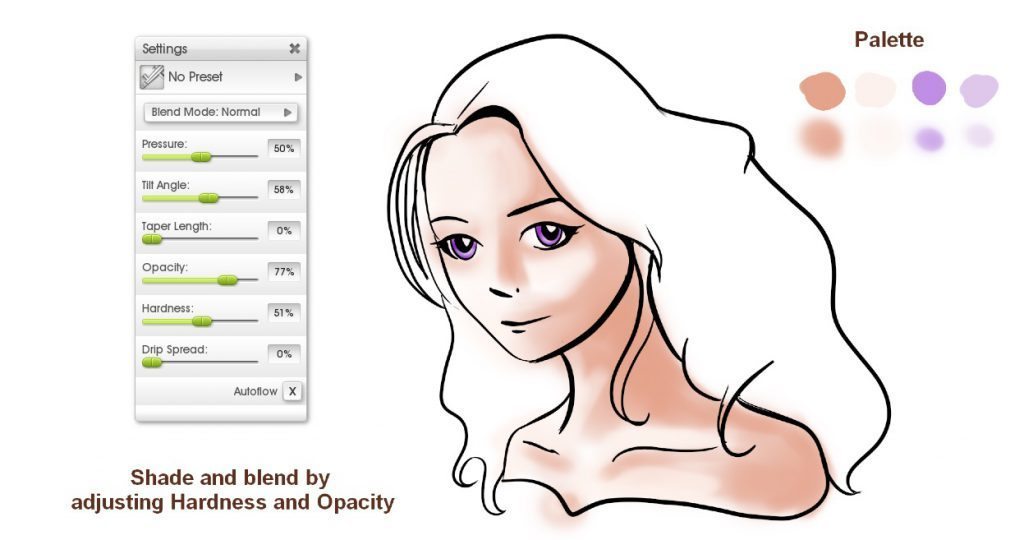
Ink Pen
The Ink Pen is one of the most ‘digital’ tools and gives you a great deal of control. It doesn’t interact with the canvas texture, other media, or lighting and therefore is completely flat.
- To use it to colour, turn Taper and Smoothing off, and set Aspect to 100%
- Lowering the Opacity produces a good layering effect that you can use to create shadows and highlights
- You can use another tool to blend everything smoothly together at the enedd
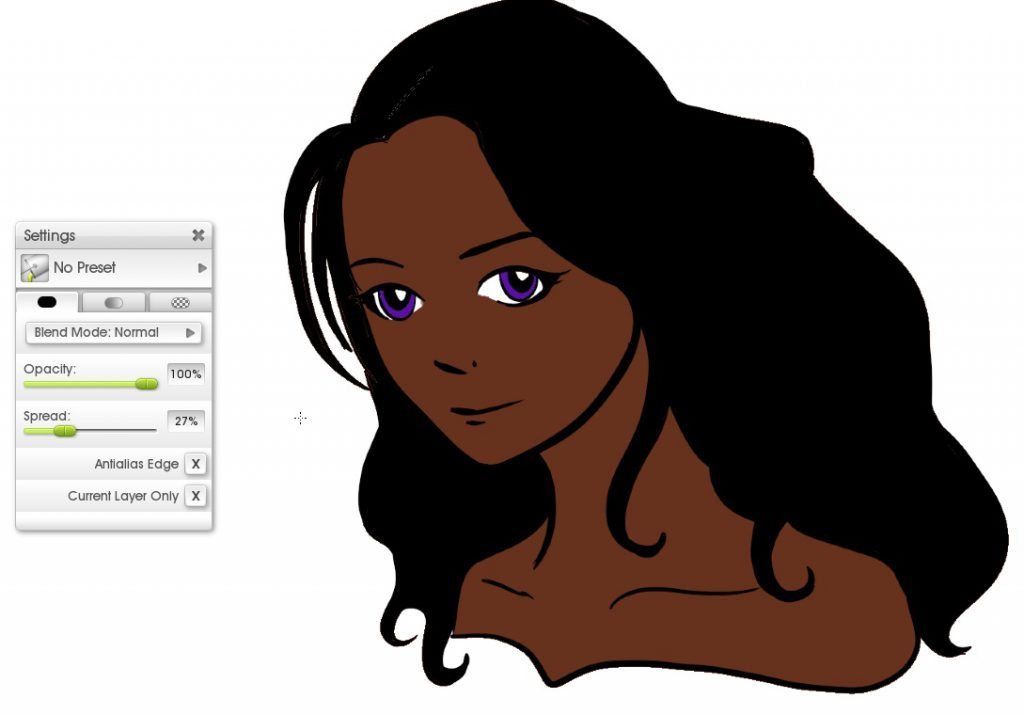
Basic Fill
The Fill Tool is the bucket used in everything from MSPaint to Photoshop for filling flat areas of colour. Basic, but helpful! Again, it has some useful settings in ArtRage that let you use the lineart on the layer above, and adjust the opacity and how far it spreads.
- Untick ‘Current Layer Only’ to add the colour to a separate layer. This keeps it safely separate from your line art.
- Pay attention to Spread and Anti-aliasing
- Take a look at the other tabs for advanced Gradient and Pattern Fills! (You can use these for screentones and neat effects)
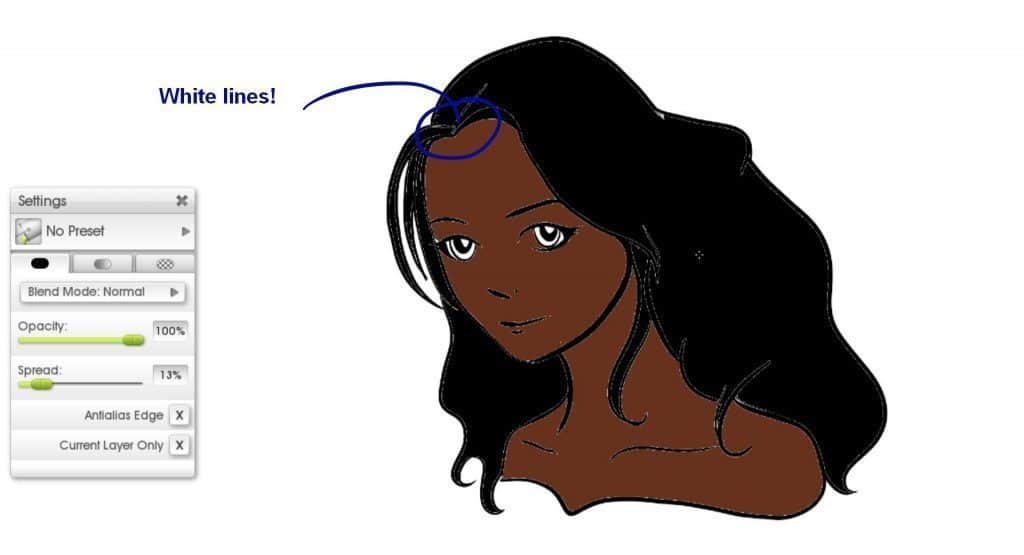
Spread & White Lines
You will probably notice some horrible white edges the first time you use the Fill Tool. This is because the ink pen lines are antialiased – the edges are smoothed out so there isn’t a pixelated edge. This means that there isn’t a clear line between the ‘fill’ and ‘do not fill’ areas.
Luckily, this is easy to fix when you are filling in nice black and white lines. Just use the Magic Wand mode of the Selection Tool to select the areas you want to fill!
If you need to fill something that isn’t easy to select, and you’re having problems, then what you want to do is increase the Spread setting. This will tell the Fill Tool to ‘spread’ out over all colours that are only 15% or 23% (or whatever number) different. So white and black are 100% different, but other colours will be somewhere in between. You may still have some lines that don’t fill nicely, but this will depend on the colours you’re using.
Warning: If you turn Spread up high enough to fill all of the ‘smoothing’ effect (antialiasing), then you may start seeing jagged pixel edges. You can go over the edges again with the Ink Pen to fix them up at the end.
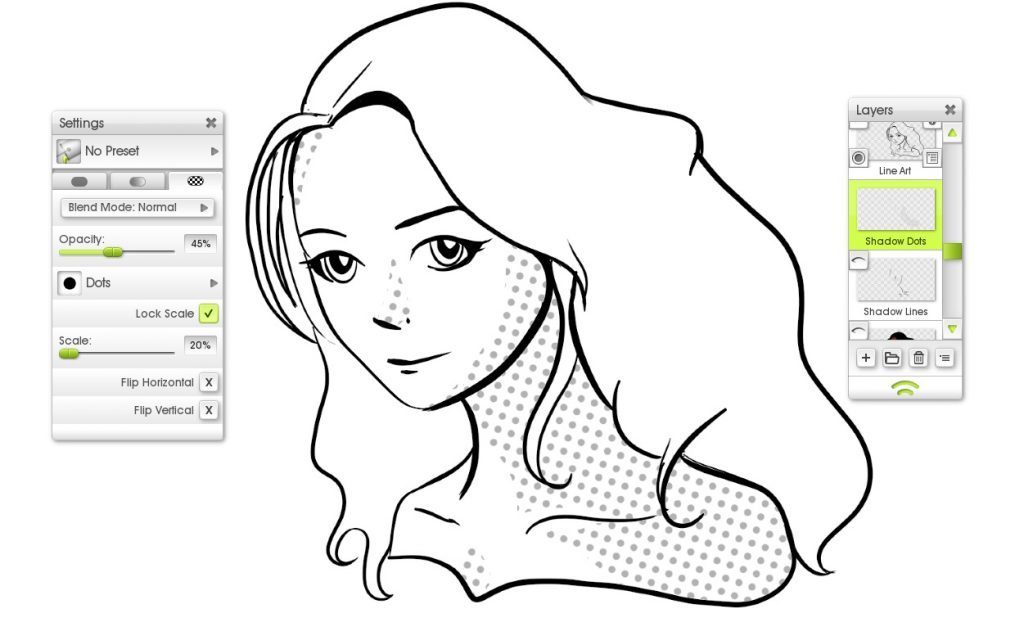
Advanced: Pattern Fill & Gradient Fill
The important things to remember here are that these tools act just like the Photoshop versions, and will apply to the entire layer. The only way to limit the filled area is to create an active selection.
Setting up the selection area can take a while, but then you can fill everything with a single click. Alternatively, you can fill a background layer, and then erase (or paint over) the pattern from anywhere you don’t want it.
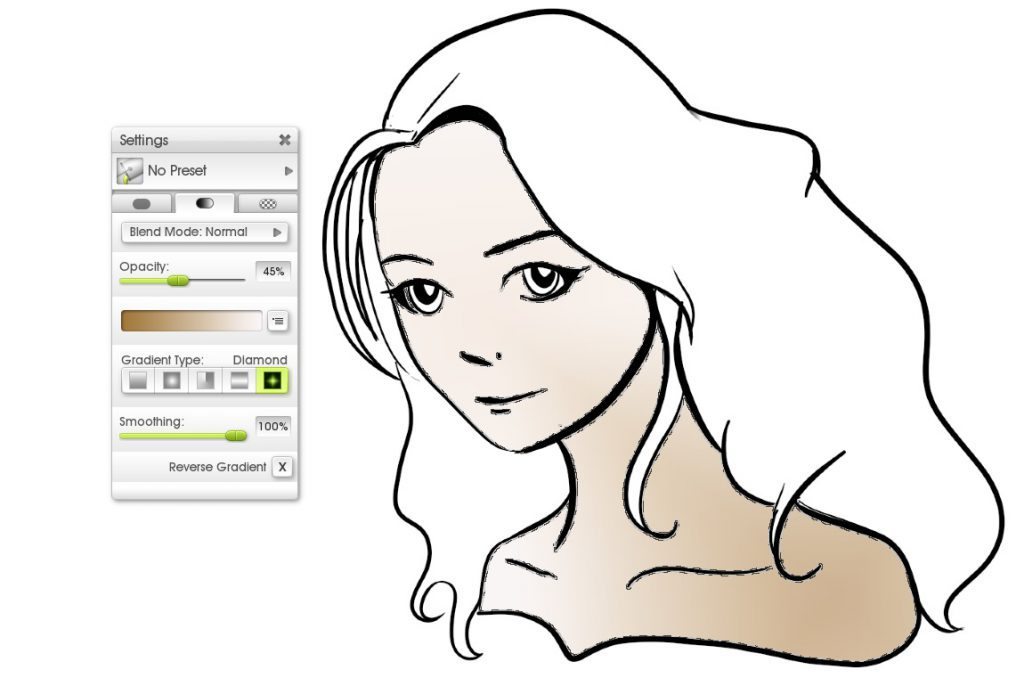
In the example below, I drew some lines on a separate layer to define the shadow areas, then used the Magic Wand selection tool to select them all at once. I then filled them with the Pattern Fill and hid the layer with the extra lines.
The Felt Pen
The Felt Pen is a nice colouring tool that’s halfway between pastels and watercolours. It’s great for flat areas of colour that need subtle blending effects. It has slightly more natural feel than the Ink Pen and let blend as you work.
It is very sensitive to canvas texture and pressure but it does not change size – a felt pen tip is a fixed size. Pressing harder just means more ink flows out and wets the paper, not that the size of the stroke gets bigger.
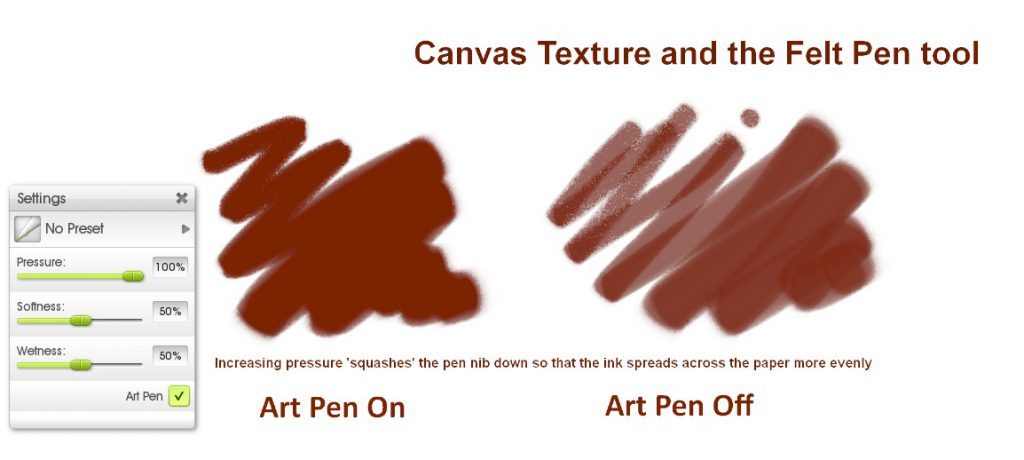
If you want a realistic ‘drying marker’ effect (where the stroke gets darker or lighter in response to pressure), you can link Wetness to Stylus Pressure in the advanced Stylus Properties section.
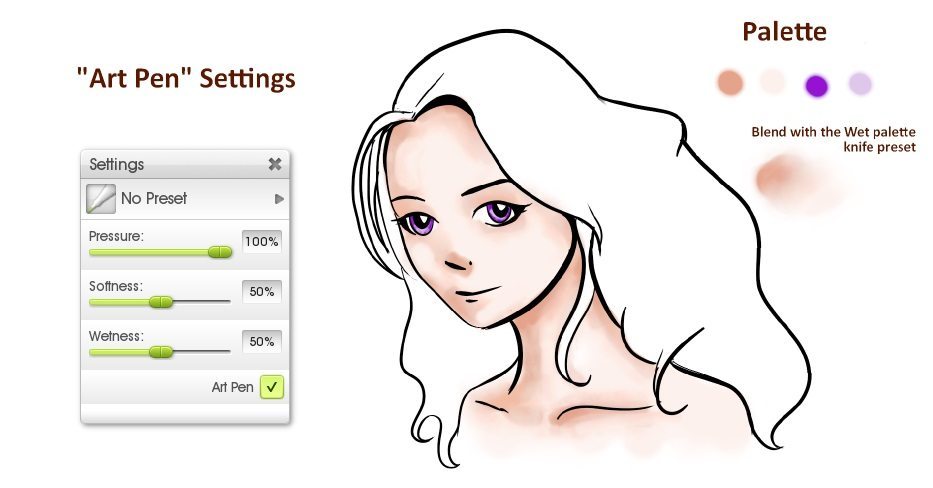
The Felt Pen includes an Art Pen mode which switches it to behaving more like a proper art marker pen. Turn this on to get more solid colour that mixes almost like paint and apply lighter ink over dark.
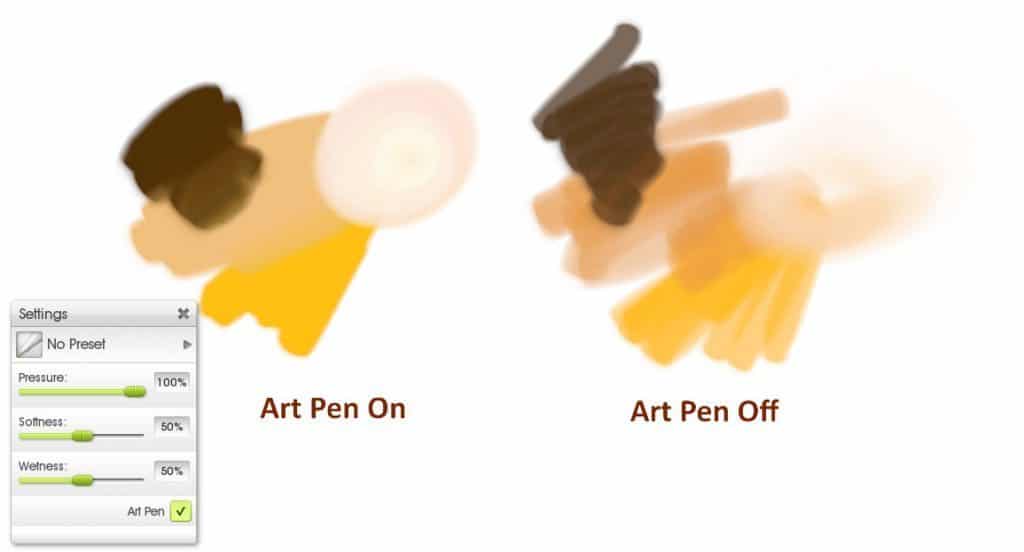
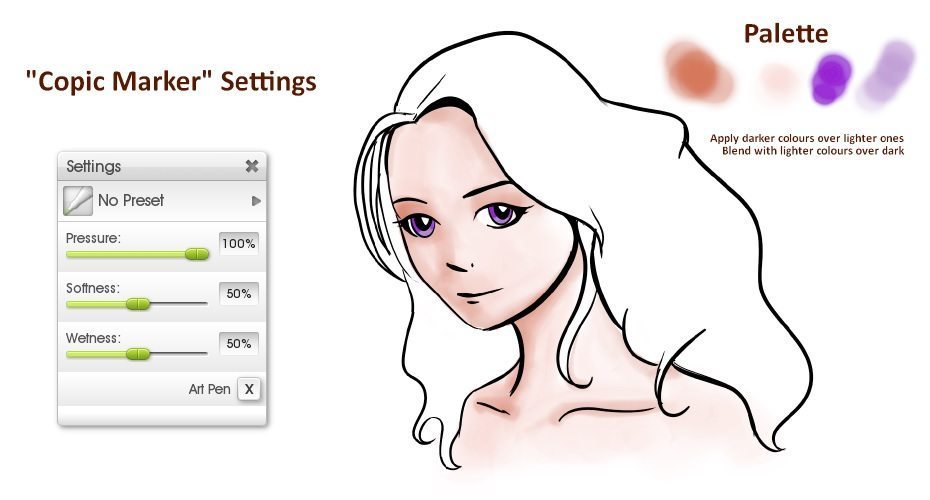
You can also get a good Copic Marker effect with the right settings, which lets you layer the strokes to build up colour and blend subtly (white makes a very good blending tool), and you can download Copic colour samples from DeviantART.
Copic Marker Settings
- Art Pen off
- 50% Softness
- 100% Wetness
- 100% Pressure
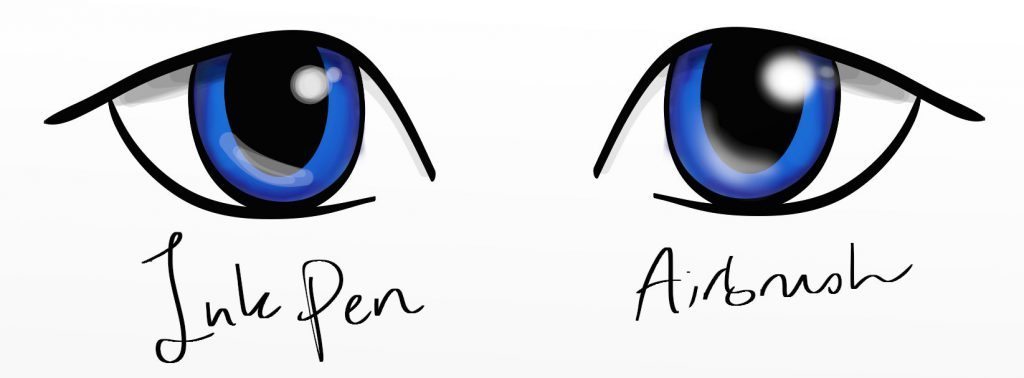
The Airbrush
Like the Ink Pen, the Airbrush is a purely digital tool that doesn’t mix as you paint or react to canvas texture. It can be used for subtle added shading and ‘glow’ effects, but also makes a good Photoshop-style brush if you tweak the settings.
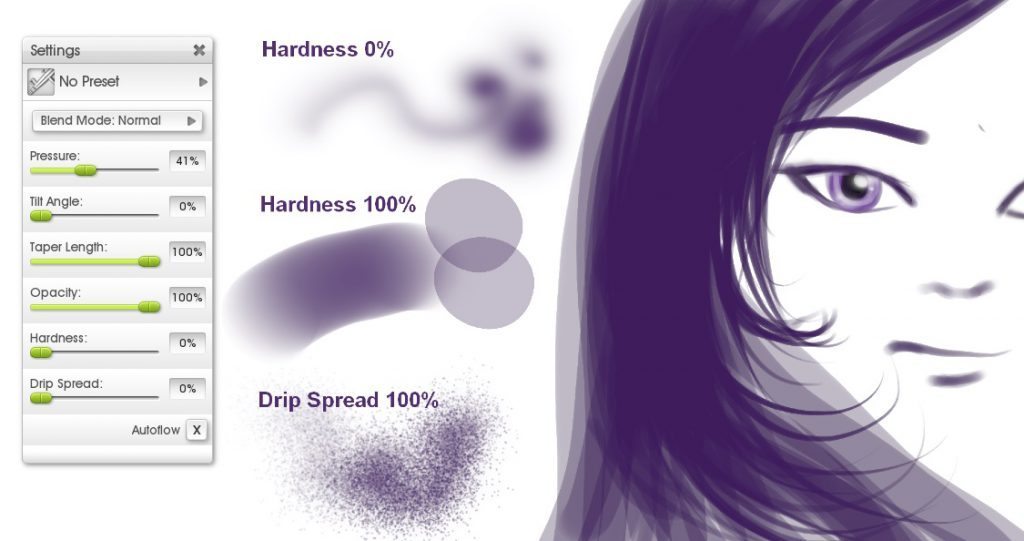
- For drawing and colouring, turn Hardness up to 90-100%
- For blending, turn it down to 50% or lower
- Turn Taper up to get narrowing lines, or off to get unvarying lines
- Pressure affects opacity, but not size
- You can customise a lot of extra behaviours in the Stylus Properties
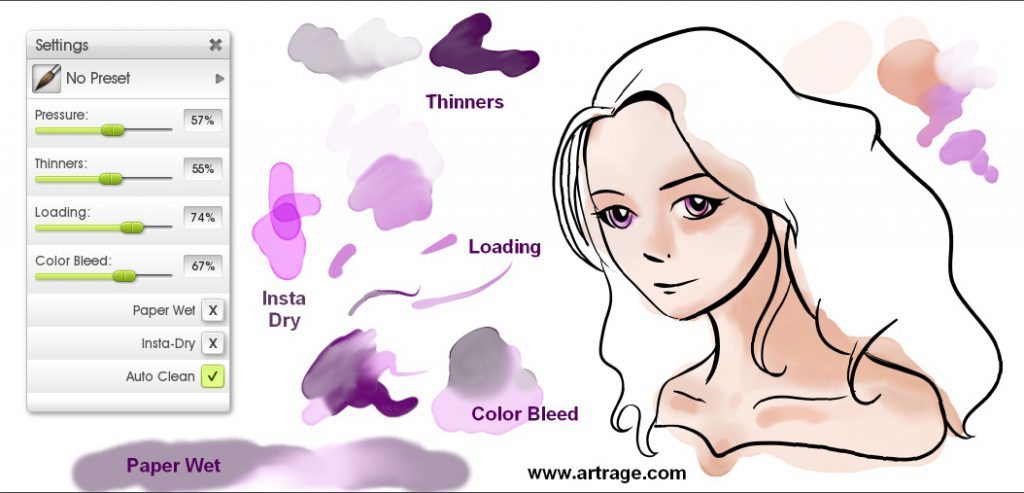
Watercolours
The Watercolour brush is a very popular one for delicate shading and blending and it’s a lot of fun to use. However, it can be a little hard to get the hang of the first time you use it. It’s much easier to use on a textureless canvas, though.
- Increase Thinners (water) to make the paint flow further
- Increase Color Bleed to make the paint mix more with the existing Paint
- Increase Loading to get more opaque paint
- Duplicate the layer at the end to get a more intense colour (as watercolours tend to be quite translucent)
- Turn on Paper Wet to get very opaque paint that mixes easily (a lot like the Art Pen mode for the Felt Pen)
Shading and Highlight
To add shadows and highlights, you can:
- Just keep adding colour with the same tool/method you were using, then refine it using blending tools
- Switch to a different tool (for example, the airbrush) capable of much more subtle, controlled, effects and add your final details
Remember, you can use layers to keep things separate, you can blend everything later, and you’re allowed to switch to other tools!
Blur and Blend
Once you have your colours down, you may want to blend the colours in neatly, to soften sharp edges and help shape the shadows. If you’re using a traditional tool that blends as you work, you may not need to do this as an extra step but there are usually some details to tidy up!
Blending Methods
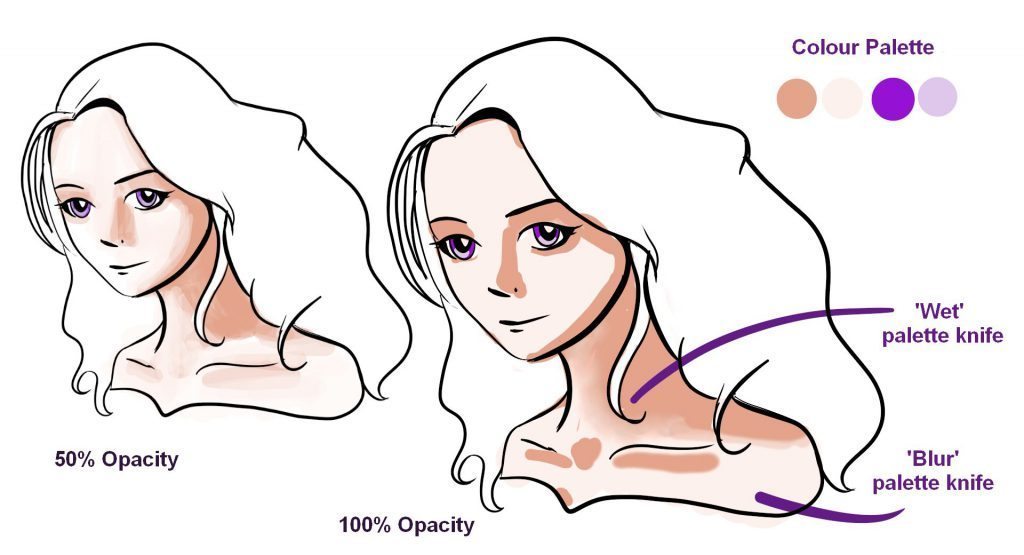
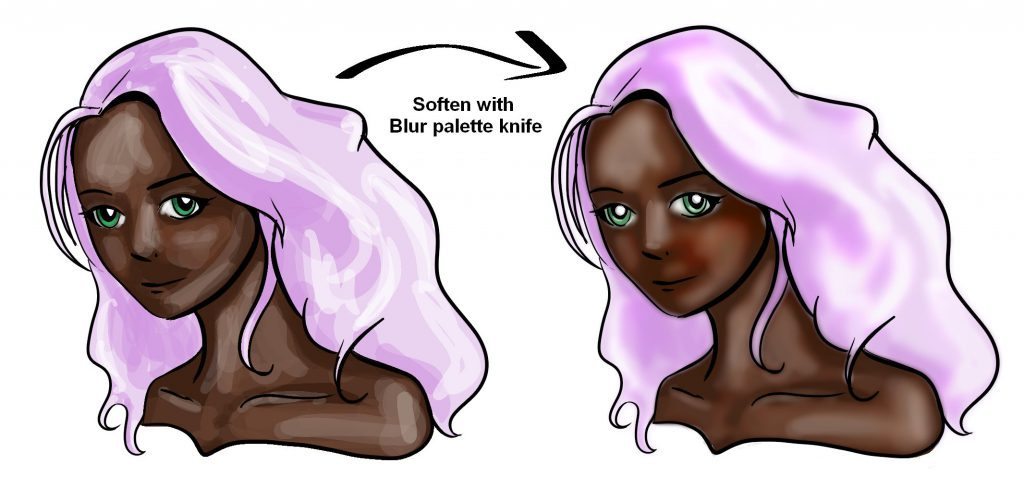
- Look at the Palette Knife’s options for blending effects. For smoothly digital manga art, you should use the Blur and Wet modes (see this guide to the Palette Knife presets).
- You can also blur an entire layer at once in ArtRage 4 by going to Edit > Blur Layer to gently soften your colours (this is also a neat way to create perspective by blurring the background).
- Go over everything lightly with a very low opacity, low hardness Airbrush.
- Go over the paint with a brush or tool that blends for a more natural traditional media effect. For example: White felt pen using the Copic Marker settings, an Oil Brush with 0% loading or a Watercolour Brush with 100% Thinners (see this guide to brush blending settings.)
Highlights
Add highlights last. To get highlights on the eyes, you can add white using the same tool you were using to draw, or the eraser. Personally, I prefer either the Airbrush or a slightly translucent Ink Pen as it makes it easy to get a round shape and adjust the brightness.
Advanced Features
Colouring With Stencils and Layer Locks
You can use these features to stay inside the lines and make colouring much easier! For example:
- Convert your lineart to a stencil, invert it, and use the lines as a guide (or fill the background outside the lineart and use that!)
- Fill areas with the paint bucket and convert them to stencils
- Import pre-made stencils for hair, eyes, and face, and use them to create your character
- Lock the paint or transparent areas of layers so you can freely recolour and shade it without going over the edges
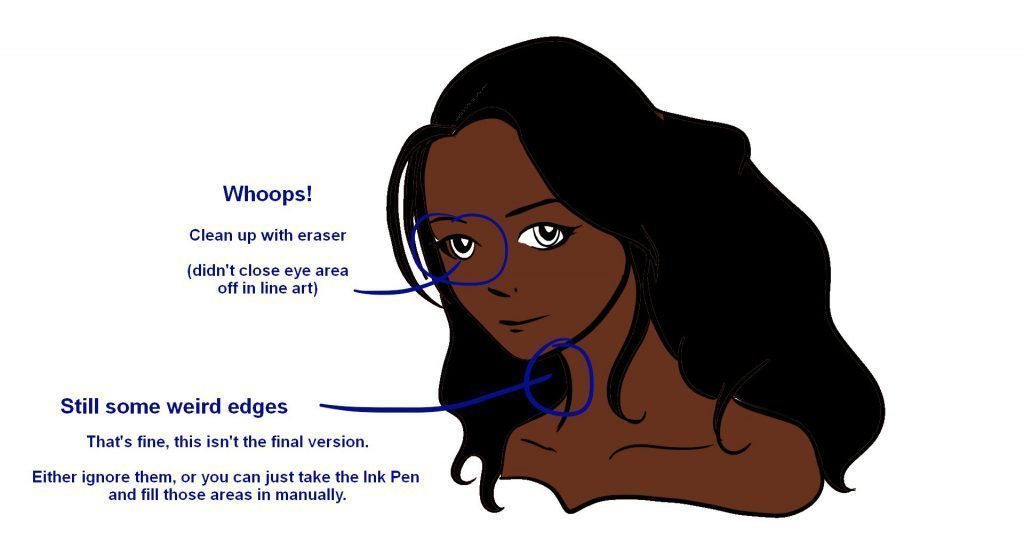
You can also quickly clean up using the Magic Wand selection tool. If you’ve gone over the edges, select that area in the line art above, switch back to the colour layer, and press delete!
Other Neat Stuff
- Symmetry (makes it easier to draw neat faces)
- Snap To Grid (makes it easier to draw borders and boxes – there’s also a Ruler in the Stencils)
- Stencils (add halftones, textures, gradients etc)
- Sticker Spray (lets you import Photoshop brushes and includes a lot of stuff like ‘hair strand’ brushes in the presets).
Manga Tutorials & Articles
[fp_carousel width=”940″ height=”200″ items=”5″ num=”-1″ speed=”600″ tag=”manga” orderby=”date” post_type=”post”]For more help with using ArtRage, check out the list of community tutorials. And don’t forget to check the FAQ section!
You can also drop by our Artrage Forums, or Contact our Tech Support.