There are many ways to achieve anything in any style with ArtRage 5, but this tutorial will look at some fundamentals such as using gradients, layer selection, transparency locking and layer effects to create a metal shield boss. The methods here are not necessarily the fastest way to paint a shield boss, though once learned they take much less time to execute than to write or read and when exploring new features, working towards a practical end result cements their application and usefulness in our memories.
Terminology:
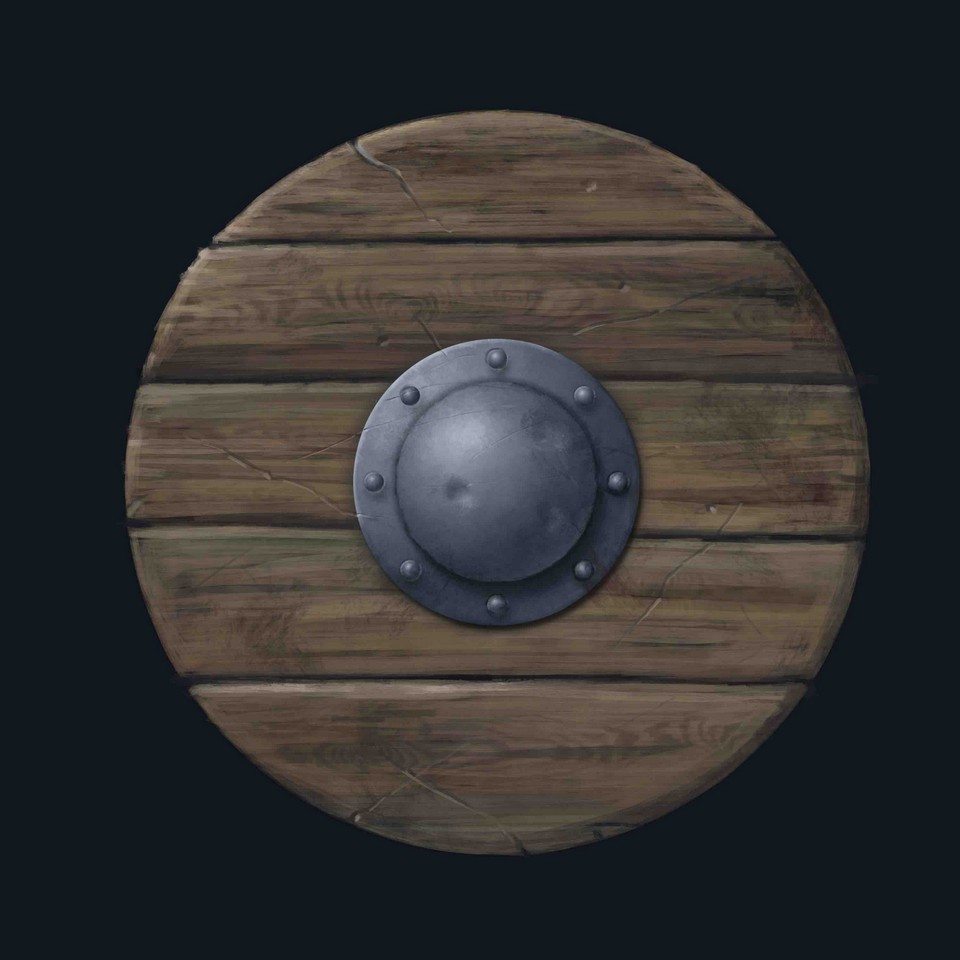
A shield boss is the piece of round metal in the center of a round shield. It was originally used to deflect blows. The boss dome is the small domed part in the middle of the boss. The boss rim is the outer metal ring around this dome. Rivets are the small round fasteners (like nails) that are used to hold the rim to the shield itself.
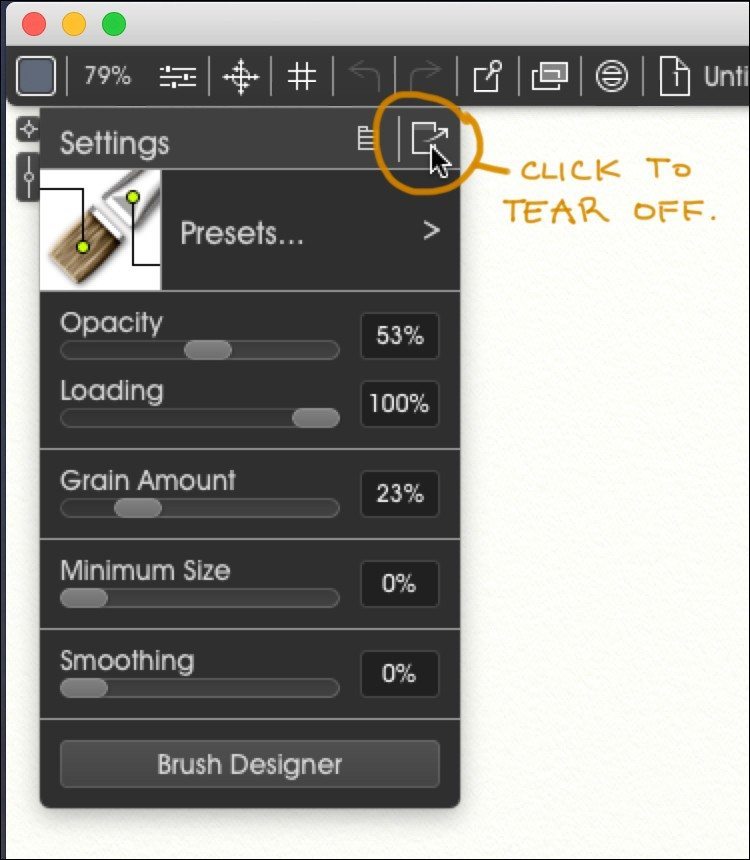
Before we start, users of previous versions of ArtRage may notice the interface in this tutorial looks very different to the old classic mode. Classic is still the default, but ArtRage 5 introduces a new docking mode in place of version 4’s workbench layout. To use Docking mode go to the top menu > View > Interface Mode > Docking Mode. You can tear off a panel by clicking its top right icon (labelled below centre.) Next, drag the panel to the vertical centre of either left or right edge of your canvas until a docking icon appears. Drop the panel over that icon and it will dock to the side of the screen. We are all different, but I love the docking mode so much it has become my permanent ArtRage Interface.
Switch to Docking Mode by going to View > Interface Mode > Docking Mode
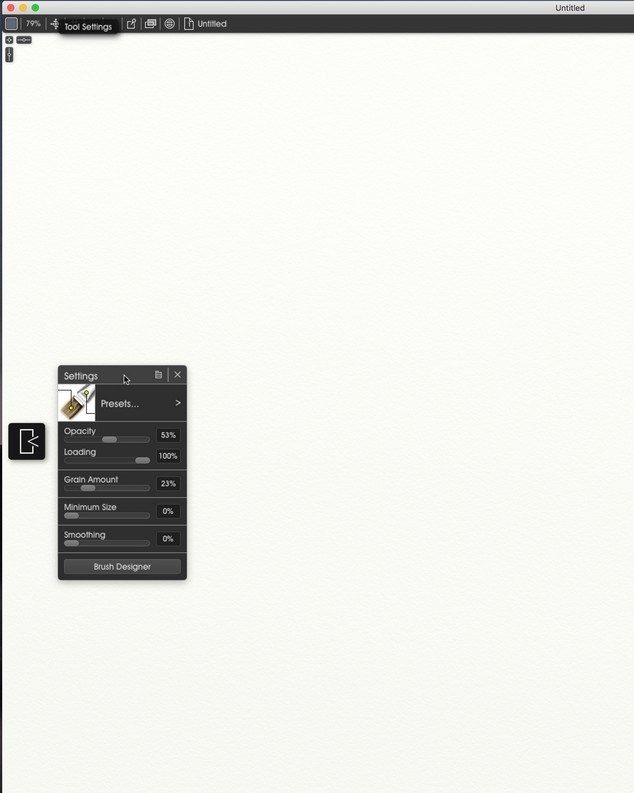
You can open individual menus and then detach them from the menu bar.
Dock menus on the left or right of the workspace
Back in menu > View > Interface Mode, you will also notice an item called, ‘Lights Out.’ This gives ArtRage a dark interface which I also love. Once set, docking and mode options persist between sessions.
Backdrop Layers
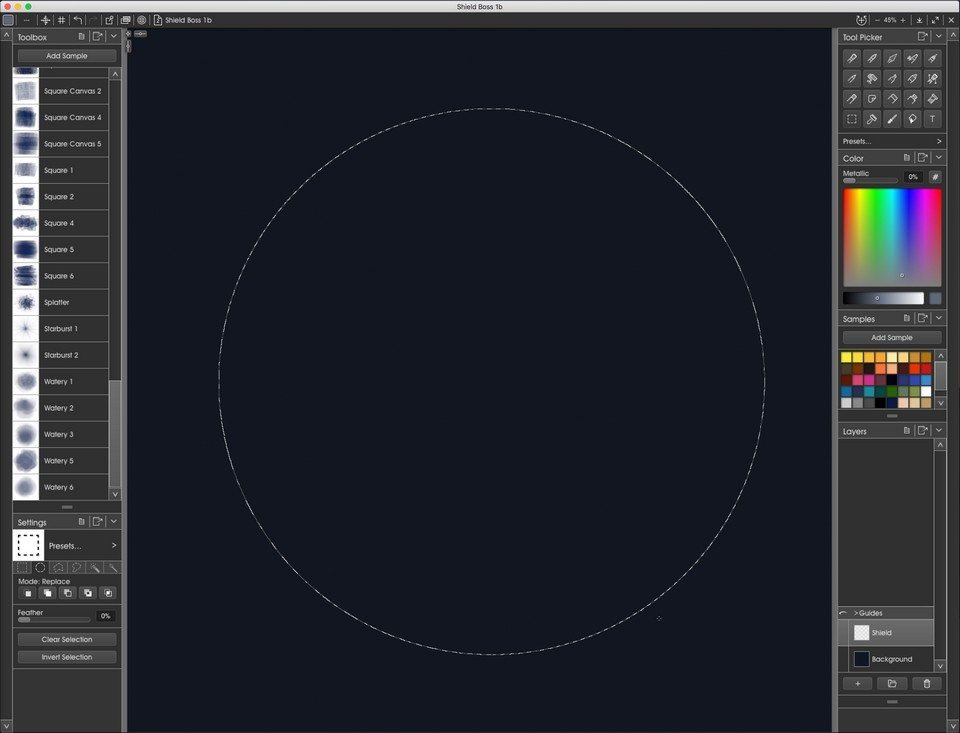
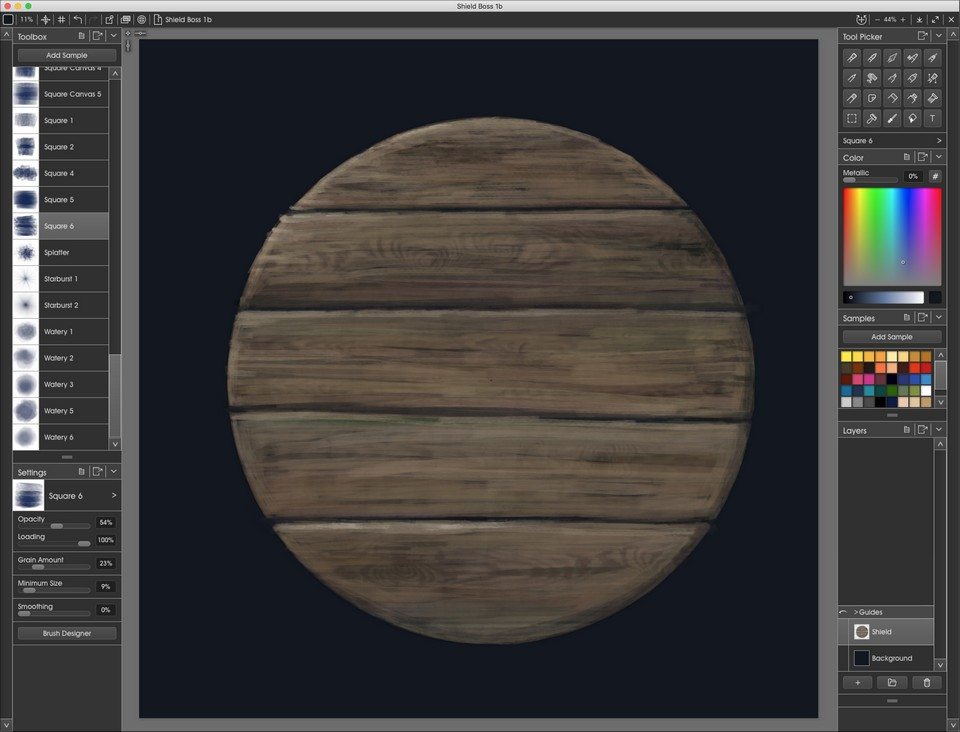
Now we’re ready to begin. Double click the default layer’s title and rename it, ‘Background.’ Flood this layer with a solid dark color by either painting it or using the Fill Tool. Create a new layer and rename it, ‘Shield.’ With this layer active drag out a circular selection mask, then using a custom bristle brush, paint horizontal streaks from dark to light, finishing off with hints of wood grain pattern. The shield is given a bevelled edge to reveal a top left light source. My example won’t be too detailed as the boss is our focus.
Use an active Selection or a Stencil to create a circle.
Paint your shield first.
Shield Boss Layers
Create another new layer and call it, ‘Boss Dome.’ Choose a circular Selection Tool, place your cursor at the centre of the shield then simultaneously press Shift and Alt (Option on Mac OSX) on your keyboard before dragging a circular selection to the size of a shield boss dome. The keyboard shortcuts create selections radiating outwards from the cursor position.
Select the Fill Tool. Click on the central tab of Fill Tool Settings to access gradient options and choose ‘Radial’ as the gradient type. Click on the grey bar above gradient types to access the Gradient Editor.
The Gradient Editor for the Gradient Fill tool
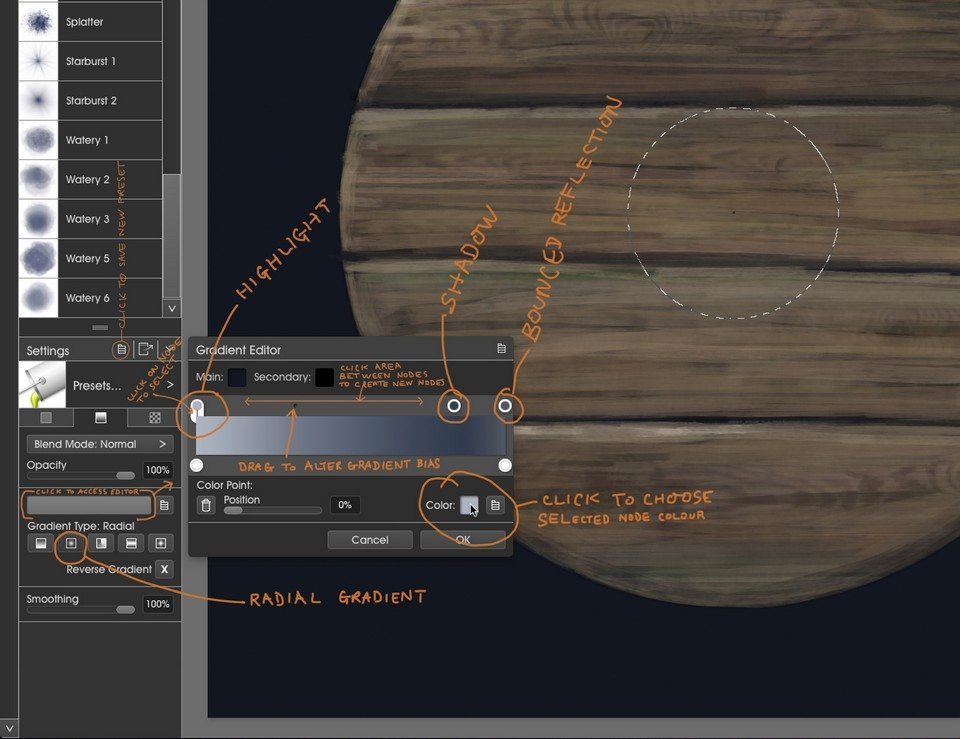
By default a gradient has two nodes going from light to dark. If we only wanted a simple gradient we could use the Main and Secondary color wells to choose colors, but we’ll add a further node because we want the boss dome to have a highlight, a shadow and some bounced reflected light below the shadow. To add a node simply click the space between existing nodes and drag the new node into place near the right edge. To change a node color, first click it to select, then click on the lower right color well to choose its color. Here the three nodes have been given metal grey shades. Using these methods, create a gradient following the annotated diagram below and save it as a preset for later use.
Use the Gradient Fill to easily add a smooth gradient with lighting.
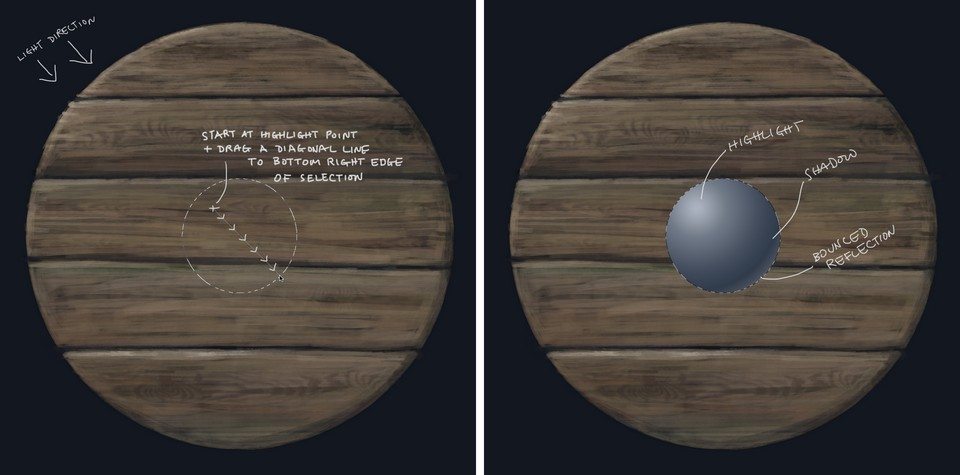
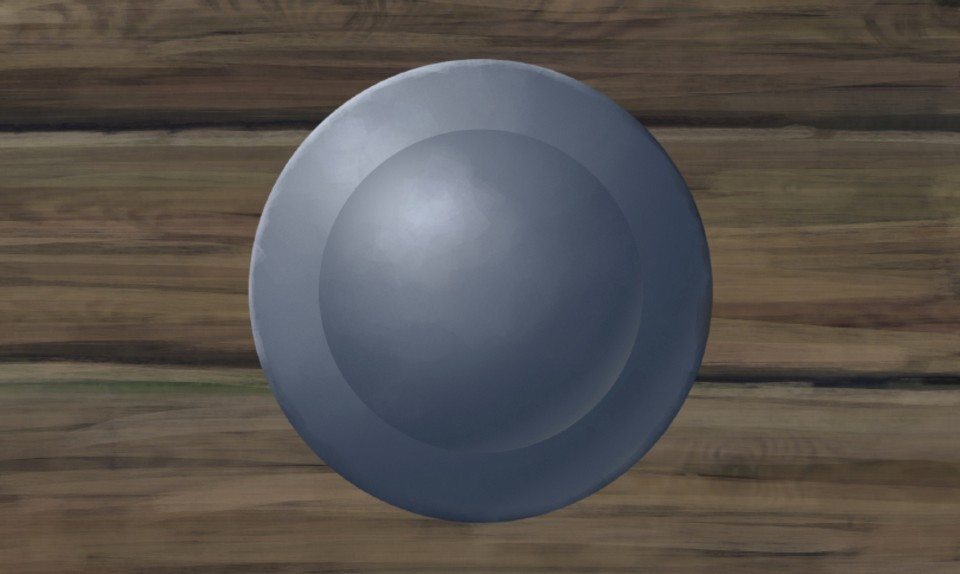
We want to fill the selected area to look like a sphere. Bearing in mind the light direction – top left – move your cursor to the point where the highlight on the sphere would be, drag diagonally down to the bottom right edge of the selection and release the pen/mouse.
Drag and click with the Gradient Fill inside the Selection
Note: If you need more help with the Gradient Fill see the manual.
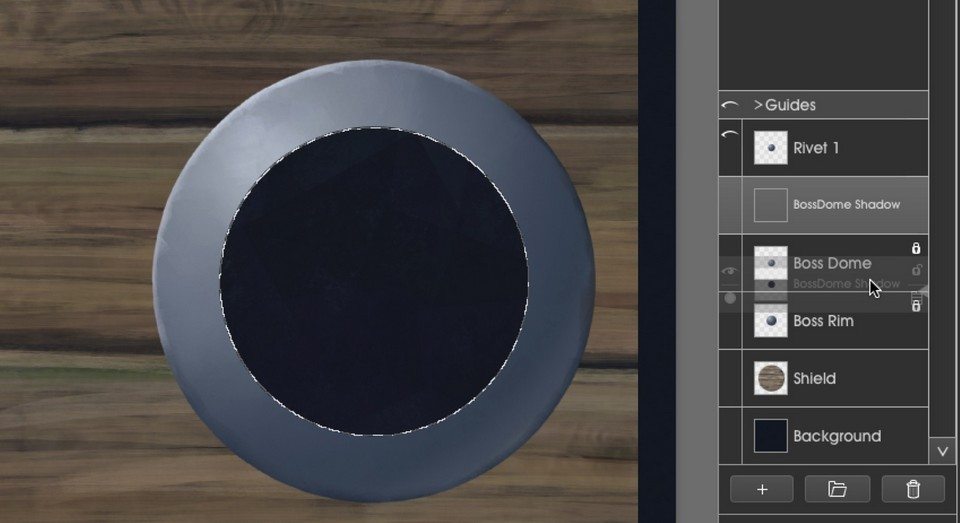
Deselect and duplicate the Boss Dome layer twice by right-clicking on it and choosing, ‘Duplicate Layer’ from the pop up menu.
Rename the first new layer ‘Boss Rim’ and drag it below Boss Dome. Rename the second new layer, ‘Rivet’ and leave it above Boss Dome but hide it for now, we’ll come back to the rivets later.
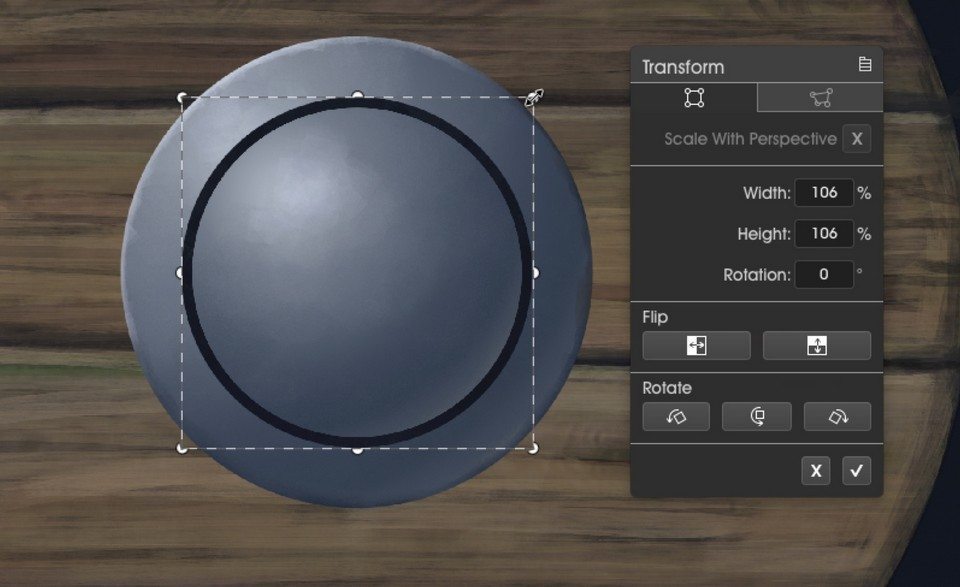
Activate the Transform Tool and scale up the Boss Rim layer until it looks like a ring of metal around the boss dome.
Duplicate the metal layer and then use Transform to create a circle inside a circle.
Now we have the basics of a shield boss but it looks too clean, so we’ll make a custom brush blender by disabling its ability to lay down color. Then we’ll lock the layer transparency of both layers before scuffing up the metal surfaces.
The Custom Brush Settings
Custom Brush Blender (Scuff Marks)
My first thought for scuffing up the surface was to use a palette knife with drip spike deformations, but when using transparency lock, the edges tend to go white where for some reason the distortions which are supposed to go beyond the edge cannot be resolved. Making a blender from ArtRage 5’s new Custom Brush tool solves this problem and is simple to set up via the Brush Designer panel.
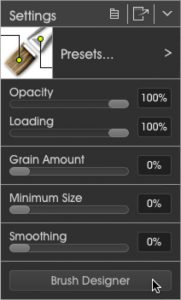
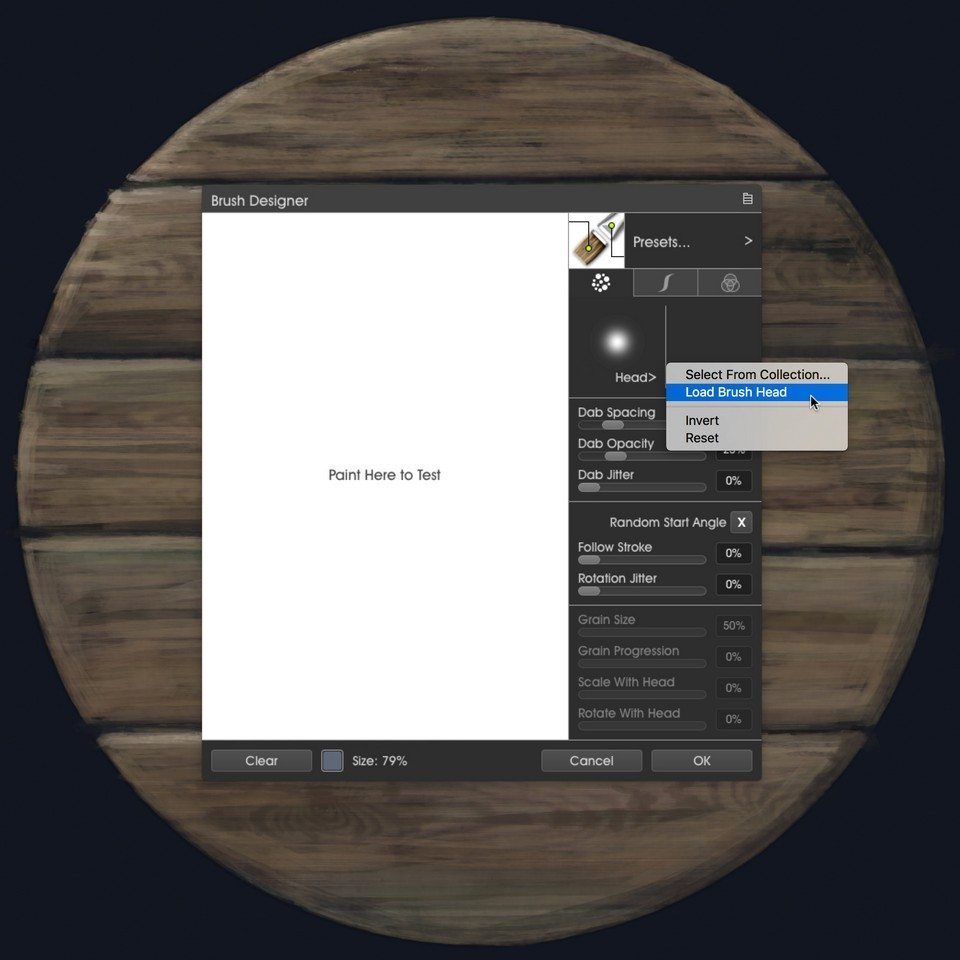
Select the Custom Brush either from the top menu or via the Tool Picker. If its Settings panel is not open, open it and click on the ‘Brush Designer’ button. You are presented with a new panel consisting of a testing canvas to the left and three tabs of options to the right.
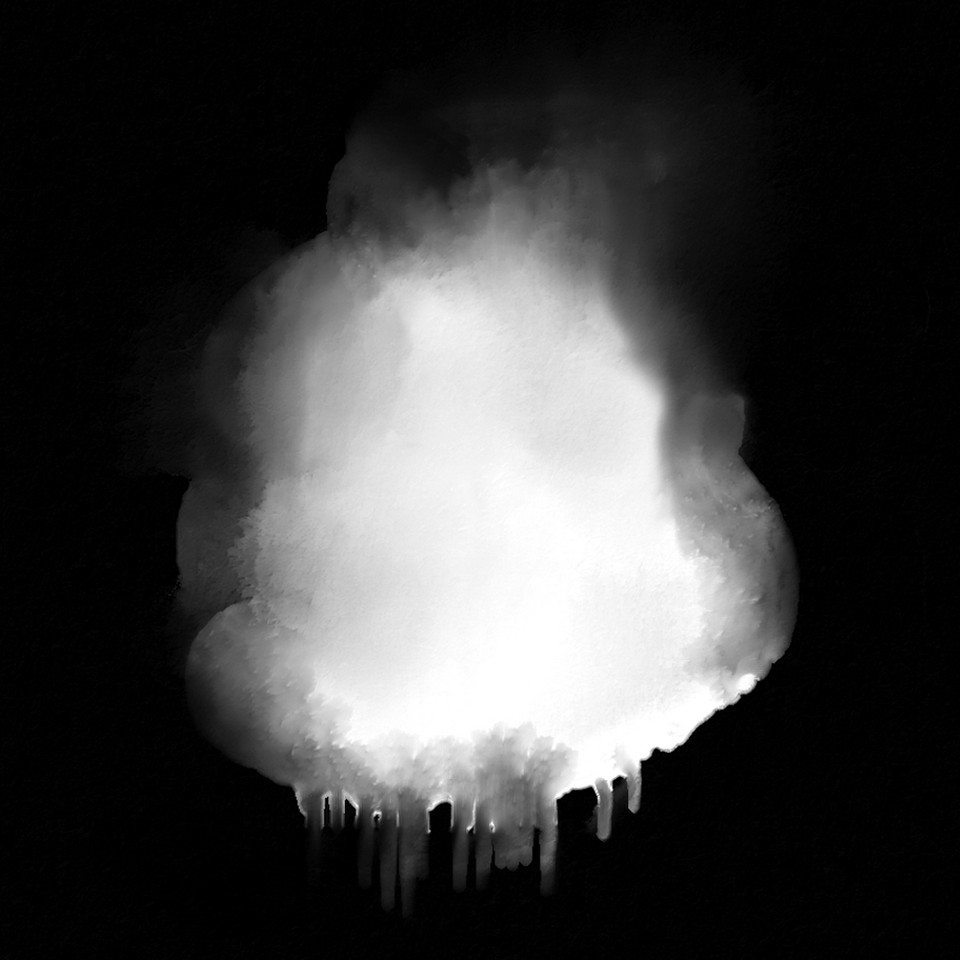
The first tab allows you to load a brush head sample which represents a ‘Dab’ or pattern sample which can be laid down in various ways to give the impression of a brush stroke.
In this example a watery brush head is loaded by clicking on the default brush head and navigating to the new one.
‘Watery’ Brush Head
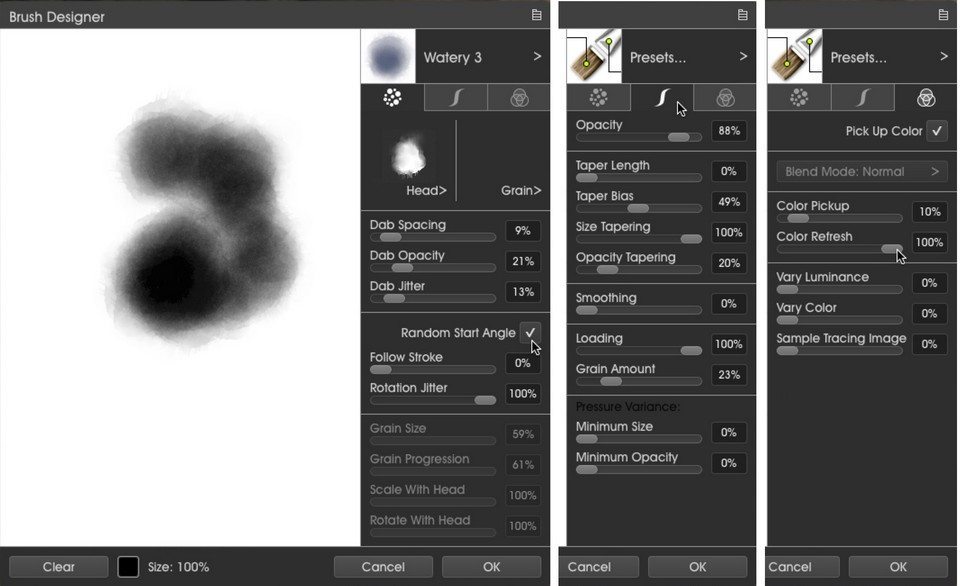
The Custom Brush Designer
Follow the settings in the screenshots below, paying particular attention to the three active settings on the last tab:
Pick Up Color checkbox checked
Color Pickup slider set to 100%
Color Refresh slider set to 0%.
Head, Stroke and Color Settings in the Custom Brush Designer
These settings ensure that you can pick up existing paint on the canvas but cannot deposit new paint over it, therefore allowing the blending of existing paint using a custom patterned head.
Once you’re happy with how the brush performs, save it as a preset for repeated use.
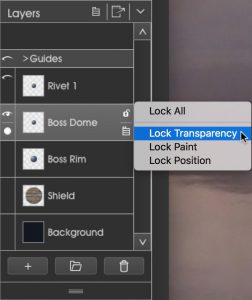
Lock Transparency from the Layers menuWe want to use the blender to scuff up the shield boss. I found this is best achieved by making the brush size very large and applying short strokes over the surface, so to ensure that the boss edges are not distorted while painting, place your cursor over the Boss Dome layer.
A few tiny icons appear as you roll over the layer. Click on the open lock icon in the top right corner and choose ‘Lock Transparency’ from the pop up menu. The icon has now changed to a closed lock and your brush stokes will only effect the pixels on the layer.
With the Custom Brush blender selected, increase its size to around 300 (or whatever seems suitable for the size of your canvas) by pressing Shift on your keyboard while click dragging across the canvas. You should see the brush cursor resize in real time. Alternatively you can click the Tool Size indicator and enter 300 in the text field.
Make sure the Boss Dome layer is active and paint short strokes over it until the surface no longer looks smooth. Do the same with the layer, ‘Boss Rim.’ If the distorting effect is too strong, reduce the Opacity slider in the brushes Settings panel.
Once scuffed, choose a suitable custom brush and highlight color, then proceed to enhance the highlights on both layers as they may get a little lost during scuffing. You may need to reduce the opacity slider in the Settings panel to gradually reinforce highlights.
With the Boss Rim layer selected and Transparency Lock still active, choose a brush that will lay down paint, pick a highlight color and carefully brush around the top left edges of the rim to create a bevelled edge. Pick a shadow color and continue painting the bevelled edge around the rim’s bottom right edge. Now it is beginning to look more like a used shield boss.
Start scuffing the metal with the blender
At this stage it is a good idea to deactivate transparency lock on both layers or at least keep it in mind the reason why you can’t paint anywhere else on those layers.
Grounding Objects
You may disagree, but I would like the transition between the boss and rim to be more pronounced. To do this, click on the Boss Dome layer and choose, ‘Select Layer Contents’ from the Edit menu. You can see I have set up a keyboard shortcut for this command as it is very useful. Make a new layer above Boss Dome and call it, ‘Boss Rim Transition.’ Making sure it is the active layer, sample the background color and fill the selection.
Fill the inside of the circle with the same color as the background before working on the smaller part of the rim
Deselect, move the layer below Boss Dome and scale it up a little to make a thin border.
Use the Transform to scale the Boss Rim
From the Edit menu choose Filters > Blur Layer and drag the slider to around 7 to soften the transition edges. Accept the blur and reduce the transition layer’s opacity to around 60.
Go to Edit > Blur Layer and blur the edges slightly
At the moment the boss looks a little like it is floating above the shield, so we want to add more of those weak soft edge transitions to help ground it and also respect the primary light source by adding directional shadows.
The transitions represent an effect called ambient occlusion or AO. The sky is a massive secondary domed light source, much weaker than the primary light, but still strong enough to affect local surface colours and cast subtle shadows. Because the light emits from every point on the sky dome, weak shadows are cast in every direction forming subtle dark gradations between objects or near crevices. Those crevices are darkest because the weak ambient light cannot reach them, they are occluded.
First then, we make an AO transition in exactly the same way described above, but this one will sit between the Boss Rim and wooden shield. Now the rim no longer looks as though it is floating above the shield.
Layer Effects
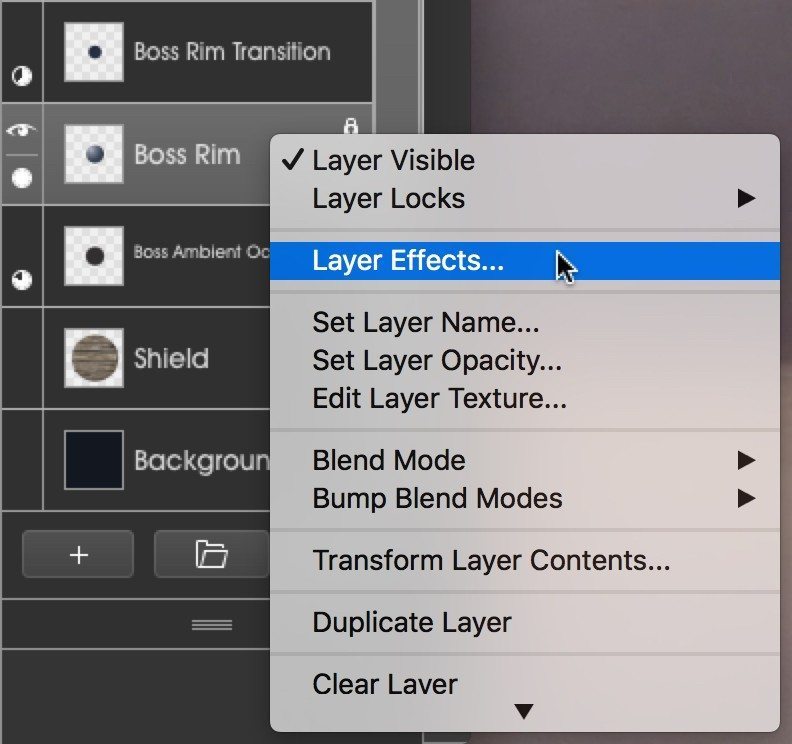
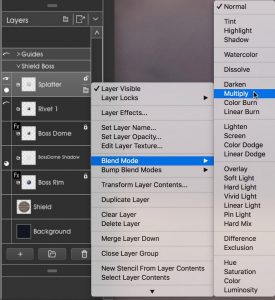
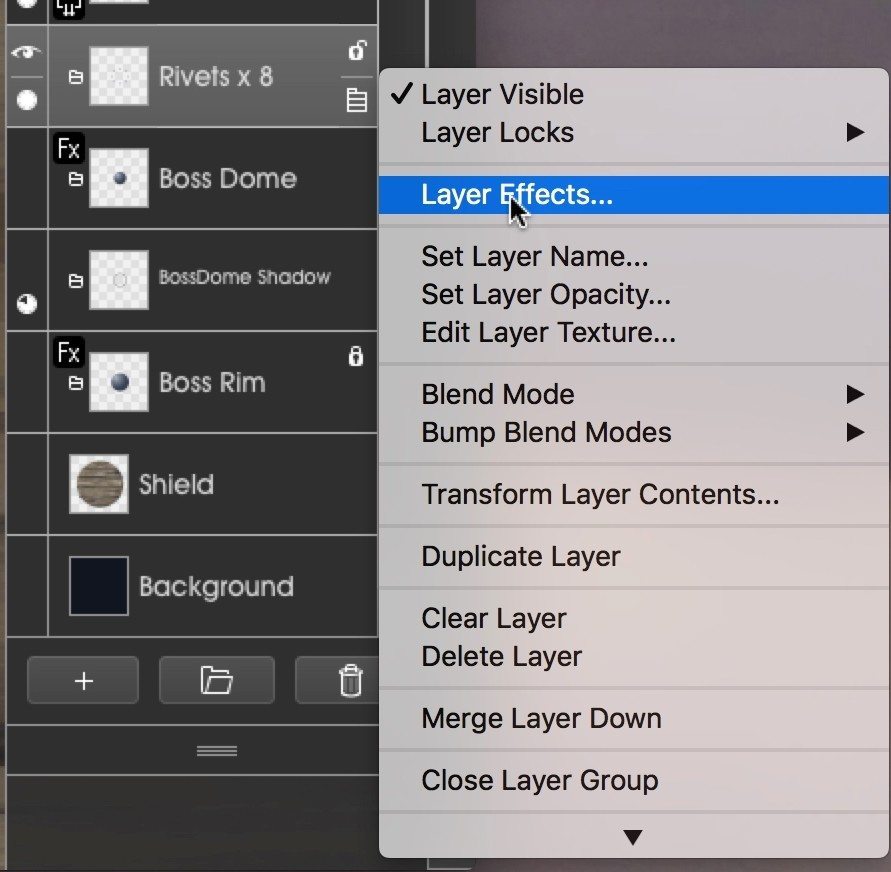
ArtRage 5 introduces layer effects, one of which is Shadows, so let’s quickly add directional shadows to both the rim and the boss. Right click on the Boss Rim layer and choose, ‘Layer Effects’ from the pop up menu.
Open the Layer Effects from the Layers menu
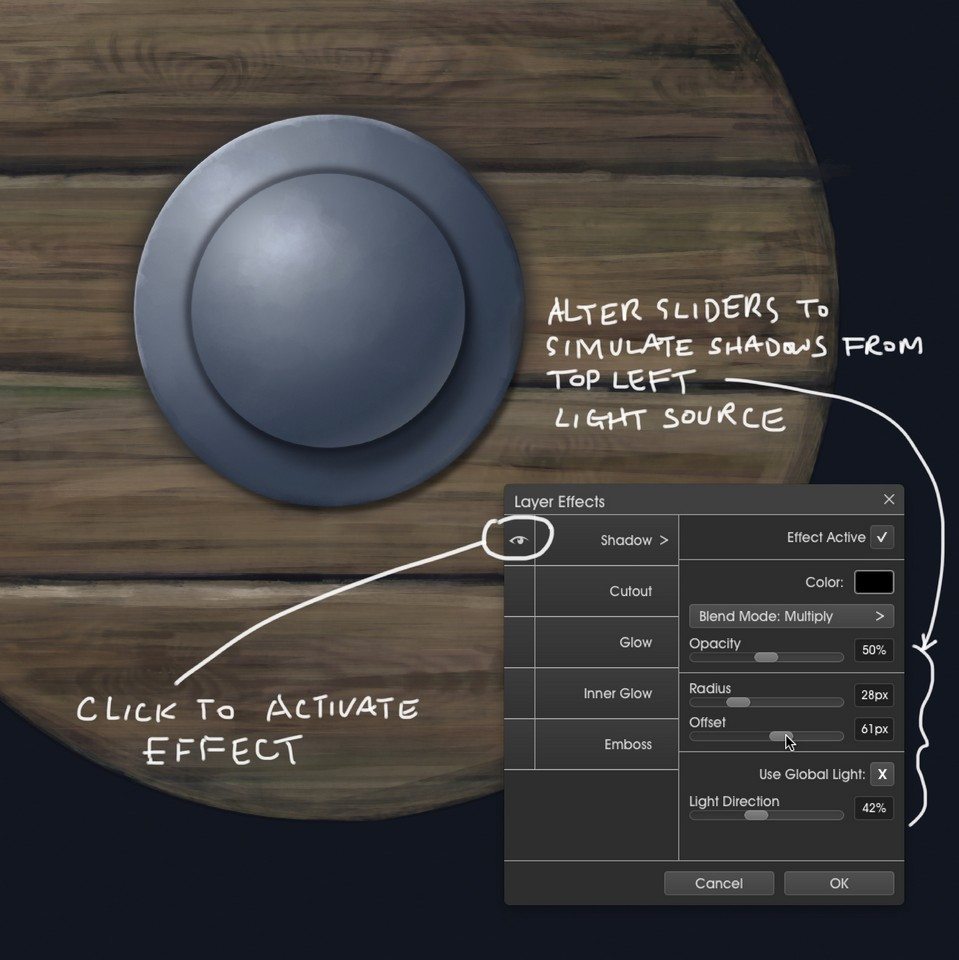
Add a Shadow and use the slider to adjust the size
The Layer Effects panel contains five effects. To activate Shadow click in its leftmost grid cell so an eye appears. Alternatively select Shadow and click the Effect Active checkbox. Choose a shadow colour and play with the sliders until a shadow extends beyond the bottom right edge of the rim. Do the same to the Boss Dome layer but make its Offset larger because it is a taller object and therefore casts a longer shadow.
Ageing, Rivets, Dents and Scratches
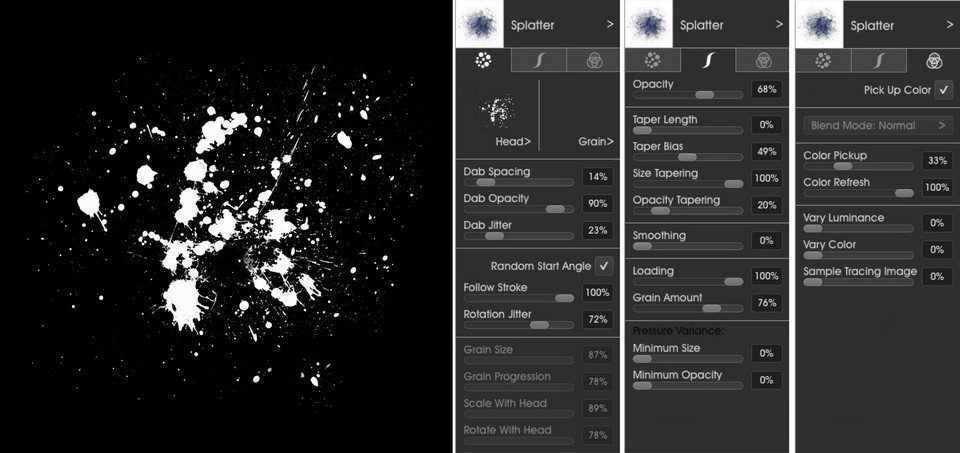
Although we scuffed the metal surface earlier, we will begin to add some ageing by using a brush with a splatter effect head. You should find a Custom splatter brush in presets, but if not here’s a quick overview of how to build one. Select the Custom Brush Tool and load a splatter effect head or take a screenshot of the one below, but make sure the black is pure black or it will not be masked out. Open Brush Designer and copy the settings in the three tabs shown. When you’re happy, save the brush as a Preset.
The Custom Brush settings for the ‘splatter’ effectSet the splatter layer to ‘Multiply’
We could choose each layer, lock its transparency and paint some splatter, but to make the process more efficient, we’ll apply a single splatter layer to encompass both the rim and dome. Select the Boss Rim layer and then Edit > Select Layer Contents. Now make a new layer above all the others, name it ‘Splatter,’ increase your new brush size to something big and choose a dark dirt colour, then paint away. Don’t overdo it, we still want to see the metal surface underneath. Again you may need to temporarily lower the Opacity slider in the brush’s Settings panel. This brush will also be good for strengthening highlights and shades where necessary.
Set the layer blend mode to ‘Multiply’ and if necessary lower the layer opacity until the splatter looks right.
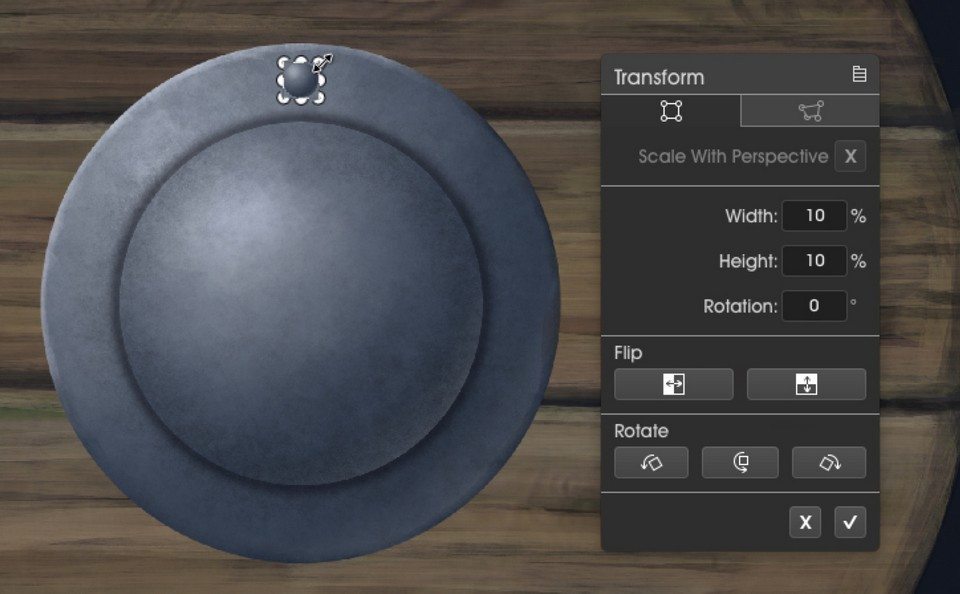
Next up, rivets. Switch on the Rivet layer created earlier and scale it to an appropriate size using the Transform tool. Hold down the Shift key to constrain the movement along the vertical axis and drag the rivet upwards until it sits central to the rim and boss edges.
Once placed, merge all the rivets to a single layer and right click > add Layer Effects.
Place the first rivet using Transform
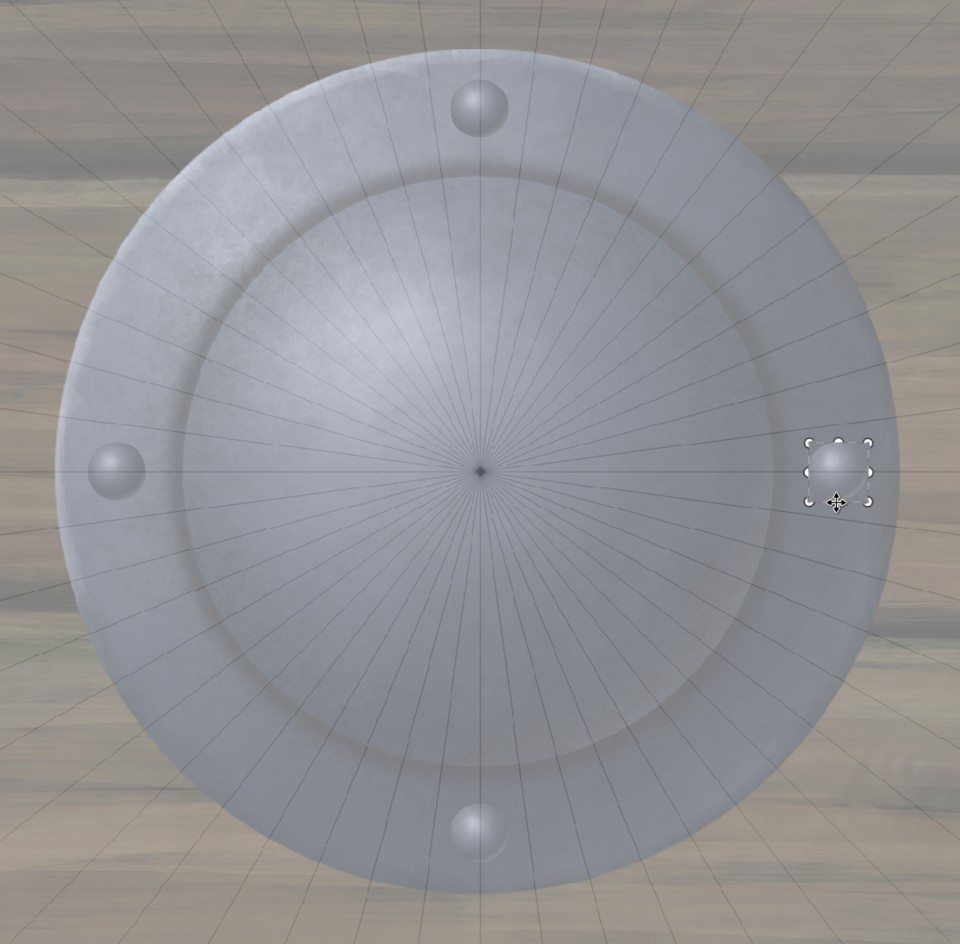
Duplicate the rivet, press the Shift key once more and drag rivet two down so it is vertically symmetrical at the bottom of the rim. Duplicate that layer and move it to the centre left. Duplicate that layer and hold Shift while moving the rivet symmetrically right. If you are having trouble placing the rivets use ArtRage’s built in guides or if you have previously made one as shown below, use that. In all we want eight rivets evenly spaced around the rim.
Hold SHIFT + CTRL (or CMD on Mac OSX) to place the rivets at fixed angles around the center
Merge all rivet layers and go to Layer Effects
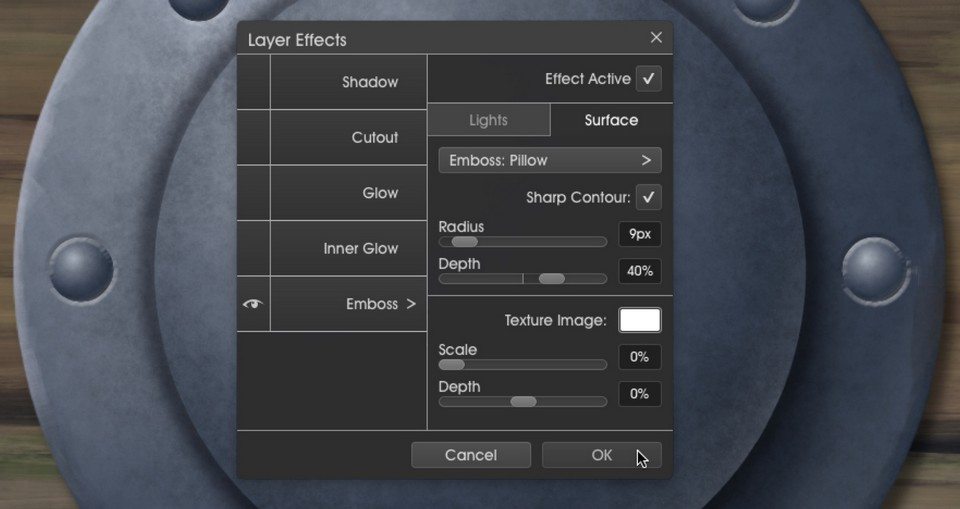
Since we have them, we may as well quickly add an effect to emboss the rivets so they look embedded. Set the light to come from top left and the bevel surface to ‘Pillow.’ Play with the refinement sliders until you are happy with the results. You will notice the lower rivets look a little out of place, but these can easily be bedded in by creating a separate layer over all the others and painting over them to tone down the highlight brightness among other things.
Adjust the Lighting for the Emboss effectAdjust the surface texture for the Emboss effectCreate various layers with scratches and dents and play around with different brushes
To finish off we’ll add some dents, scratches, tweaks and smears on separate layers so that each addition can be easily re-edited.
Knock yourself out and play with different brushes to achieve certain effects. For the scratches you’ll want something opaque and capable of laying down small brush sized fine lines. Remember the light comes from top left, draw the dark scratch line first, then the highlight scratch line either below it or to the right or both depending on each scratch’s angle. It helps to make some scratches continue between shield and boss.
The same principle goes for dents – paint the shadow first, then place highlights below and to the right.
For smears I used a brush which employs both a brush head and a grain to give the impression of those very old worn bristle brushes that are useful for adding texture.
On one of these top layers you can also tone down some of the rivets’ pillow embossed highlights to bed them in. I also softened the boss dome’s edges as they looked a little sharp, but feel free to open the included .ptg file to further experiment or study as required.
Ambient Design is a New Zealand based software development company specializing in creative tools for artists.
Our work across desktop and mobile platforms focuses on creating natural tools with intuitive interfaces. These let artists from both traditional and digital backgrounds paint without having to learn digital tricks to get realistic results.